Discord includes a powerful set of permission features that can be configured through the use of roles. Each role can be assigned to multiple people and each person can have multiple roles. Each permission setting has two values, “Granted” and “Not granted”. When a user has multiple roles with conflicting permissions, “granted” permissions always outweigh “not granted” permissions.
Creating or managing existing roles
To create a new role or manage existing roles, you need to open the roles menu, to do so, click on the server name in the top-left and then click “Settings” from the drop-down menu.

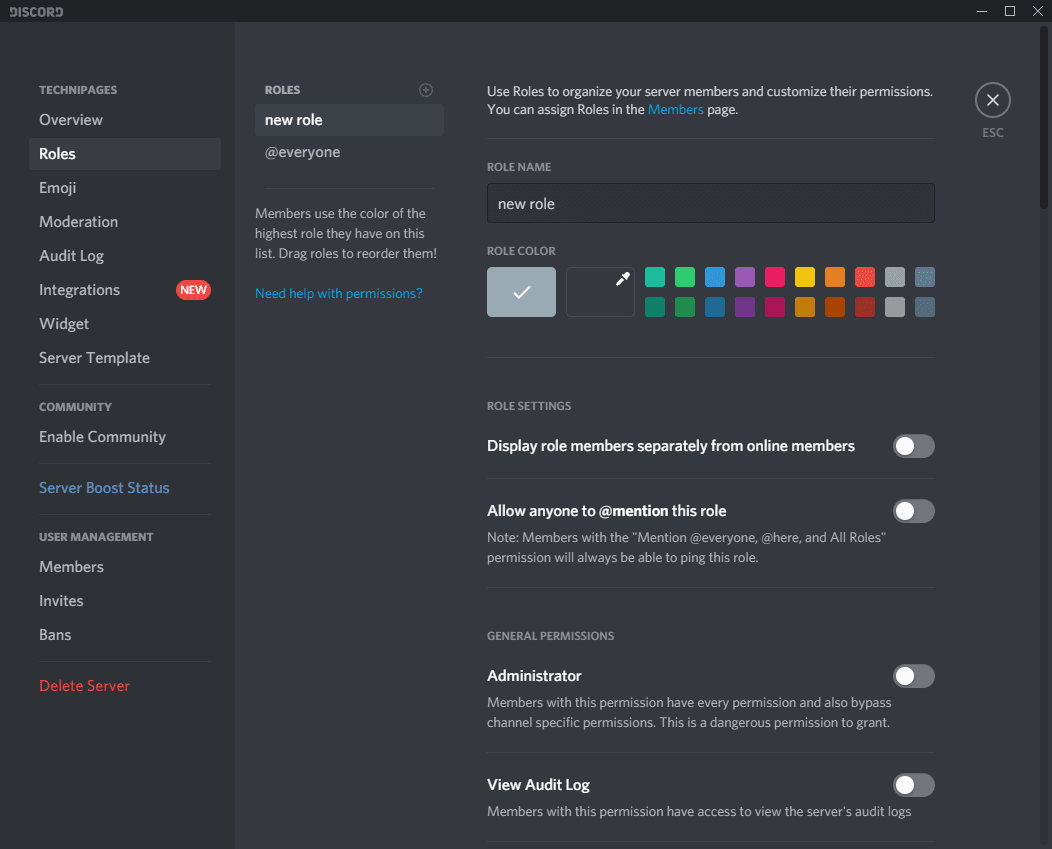
In the server settings, switch to the “Roles” tab, second from the top. You can manage existing roles via the role list or add a new role by clicking the plus icon at the top of the roles list.
Permissions breakdown
The first option for a role is its name, you can assign any name you want, just be aware that all users can see the role names of all other users in your server.
Next, you can choose a colour for the role. A user’s username will appear in the colour of their highest role, as ordered by the role list.
Tip: Click and drag roles in the role list to re-order them.
- “Display role members separately from online members” changes how the list of online users is displayed in the default server view. By default, the list is separated into “Online” and “Offline” users. By giving a role this permission, users with it will appear in a separate category above “Online” in the list of users.
- “Allow anyone to @mention this role” allows anyone to mention all users with the role by typing @<rolename> in their message.
- “Administrator” grants users with this role full admin powers over the server. While administrators can’t delete the server, they can essentially do everything else, so use grant this permission with care.
- “View Audit Log” allows users to view the server’s audit log. This is a log of all changes made to the server, including new/changed roles, new channels, deleted messages and kicked users, etc.
- “Manage Server” allows users to change the server’s name and change the region that the server is hosted in.
- “Manage Roles” allows users to create new roles and edit/delete existing roles. This only applies to roles sorted below the role that grants this permission.
- “Manage Channels” grants users the permissions to create, edit or delete voice and text channels.
- “Kick Members” and “Ban Members” grant users the permissions to kick or ban other members.
- “Create Invite” allows users to create invite links to the server.
- “Change Nickname” allows users to change their own nickname in the server. Whereas “Manage Nicknames” allows users to change the nicknames of other users.
- “Manage Emojis” allows users to add, remove, and edit the alias for existing emojis.
- “Manage Webhooks” allows users to create, edit, and delete webhooks.
- “Read Text Channels & See Voice Channels” allows users to be able to see channels in the server. If a user has no role with this permission, they will be unable to see any channels in the server.
- “Send Messages” allows users to send messages in text channels.
- “Send TTS Messages” allows users to send text to speech messages by starting a message with “/tts”. Text to speech messages can be heard by anyone looking at the text channel.
- “Manage Messages” allows users to delete messages from any users and allows users to pin messages.
- “Embed Links” allows users to embed a preview of links. Embedded previews are included by default when this permission is enabled.
- “Attach Files” allows users to upload files from their computer.
- “Read Message History” allows users to see messages in the server from before their current session. If a user doesn’t have this role, they can only see messages posted since they opened discord.
- “Mention @everyone, @here, and All Roles” allows users to mention any role on the server regardless of if it has the “Allow anyone to @mention this role” permission.
- “Use External Emojis” allows users to use emojis from other servers.
- “Add Reactions” allows user to react to messages with emoji.
- “Connect” and “Speak” allow users to connect to and speak in voice channels respectively.
- “Video” allows users to stream or use a webcam in the server.
- “Mute Members” and “Deafen Members” allows users to apply a server mute and server deafen respectively to other members in voice channels. Users that have been server muted or deafened can’t unmute or undeafen themselves.
- “Move Members” grants the permission to move users from one voice channel to another.
- “Use Voice Activity” allows users to use the “voice activity” microphone activation setting. If a user doesn’t have this permission, they can only use push-to-talk.
- “Priority Speaker” allows users to use a special push-to-talk mode that reduces the volume of other users while activated. This is designed to allow someone to be more easily heard but can only be used with a “Push-to-talk (Priority)” keybind.