For Xiaomi users, an upgrade to MIUI is arguably more exciting than the latest Android OS version. MIUI potentially offers more fascinating features for Xiaomi phones over the Android update.
The official MIUI 12 includes new skin and visual design, a Control Center menu similarly found in iOS, better system-wide dark mode, privacy fixes, improvements on system animations, and much more.
Contemporary Xiaomi phones users can expect to get the update in the coming weeks or months. With that said, the first stage of the MIUI 12 rollout is already complete. Some phones can use already it.
Contents
Devices Supporting the Stable Release of MIUI 12
First announced on April 27, 2020, MIUI 12 update is now available for selected Mi, Redmi, and Poco phones. The stable release is already accessible for some of the recent Xiaomi models in China.
For the rest of the world, though, the support for the new skin is only attainable for a very limited number of models, including Redmi K20, Mi 9, and Redmi Note 8 Pro—as of July 21, 2020. Visit XDA to view the full list.
If your phone is not supported, don’t throw in the towel just yet. Xiaomi will announce more compatible models in the future. As a reference, you can check which models will support the new UI from the MIUI official website—scroll down to the bottom of the page.
Don’t Want to Wait? You Can Install MIUI 12 Yourself
If you are a technology enthusiast who cannot wait to try out the latest fad, chances are, you would rather install the current, unofficial version of MIUI 12 yourself. Luckily, it’s possible. You can theoretically install MIUI 12 on any Xiaomi device using TWRP. With that said, the beta build for MIUI 12 is only available for phones running Android 9 or above.
With that out of the way, let’s just jump into how you do it.
Important Note: the method listed below makes your device vulnerable to malicious attacks and wipes all of your data! TWRP needs your device to be unlocked and formatted. Proceed at your own risk.
Initial Set-Up
- Unlock your phone’s bootloader using the Mi Unlock app provided by Xiaomi.
- If you wish to learn more about unlocking a device bootloader and what does it entails, read this FAQ sheet from the Mi community.

- Set up ADB on your computer.
- Download TWRP from the official site. Keep in mind that you need to get the correct TWRP version for your particular Xiaomi device.
- Download the latest MIUI 12 beta build from your phone. XDA Developers compiled this full list consisting of the MIUI 12 builds for each model. You can opt to use an older build should you wish. The file is in .zip, but don’t extract it!

Installing MIUI Update
The initial preparatory steps are now done. Now let’s get MIUI 12 to work with your phone.
- Put the TWRP file you’ve just downloaded into your ADB folder on your PC (the default folder’s name is usually ‘platform-tools’).
- Connect your phone and your PC using USB to start up ADB.
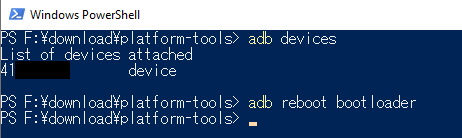
- Run Shell or Terminal from your ADB folder then execute the following command: ADB reboot bootloader.
- Additionally, you can check if your device is properly connected by running ADB devices.

- Additionally, you can check if your device is properly connected by running ADB devices.
- Afterward, your phone will go into fastboot mode. To check if everything has gone smoothly so far, run fastboot devices on your Terminal, and you should see your device serial number.
- Once you are sure that nothing is amiss, run this command (change twrp-x.x.x.x.img with the correct file name): fastboot flash recovery twrp-x.x.x.x.img

- Wait until the TWRP installation is completed. After it does, disconnect your phone from the PC.
- Reboot your phone into TWRP by holding the Volume Up + Power button at the same time. Keep doing this until your phone model logo appears.
- Before proceeding, you can backup your stock ROM or MIUI using TWRP if necessary.
- Inside TWRP, navigate to Wipe —> Advanced Data —> select Cache, System, Dalvik, Vendor, and Data. DO NOT touch Internal Storage.
- After you are certain that you’ve picked the correct choices from the list, swipe to wipe as explained at the bottom part of your screen.
- Go back to TWRP main menu and choose Install.
- Select the downloaded MIUI 12 ROM .zip file as the installation build. Swipe to install.
- Once installation is complete, go to the Wipe menu and choose Format Data. Doing this will effectively erase all the data on your device.
- Restart your phone by selecting Reboot from TWRP main menu. If an error saying ‘No OS installed’ shows up, ignore it.

At last, MIUI 12 is fully installed on your phone. Now, you can enjoy the sleek experience of the new MIUI to its fullest. Remember that, in reality, the MIUI 12 installed on your phone is still in its beta phase, so don’t expect things to run smoothly all the time.