The end of an email is just as important as the body or the beginning. The signature at the end of the email provides vital contact information and can help display your personality or business’s mission with a quotation. Sometimes you might have more than one email signature that you need to switch between frequently. There are a couple of different ways you can do this. One is just by using a button at the bottom of the email itself. The second way is to have a different signature assigned to each email connected to your Gmail account.
Contents
Why Have More Than One Signature?
For some people, having more than one signature may not seem very practical. However, you might be using your email account for both personal and business-related matters and not want to use the same signature. This would be an excellent reason to have more than one signature on your account — it all depends on how you are using your email account.
Adding a Signature to Your Account
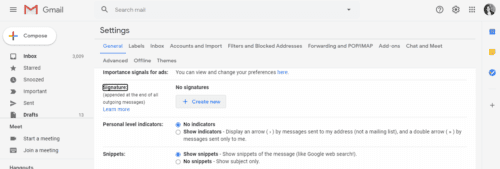
Before you can switch between signatures, you need to make sure you have signatures on your account.
- Make sure your Gmail account is open.
- In the top right corner of the window will be a symbol like a gear. That is your Settings button. Click on it.
- Click on See All Settings.
- The Settings window will open to a general settings page. Scroll down to the bottom to create your signature.
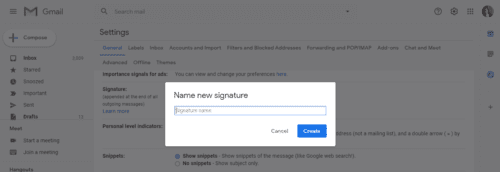
- Add the signature text to the box. You will need to name it. You can add an image or even change the style of the text if you want.
- When you have finished creating each signature, scroll to the bottom of the page, and click Save Changes.

You can also a default signature. Select which signature you want as your default using the drop-down menu below the signature text box.
Manage Signatures in Body of Email
You can change the signature at any point while writing an email. In other words, you do not have to change it before you start writing your email.
- If you need to change the signature while writing an email, click the Insert Signature button at the bottom of the email text box. The symbol for this button looks like a pen.
- When you click the Insert Signature button, a new menu will appear listing all the signatures you have saved.
- Select the signature you want to use. This will change the signature without changing the content of your email.

Manage Signatures with the “Send Mail As” Feature
First, make sure that you connect all of your email addresses to your Gmail account. Once you have connected the necessary addresses, you can assign a different signature to each email address and change them before you compose a new email.
Adding Additional Emails

- Open your Gmail account.
- Click on the Settings button in the top right corner of the window.
- Click on See All Settings > Accounts and Import or Accounts tab.
- Scroll down until you find the Send Mail As section.
- Click Add Another Email Address.
- Type in your name and the email address you want to add.
- Click Next Step > Send Verification.
- If you are adding a work or school email, you need to enter the SMTP server (such as smtp.gmail.com or smtp.yourschool.edu) and the username and password for the account.
- Click Add Account.
- Sign in to the account you are adding to Gmail.
- Open the confirmation email Gmail sent.
- Click on the link.
Adding a Signature to Different Email Addresses
- Go to the Settings page where you create signatures.
- Select the email you want to make a signature for in a drop-down menu or a menu to the side of the signature box.
- Create the signature and click Save Changes.
Changing Addresses
If you have multiple email addresses attached to your Gmail account, you can switch between emails without signing in and out of them. When you switch the address, the signature will change with it.
- When composing a new email, click the From line.
- Select the address you want to use. This will update any settings and signatures you may have assigned to this email address.
Conclusion
Switching between signatures and email addresses is very simple. Having more than one signature keeps things organized for you and helps you look more professional.