• Skip to main content
  • Skip to primary sidebar

Technipages

Smart phone, gadget and computer tutorials

  • Topics
    • Android
    • Gaming
    • Hardware
    • Internet
    • iOS
    • MacOS
    • Office
    • Software
    • Windows
    • Definitions
  • Product Reviews
  • Downloads
  • About
Slack: How To Make an Existing Channel Private

Slack: How To Make an Existing Channel Private

Posted on January 25, 2021 by Mel Hawthorne Leave a Comment

There are two types of channels in a Slack workspace: public and private. Channels are public by default but can be configured to be private instead when they are created or at any time. Private channels can’t be changed back to being public channels.

Public channels are visible in the channel browser to all members of the workspace and can be joined at any time. Private channels are hidden from non-members and can only be viewed or joined by invitation.

This difference in privacy and accessibility makes public channels ideal for most communications. For example, having a team’s channel be public means that if anyone needs to contact them, they can choose to temporarily join to ask their question. Similarly, people can see if there are any special-interest channels that they are interested in that they can then easily join. Private channels are ideal for discussing more sensitive topics that most users should not see. For example, if there is an HR complaint against someone, or if the company is planning layoffs, etc.

If you want to change the status of a public channel to make it private, you need to go into the additional channel options. To do so, open the channel you want to change, click the “Show channel details” button in the top-right corner, then click the triple-dot icon labelled “More” and select “Additional options”. Alternatively, you can right-click on the channel in the list and select “Additional options” from the right-click menu, but it is easier to accidentally click on the wrong channel.

Open the additional channel options.

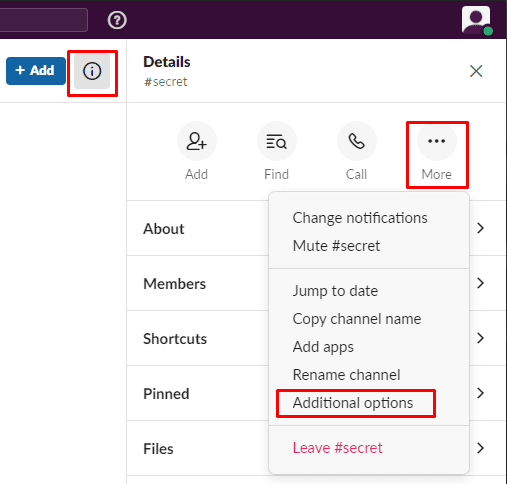
In the additional options, select “Change to a private channel”.

In the channel options, click “Change to private channel”.

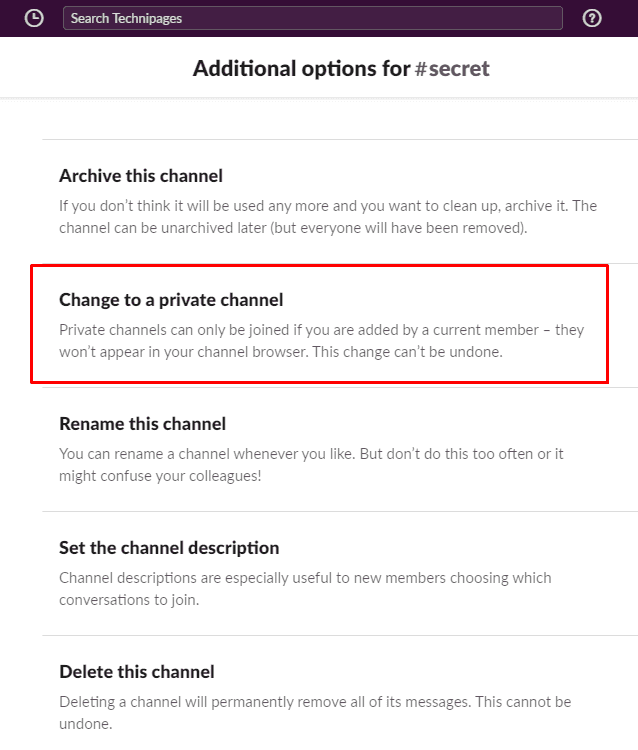
Changing the channel to private will not make files that have been shared already private, they will remain public. Additionally, the channel history and the member list will be unaffected by the change. If you want to continue and are aware that it is impossible to make a private channel public again, click “Change to private”.

Click “Change to private” to continue.

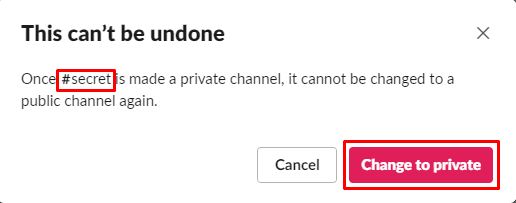
A final pop-up notice will appear to remind you that you will be unable to make the channel public again. If you’re sure, double-check that the channel name is correct, then click “Change to private” to finalise the change.

Click “Change to private” to confirm and finalise the change.

Setting a Slack channel to private means that users can only see or join it by invitation. By following the steps in this guide you can change a channel to private.

You Might Also Like

  • How To Create Private Channel in Slack
    How To Create Private Channel in Slack
  • Microsoft Teams: Change Channel from Private to Public
    Microsoft Teams: Change Channel from Private to Public
  • Pinterest: Make Private Board
    Pinterest: Make Private Board
  • Android: How to Make Your Number Private or Not
    Android: How to Make Your Number Private or Not
  • How to Always Make Microsoft Edge Open in Private Mode
    How to Always Make Microsoft Edge Open in Private Mode
  • How to Save Notes on Slack and Keep Them Private
    How to Save Notes on Slack and Keep Them Private
  • How to Save Notes on Slack and Keep Them Private
    How to Save Notes on Slack and Keep Them Private
  • Slack: How To Create a New Channel
    Slack: How To Create a New Channel
  • Slack: How to Archive a Channel
    Slack: How to Archive a Channel

Filed Under: Internet, Software

Reader Interactions

Did this help? Let us know! Cancel reply

Your email address will not be published. Required fields are marked *

This site uses Akismet to reduce spam. Learn how your comment data is processed.

Primary Sidebar

Recent Posts

  • Fix Skype Error: Exchange Needs Your Credentials
  • Fix Skype Notifications Not Working on Windows 10
  • Teams in Outlook: We Couldn’t Schedule the Meeting
  • VR Oculus Quest 2: How to Configure a New Room-Scale Boundary
  • VR Oculus Quest 2: How to Adjust Boundary Sensitivity
  • Dropbox: How To Change the Date Format
  • Microsoft Teams: There Was a Problem Saving the Photo
  • VR Oculus Quest 2: How to Set up Oculus Link

Who’s Behind Technipages?

Baby and Daddy My name is Mitch Bartlett. I've been working in technology for over 20 years in a wide range of tech jobs from Tech Support to Software Testing. I started this site as a technical guide for myself and it has grown into what I hope is a useful reference for all.

Follow me on Twitter, or visit my personal blog.

You May Also Like

© Copyright 2021 Technipages · All Rights Reserved · Privacy