
Another year, another Galaxy. Samsung has finally released its first major flagship phones of the year with the Galaxy S23, S23+, and Galaxy S23 Ultra. But one question that is regularly asked is how to screenshot on Galaxy S23. From time to time, phone makers have a tendency to change how you can take a screenshot. If you’re trying to get better acclimated with your new phone, we walk you through the different ways to take a screenshot on Galaxy S23.
Contents
How to Screenshot on Galaxy S23 Using Buttons
The easiest and most intuitive way to take screenshots on Galaxy S23 is simply using the hardware buttons. This has been the default method on almost every smartphone, including the iPhone. With the Galaxy S23, press and release the Volume Down and Power (Side) buttons simultaneously. The screen will flash after the screenshot is captured, and then you will be able to save it or edit it before saving it.
With Palm Swipe
Palm Swipe is one of those features that Samsung has been implementing on its Galaxy phones for years, including the Galaxy S23. However, this feature is not available on all phones, so you’ll want to make sure that it’s available and enabled before trying to use it. Here’s how you can enable Palm Swipe on the Galaxy S23:
- Open the Settings app on your Galaxy S23.
- Scroll down and tap Advanced Features.
- Scroll down and tap Motions and Gestures.
- Tap the toggle next to Palm swipe to capture to enable the feature.

Now that Palm Swipe is enabled, all you need to do is swipe the edge of your hand across any screen. If done correctly, the screen will flash, and the screenshot will be presented so you can make edits or just save it to your gallery.
Scroll Capture
Sometimes, you might find that you need to screenshot more than just what you can see on a page. In those instances, Samsung’s Scroll Capture functionality might come in handy, removing the need to scroll and take multiple screenshots. This is available on every Galaxy S23, and here’s how you screenshot using Scroll Capture.
- Navigate to the screen that you want to capture.
- Press the Power and Volume Down key at the same time.
- At the bottom of the page, a pop-up menu will appear.
- Tap the Scroll Capture icon (a box with a down arrow in it)
- Tap the same icon again.
- Continue tapping the icon until you reach the bottom of the page.
- When you are done, tap outside of the menu bar.

Voice Commands
While many of you might be familiar with Amazon Alexa or Google Assistant, Samsung actually has a voice assistant of its own. Bixby can handle many different requests and is the default voice assistant on the latest and greatest Galaxy phones. One such request is that Bixby can actually take a screenshot just by using your voice, removing the need to try and fiddle around with pressing the right buttons or using different gestures.
After Bixby has been set up on your Galaxy S23, all you need to do is say, “Hey Bixby, take a screenshot.”
Smart Select
Another feature that has been available on many Galaxy phones over the years is Edge Panels. These are essentially shortcuts to different apps or utilities built into your phone, including the Galaxy S23. But to make use of Edge Panels and Smart Select, you first need to make sure that everything is enabled:
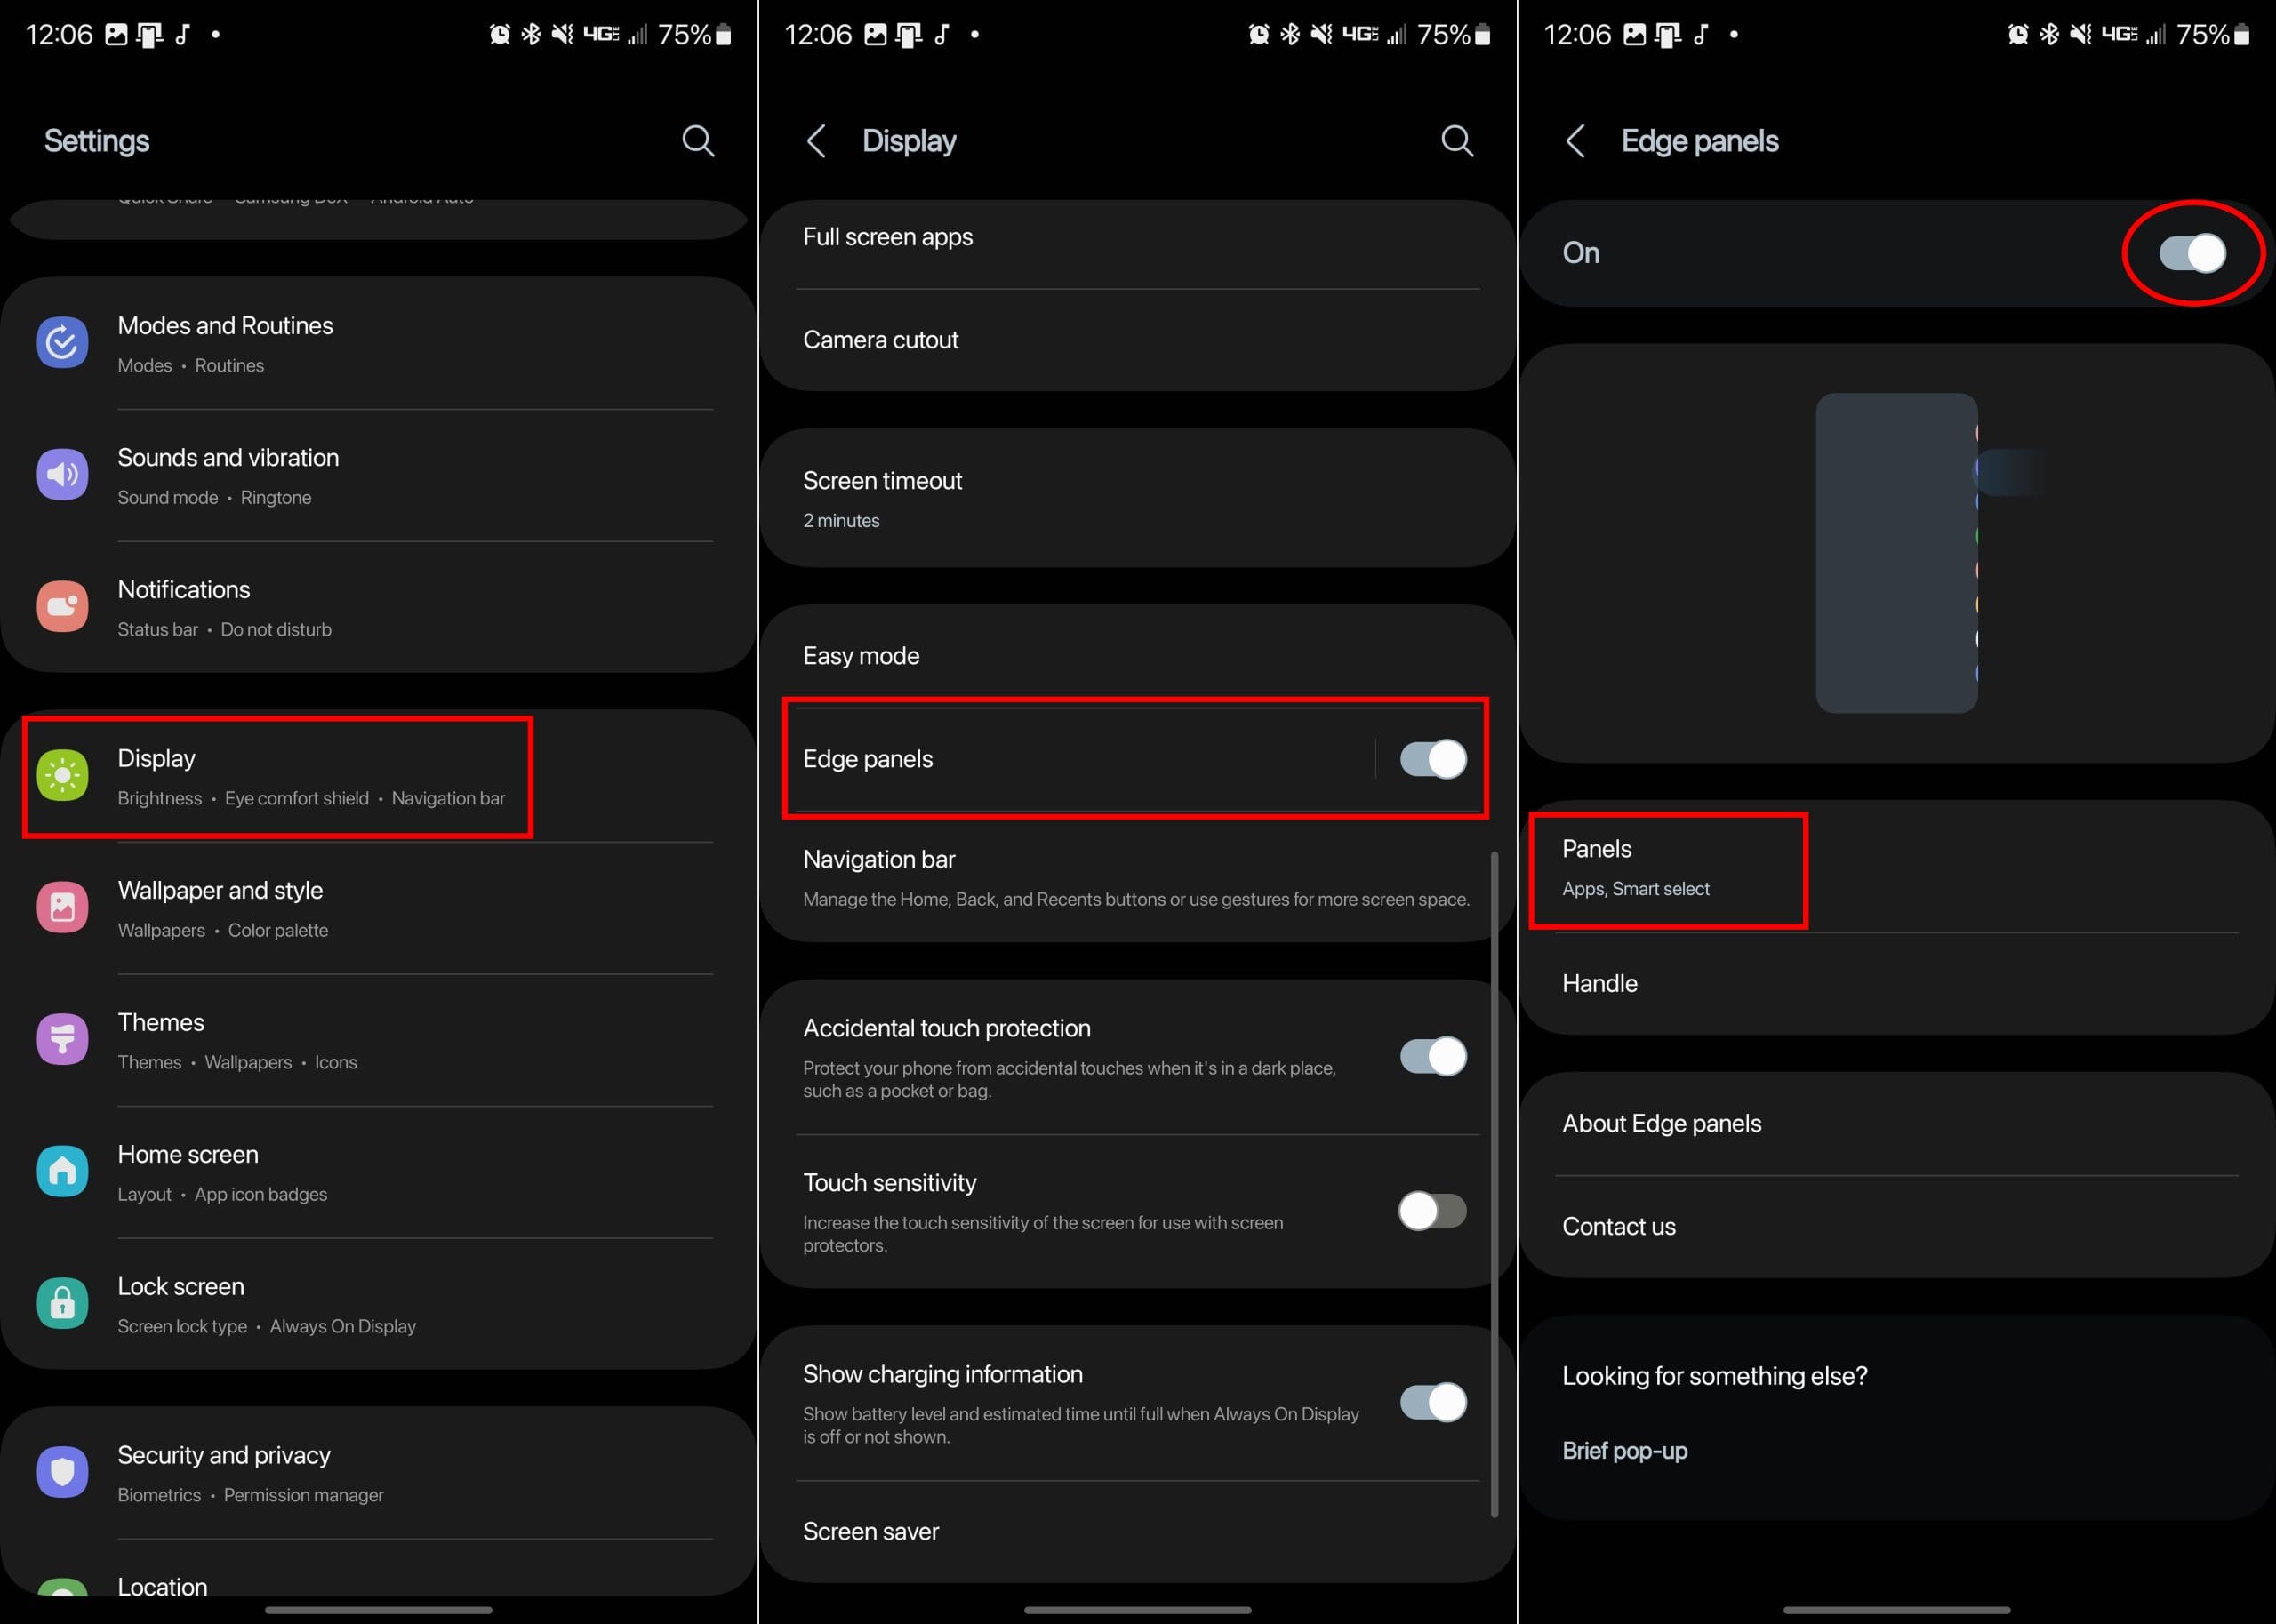
- Open the Settings app on your Galaxy S23.
- Tap Display.
- Scroll down and tap Edge Panels.
- Tap the toggle next to Edge Panels to turn this feature on.
- Tap Panels.
- Make sure that Smart Select is enabled.
- Close the Settings app.
- Navigate to the page that you want to take a screenshot of.
- Open the Edge Panel with a swipe from the side of the screen.
- You should see a small outline of a box indicating where Edge Panels reside.
- Swipe again until you see the Smart Select panel.
- Select one of the following:
- Rectangle
- Oval
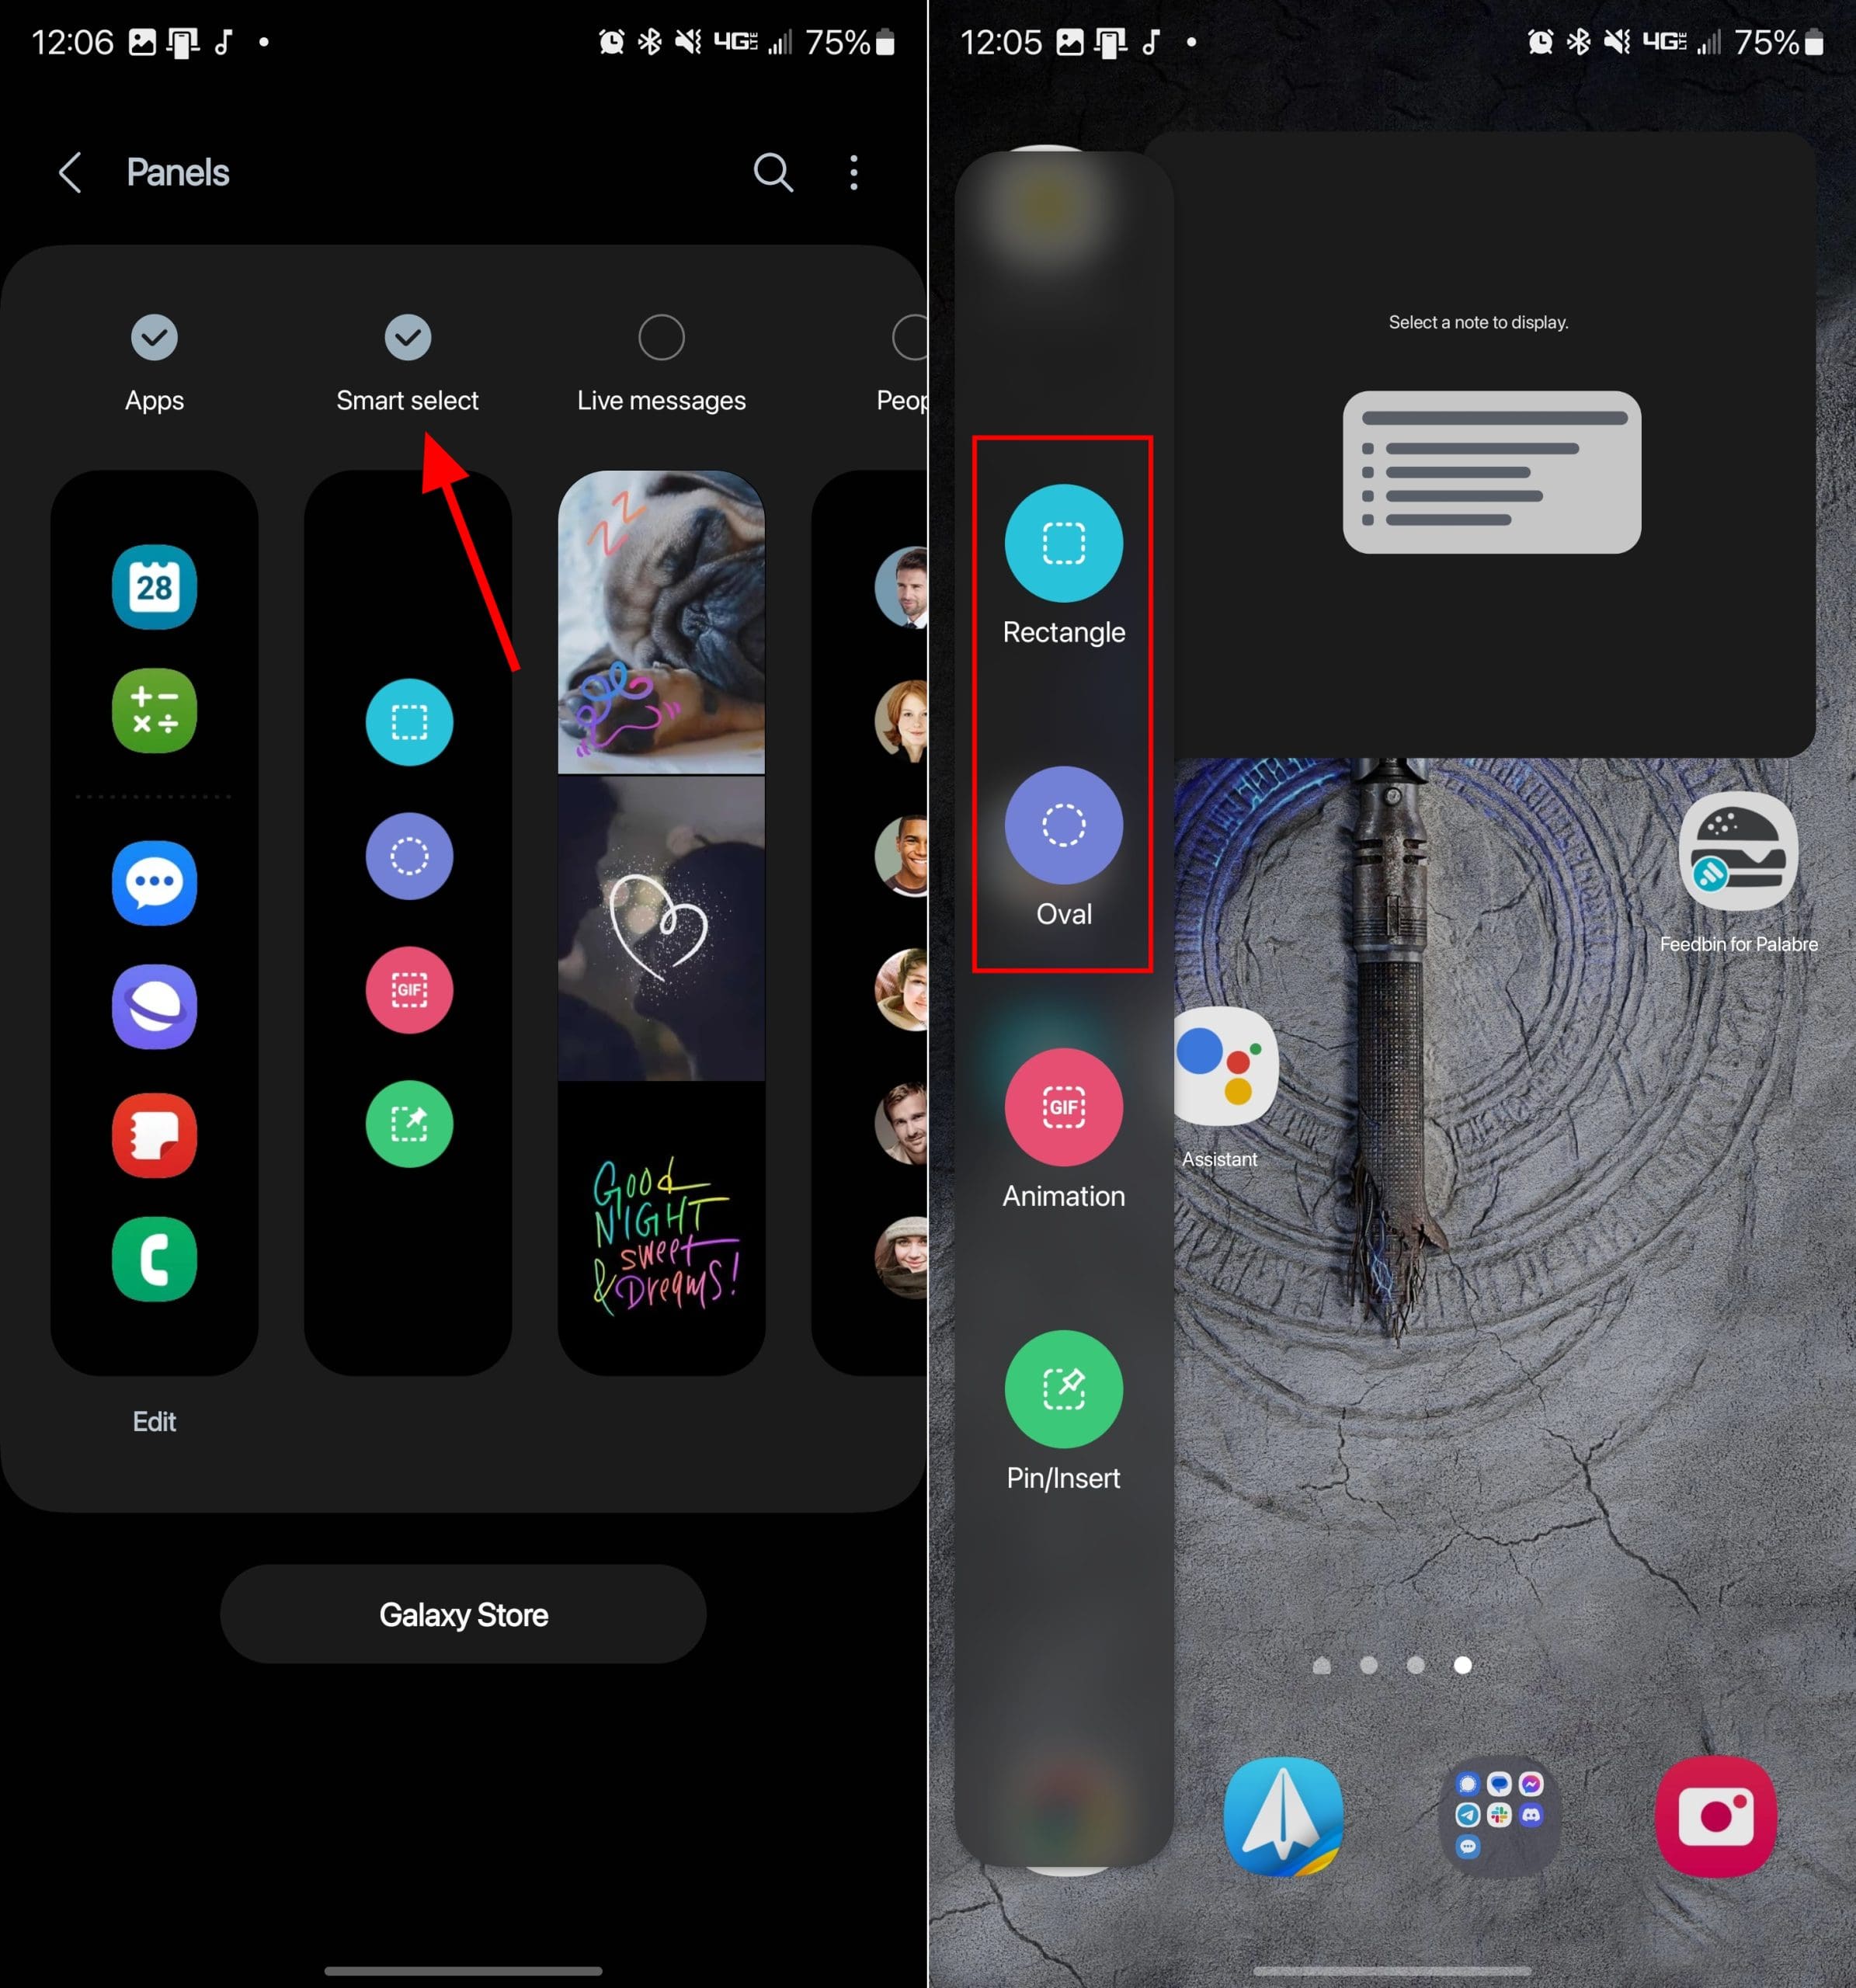
After you select, a rectangle or oval will be placed on the screen. Simply drag the corners or edges of the shape until you have highlighted the area you wish to screenshot. When everything is in place, tap the Done button.
S Pen
This last option is obviously only for those who own the Galaxy S23 Ultra. Now that the S Pen is included in the box, it’s much more convenient to take screenshots, sign PDFs, and just use it to navigate your phone compared to before. With the S Pen, Samsung has brought its Air Command features, essentially a panel of utilities designed to be used with the S Pen. Here’s how you take a screenshot on Galaxy S23 Ultra with the S Pen:
- Take the S Pen out of its silo on your Galaxy S23 Ultra.
- Tap the Air Command icon.
- Select Smart select.

After selecting Screen Write, your phone will automatically capture whatever is on the screen at the time. Then, you can use your S Pen to annotate the screenshot, or you can tap the Save icon in the menu bar to save the screenshot.
Conclusion
There are always a few different ways to capture screenshots on different phones, including the Galaxy S23. But with the Galaxy S23 Ultra and its included S Pen, you have even more possibilities, along with being able to pick out different parts of a screenshot as opposed to just using your fingers. If you have any problems when it comes to taking a screenshot on Galaxy S23, let us know in the comments below!


Tried it didn’t work