• Skip to main content
  • Skip to primary sidebar

Technipages

Tutorials and fixes for smartphone, gadget, and computer problems

  • Topics
    • Android
    • Gaming
    • Hardware
    • Internet
    • iOS
    • MacOS
    • Office
    • Software
    • Windows
    • Definitions
  • Product Reviews
  • Downloads
  • About Technipages
Razer Synapse 3.0: How to Bind a Second Action to a Key With Hypershift

Razer Synapse 3.0: How to Bind a Second Action to a Key With Hypershift

By Mel Hawthorne Leave a Comment

With a keyboard you always expect certain keys to perform certain functions. Generally, the number of functions that can be performed by a keyboard is limited by the number of keys it has. This number can be expanded through the use of keyboard shortcuts that require a certain combination of keys to be pressed.

Razer has expanded on this concept in its keyboards by including a dedicated secondary-functionality key. This secondary-functionality key can be used as part of the “Hypershift” functionality to set a secondary function for most keys on your keyboard.

Hypershift is activated by holding down the Hyperhsift key “fn”, found just to the right of the space bar. Obviously, the Hypershift key is one of the keys that can’t be configured to have a secondary functionality. The other keys that can’t be configured with a second function are the function keys “F1” through to “F12”, the Windows key, Print Screen, Scroll lock, and Pause. Every other key on the keyboard can be configured to have a secondary key functionality.

How to add a secondary key binding

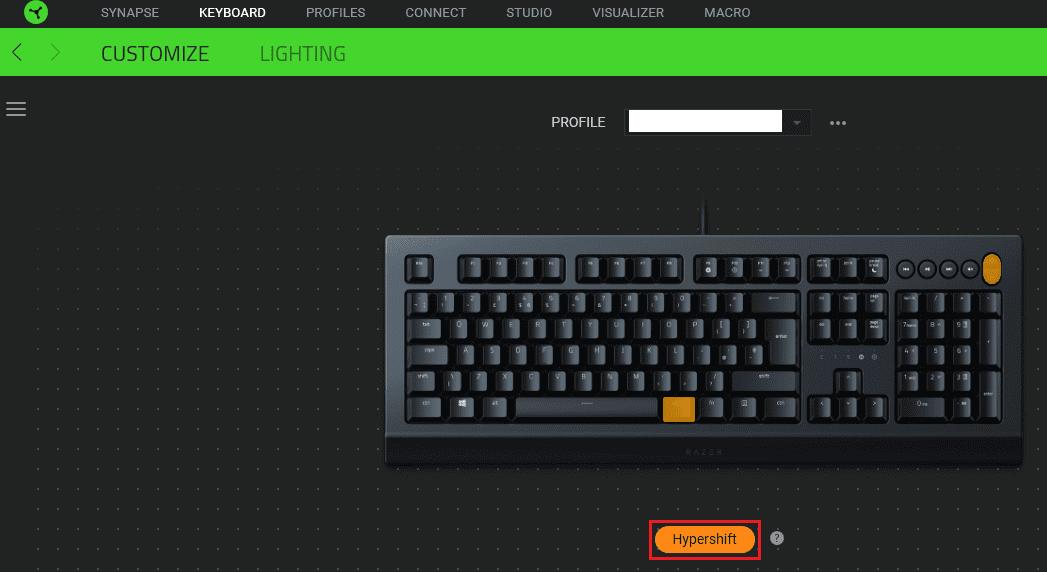
To add a secondary key binding, you need to use the Razer Synapse 3.0 software designed to manage modern Razer peripherals. First, you need to go to the “Customize” sub-tab of the “Keyboard” tab. The Hypershift key bindings can be configured by clicking the button under the keyboard image that says “Standard”. When you click on it, it should turn orange and change to say “Hypershift”.

In the “Customize” sub-tab of the “Keyboard” tab click on “Standard” to switch to the Hypershift key-bindings.

By default, almost all keys continue to use their default behaviour when the Hypershift key is pressed. This only excludes F9-F12 and the “Pause” key which have built-in secondary functions that can’t be overridden.

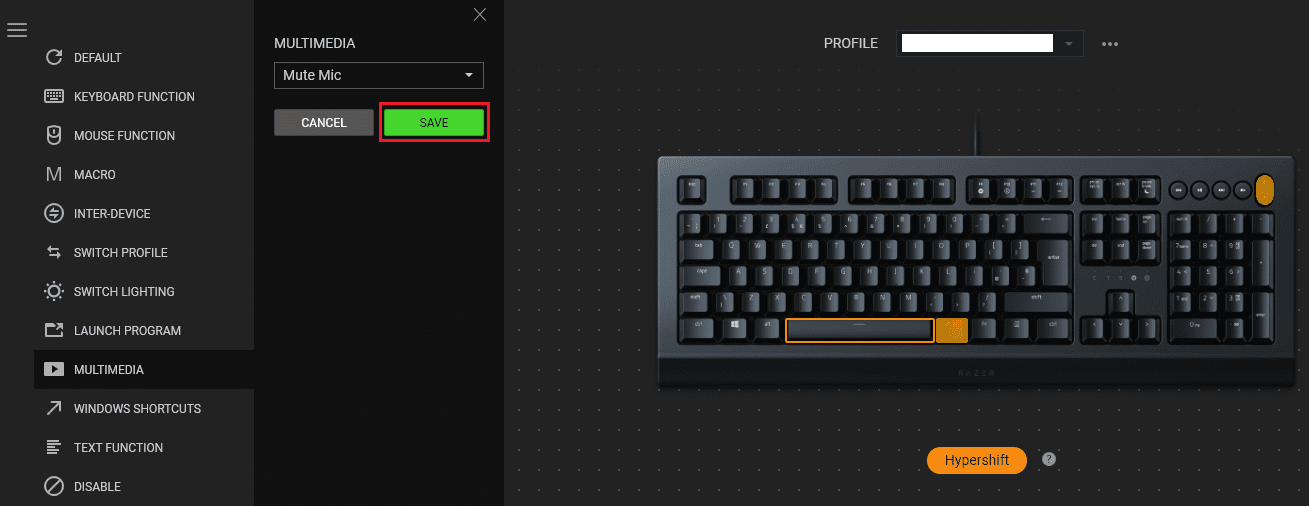
For the keys that can be given a secondary binding, you can select them on the keyboard map, and then select a function from the columns on the left, as you would for a normal key-binding change. Once you’ve found the secondary function that you want to use, click “Save” to apply the setting.

Select the key you want to use, then configure a secondary function via the columns on the left and click “Save”.

Each key that has been configured with a custom secondary function with Hypershift will be highlighted in orange on the keyboard representation when in the Hypershift view. This makes it easy to see which keys have had their functions changed if you ever want to change or undo the setting.

To use the Hypershift functionality that you’ve configured you need to press and hold the Hypershift key “fn”, then press the key you want to use, like you would with any other keyboard shortcut.

You Might Also Like

  • Razer Synapse 3.0: How to Rebind a Key
    Razer Synapse 3.0: How to Rebind a Key
  • Razer Synapse 3.0: How to Configure a Custom Keyboard Backlighting Color Scheme
    Razer Synapse 3.0: How to Configure a Custom Keyboard…
  • 6 Options For Customizing Your Razer 2 Phone 
    6 Options For Customizing Your Razer 2 Phone 
  • Optimizing Razer Phone 2 For Gamers
    Optimizing Razer Phone 2 For Gamers
  • What Is and How to Use Windows 10 Action Center
    What Is and How to Use Windows 10 Action Center
  • Office: This Action Could Not Be Performed
    Office: This Action Could Not Be Performed
  • How to Turn off the Windows 10 Action Center
    How to Turn off the Windows 10 Action Center
  • Outlook: Your Organization’s Policies Are Blocking This Action
    Outlook: Your Organization’s Policies Are Blocking This…
  • Bitwarden: How to Configure the Timeout Action of the Web Vault
    Bitwarden: How to Configure the Timeout Action of the Web…

Filed Under: Gaming, Software

Reader Interactions

Did this help? Let us know!

Your email address will not be published. Required fields are marked *

This site uses Akismet to reduce spam. Learn how your comment data is processed.

Primary Sidebar

Recent Posts

  • Windows 11: How to Add Clocks with Different Time Zones
  • Google Assistant: How to Never Miss a Birthday
  • Windows 11: How to Disable Notifications and Ads
  • How to Use Oculus Quest 2 Air Link
  • How to Create an Avatar in the Oculus Quest 2
  • 5 Free and Fun Math Apps for Kids
  • Windows 11: How to Discover What Graphics Card You’re Using
  • How to Change Display Resolution on Windows 10 and 11

Who’s Behind Technipages?

Baby and Daddy My name is Mitch Bartlett. I've been working in technology for over 20 years in a wide range of tech jobs from Tech Support to Software Testing. I started this site as a technical guide for myself and it has grown into what I hope is a useful reference for all.

© Copyright 2022 Technipages · All Rights Reserved · Privacy