Skip to content
LogoTechnipages
LogoTechnipages
  • Topics
        • Android
        • Browsers
        • Gaming
        • Hardware
        • Internet
        • iPhone
        • Linux
        • macOS
        • Office
        • Reviews
        • Software
        • Windows
        • Definitions
        • All Recent Posts
  • Product Reviews
  • About

How to Set the Email Signature in Outlook 365

Mitch BartlettNovember 9, 2022 Comments (0)
Outlook 2010 email signature screen

Put an email signature at the bottom of all of your email messages in Microsoft Outlook for Windows, Mac, iPhone, Android, or the web-based versions.


Contents

  • 1 From Windows Outlook Client
  • 2 From Outlook 365 (Web)
  • 3 From Outlook Web Access (OWA)
  • 4 From Outlook for Mac
  • 5 From Android and iPhone Mobile App
  • 6 FAQ

From Windows Outlook Client

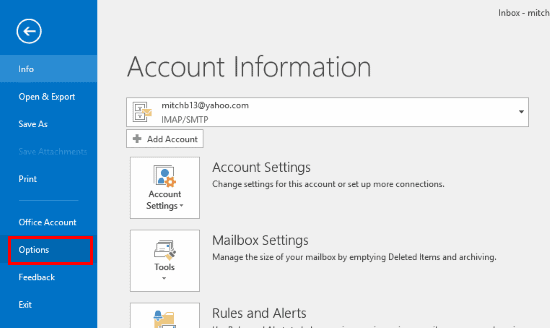
  1. In Outlook, select “File“ > “Options“.
    Outlook 2016 Option selection
  2. Select “Mail” on the left, then click “Signatures…”
    Outlook 2016 Signatures button
  3. Select “New“.
  4. Give the signature a name. Any type of name will do. Click “OK” when done.
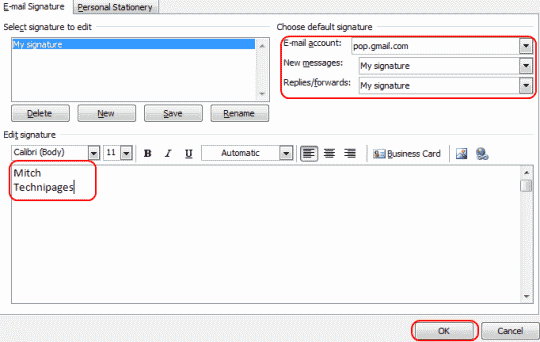
  5. Under the “Choose default signature” area, select the “E-mail account” you wish to apply the signature to. Also select the name of the signature in the “New messages” and/or “Replies/forwards” fields as desired. In the “Edit signature” area, write the signature just as you would like it to appear in your messages.
    Outlook 2010 email signature screen
  6. Click “OK“, then “OK” again and you’re done. Your signature will automatically be added to the bottom of your email messages.

From Outlook 365 (Web)

  1. While logged into Outlook, select the settings gear ⚙️ located at the upper-right corner.
  2. Choose View all Outlook settings.
  3. Select Email in the left pane, then choose Compose and reply.
  4. Under Signature, type your signature the way you’d like it to look.
  5. Select Save, and you’re done!

From Outlook Web Access (OWA)

  1. Login to your OWA account.
  2. Select the gear icon in the upper-right corner, then choose “Options“.
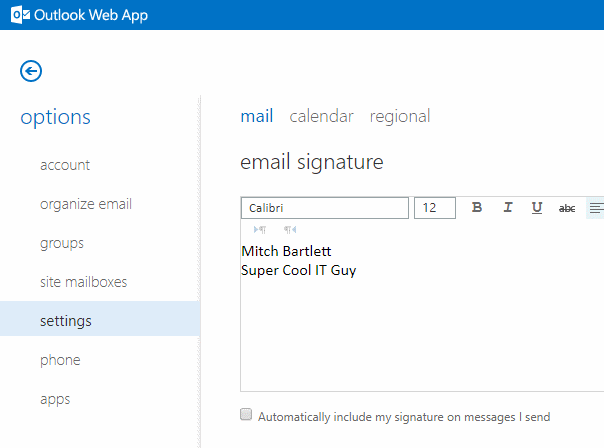
  3. Select “Settings” on the left pane.
  4. Set your signature under the “Email Signature” section. Check the “Automatically include my signature on messages I send” box if desired.
    OWA Email Signature
  5. Select “Save“, and you’re done.

From Outlook for Mac

  1. In Outlook, select Outlook > Preferences.
  2. Open Signatures, then choose which signature you wish to edit. Select the + to make a new one.
  3. Select Edit, then type your signature.
  4. Under Choose default signature, set the account and signature name you wish to use.
  5. Select Save, and you’re done.

From Android and iPhone Mobile App

  1. Open the Outlook app, then select the Outlook icon located at the upper-left corner.
  2. Select the settings gear ⚙️ at the bottom of the left pane.
  3. Select the account you are using, then choose Signature.
  4. Set the signature you would like to use, then tap Done or Save.

FAQ

I set my signature, but it keeps changing. What’s going on?

If you’re using Outlook within a corporate environment, your IT department may be setting your signature for you. Their changes overwrite any changes you make. Talk to the folks in your IT department to see if there is a way around this policy.

Categories: Office

Author Mitch Bartlett

Through my career that spans over 20 years I have become an expert in Microsoft Systems Administration, Android, and macOS. I started this site as a technical guide for myself and it has grown into what I hope is a useful knowledgebase for everyone.

You Might Also Like

  • Word 365: Enable or Disable AutoRecover Save

    Mitch BartlettOffice
  • Outlook Logo Header

    How to View Full Message Headers in Outlook 2019/2016

    Mitch BartlettOffice
  • Important Shortcut Keys In Microsoft Outlook

    Important Shortcut Keys in Microsoft Outlook

    MonaOffice
  • disable-top-results-outlook-search-results

    How to Disable Top Results from Outlook Search

    Madalina DinitaOffice

Leave a Reply

Your email address will not be published. Required fields are marked *

  • roblox error 280

    Having Trouble With Roblox Error 280? Here’s What to Do

  • hard disk smart command error

    Hard Disk SMART Command Failed – How to Fix 

  • files automatically deleted on click

    Files Getting Deleted Automatically? Here Are Some Reasons Why

  • error 400 when signing in

    Encountered Error 400 When Signing In to Microsoft? Here’s What You Can Do 

  • unable to create notebook error in onenote

    We Were Unable to Create Your Notebook Error in OneNote – Common Fixes 

profile pic

The Experts Behind Technipages

My name is Mitch Bartlett. I've been working in technology for over 20 years in a wide range of tech jobs from Tech Support to Software Testing. I started this site as a technical guide for myself and it has grown into what I hope is a useful reference for all.

Learn More

technipages logo white
linkedin icon

Technipages is part of Guiding Tech Media, a leading digital media publisher focused on helping people figure out technology. Learn more about our mission and team here.

© 2026 Guiding Tech Media All Rights Reserved

  • About Us
  • Contact
  • Terms of Use
  • Privacy Policy

© 2026 Guiding Tech Media All Rights Reserved

Information from your device can be used to personalize your ad experience.
Do not sell my personal information.

Last Updated on November 9, 2022 by Mitch Bartlett