• Skip to main content
  • Skip to primary sidebar

Technipages

Smart phone, gadget and computer tutorials

  • Topics
    • Android
    • Gaming
    • Hardware
    • Internet
    • iOS
    • MacOS
    • Office
    • Software
    • Windows
    • Definitions
  • Product Reviews
  • Downloads
  • About
Outlook: Disable Clutter Folder

Outlook: Disable Clutter Folder

Posted on January 22, 2020 by Mel Hawthorne Leave a Comment

A number of email providers have started taking the approach of applying filters to your email. Some of these are pretty reliable like the spam filter but others are less useful, and may even be unwanted. A great example of this is Outlook’s “Clutter” filter, which filters what it determines to be low priority emails out of your inbox, into a clutter folder. The Clutter feature can cause you to miss important updates or information that you’d been waiting for, but it can be disabled.

To disable the Clutter folder in Outlook you need to open up the Outlook web client. If you’ve got the stand-alone Outlook client open, you can just right click on the Clutter folder and select “Manage Clutter”. The Manage Clutter button will open a browser window, you’ll need to sign in with your email account details, and then it will open the Clutter options page directly.

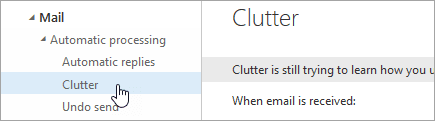
If you don’t have the Outlook stand-alone app open, sign in to the Outlook web application. Once you can see your inbox, click on the cog icon in the top right-hand corner of the window to open the settings. The clutter settings are listed under “Mail > Automatic processing > Clutter”.

Clutter settings are listed under “Automatic processing”.

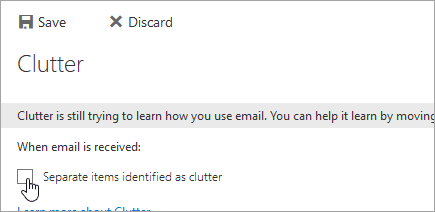
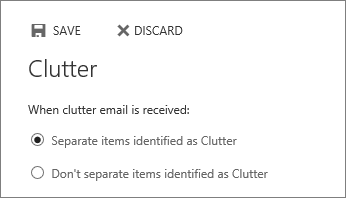
Once you’ve got to the Clutter settings you’ll be presented with one of two layouts. One will have a checkbox labelled “Separate items identified as clutter”. The second has a radio button labelled “Don’t separate items identified as Clutter”. Ensure the “Separate items identified as clutter” option is unchecked in whichever one of these layouts you see, and press “Save” to disable Clutter.

The checkbox “Separate items identified as clutter”.
The radio button “Don’t separate items identified as clutter”.

As an exchange admin it is possible to force-disable Clutter for users, to do so you will need “Exchange Online PowerShell” and an account with “Exchange Service administrator” permissions. The command to disable Clutter for a user is `Set-Clutter -Identity “<username>” -Enable $false` where <username> is replaced with the intended user’s username.

Note: This command can only be run against one user at a time rather than across a domain.

You Might Also Like

  • Enable or Disable Autosaving Email to Drafts Folder in Outlook 2016
    Enable or Disable Autosaving Email to Drafts Folder…
  • Outlook 2019/365: Enable or Disable "Outlook Today" at Startup
    Outlook 2019/365: Enable or Disable "Outlook Today"…
  • How to Find Email Folder Location in Outlook
    How to Find Email Folder Location in Outlook
  • Outlook: Enable/Disable Add-ins
    Outlook: Enable/Disable Add-ins
  • How to Enable or Disable Outlook Mail Notification Box
    How to Enable or Disable Outlook Mail Notification Box
  • Disable Email Forwarding in Outlook 2016 & 2013
    Disable Email Forwarding in Outlook 2016 & 2013
  • Outlook 2019/2016: Enable/Disable Autocorrect
    Outlook 2019/2016: Enable/Disable Autocorrect
  • Outlook 2016: Enable or Disable Cached Exchange Mode
    Outlook 2016: Enable or Disable Cached Exchange Mode
  • How to Add a New Steam Library Folder
    How to Add a New Steam Library Folder

Filed Under: Office Tagged With: Outlook 2019

Reader Interactions

Did this help? Let us know! Cancel reply

Your email address will not be published. Required fields are marked *

This site uses Akismet to reduce spam. Learn how your comment data is processed.

Primary Sidebar

Recent Posts

  • Fix Skype Error: Exchange Needs Your Credentials
  • Fix Skype Notifications Not Working on Windows 10
  • Teams in Outlook: We Couldn’t Schedule the Meeting
  • VR Oculus Quest 2: How to Configure a New Room-Scale Boundary
  • VR Oculus Quest 2: How to Adjust Boundary Sensitivity
  • Dropbox: How To Change the Date Format
  • Microsoft Teams: There Was a Problem Saving the Photo
  • VR Oculus Quest 2: How to Set up Oculus Link

Who’s Behind Technipages?

Baby and Daddy My name is Mitch Bartlett. I've been working in technology for over 20 years in a wide range of tech jobs from Tech Support to Software Testing. I started this site as a technical guide for myself and it has grown into what I hope is a useful reference for all.

Follow me on Twitter, or visit my personal blog.

You May Also Like

© Copyright 2021 Technipages · All Rights Reserved · Privacy