Skip to content
LogoTechnipages
LogoTechnipages
  • Topics
        • Android
        • Browsers
        • Gaming
        • Hardware
        • Internet
        • iPhone
        • Linux
        • macOS
        • Office
        • Reviews
        • Software
        • Windows
        • Definitions
        • All Recent Posts
  • Product Reviews
  • About

Opera for Android: How to Enable/Disable Data Saving Mode

Mel HawthorneAugust 28, 2020 Comments (0)

Most mobile phone contracts typically include a limited amount of monthly data, with some contracts being more generous than others. If your data contract doesn’t offer enough data, then you can end up running out before the end of the month. This leaves you with the option of paying more for extra data, or not having any data while out of Wi-Fi range for the rest of the month.

Neither of those options are great. The best way to avoid this scenario is to try to reduce the amount of data you use. One way you can do this while using the Opera browser on Android, is to enable the data saving mode.

Opera’s data saving mode reduces the amount of data you download, by proxying certain data types through its servers and compressing them before sending them on to you. The mode specifically compresses text and images that you download.

Tip: Compression is a method of reducing the amount of data used to store content. Given that most web content is already served in a compressed format you may not see too much of a difference in data usage or may see a degradation in the quality of images.

Opera’s data saving mode does not act as a VPN by securely hiding your IP address or online activities. The feature can, however, affect some location services and some privacy concerns are reasonable, as the feature could allow Opera to track your online activity.

To enable data saving mode, you need to go into Opera’s in-app settings. To be able to access the settings, tap the Opera icon in the bottom-right corner of the app.

Tap the Opera icon in the bottom-right corner of the app.

Next, tap “Settings” at the bottom of the popup pane to open the in-app settings.

Tap “Settings” to open the in-app settings.

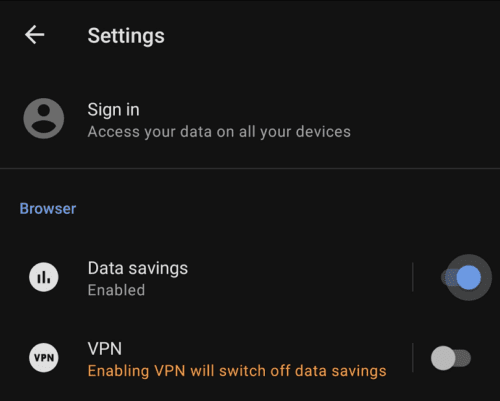
In the settings, “Data savings” is the topmost option. Tap the slider to the “On” position to enable data saving mode.

Tip: Opera’s data saving mode is incompatible with VPNs; a warning will be shown for the VPN built into the browser when the data saving mode is active. your mileage may vary but it’s not recommended that you use the data saving mode with any third-party VPNs.

Tap the “Data savings” slider to toggle the mode on and off.

If you tap anywhere else on the “Data savings” label, you’ll open a details page. This page provides some extra details about what the mode does. The page also shows a graph at the top that shows how much data you’ve saved. On this page, you can also select the quality of images, although this option is only available if the data saving mode is enabled.

Tapping on the “Data savings” label will open up a page providing extra details and allow you to configure an image quality setting.

Categories: Android | Internet

Author Mel Hawthorne

You Might Also Like

  • Google Maps Header

    How to Save Locations in Google Maps for Android

    Kat ArmstrongAndroid
  • How to Stream Disney+ From Your Samsung Tablet

    MonaAndroid
  • Ecosia for Android: How to Clear Your Browsing Data

    Mel HawthorneAndroid
  • facebook-hide-event-responses

    Facebook: How to Change Privacy Settings for Certain Posts

    Judy SanhzAndroid

Leave a Reply

Your email address will not be published. Required fields are marked *

  • clipchamp unexpected application error

    Clipchamp Unexpected Application Error: Here’s the Solution 

  • winload.efi file missing error

    Winload.EFI File Missing Error on Boot – How to Fix

  • fix error 0x9cfc7550

    How to Fix Error 0x9cfc7550 (We Couldn’t Create a New Partition) in Windows 

  • fix error code 0x3000008 1

    How to Fix Error Code 0x3000008 for Remote Desktop Connection

  • fix error code 0x80190001 1

    How to Quickly Fix Error 0x80190001 for Microsoft or Outlook Account Login 

profile pic

The Experts Behind Technipages

My name is Mitch Bartlett. I've been working in technology for over 20 years in a wide range of tech jobs from Tech Support to Software Testing. I started this site as a technical guide for myself and it has grown into what I hope is a useful reference for all.

Learn More

technipages logo white
linkedin icon

Technipages is part of Guiding Tech Media, a leading digital media publisher focused on helping people figure out technology. Learn more about our mission and team here.

© 2025 Guiding Tech Media All Rights Reserved

  • About Us
  • Contact
  • Terms of Use
  • Privacy Policy

© 2025 Guiding Tech Media All Rights Reserved

Information from your device can be used to personalize your ad experience.
Do not sell my personal information.

Last Updated on August 28, 2020 by Mitch Bartlett