
It happened to pretty much everyone. You’ve spent hours writing an important work document, only to have Word outright fail to save it on your PC. Or even worse, if you click on “Save,” the document goes somewhere but you can’t find it.
Here are some of the common fixes you can try if you experience Microsoft Word not saving files properly.
Contents
Fixes 1-4: Quick Fixes if Your Document Is Still Open
If you encounter the Word file not saving properly, chances are the program itself is still open. Try some of these fixes:
1. Use the “Save As” option to offload the file onto a different folder and under a different name.
2. Similarly, change the file extension. The “docx” is standard for modern Word versions, and shared files might have legacy extensions.
3. Check if the file is open on another PC (only applies if you’re using AutoSave via OneDrive).
4. If you’re using Microsoft 365, check if you have an internet connection, as the online version won’t save locally by default. Additionally, check if your subscription plan has expired. You’ll need to renew it if you want to save the file online.
If Word still continues to throw errors, or you’re trying to fix more sporadic issues, try the fixes below.
Fix 5 – Ensure You Have Permissions to Save
There are two things to look for here: storage permissions and file permissions.
On the storage side, check the properties of the folder where you’re trying to save. The “Write” permission needs to be on.

On the file side, this boils down to if the shared file has editing permissions.
Step 1. Go to the “Review” tab.
Step 2. If editing restrictions are on, the “Block Authors” button will be available in the “Protect” section.
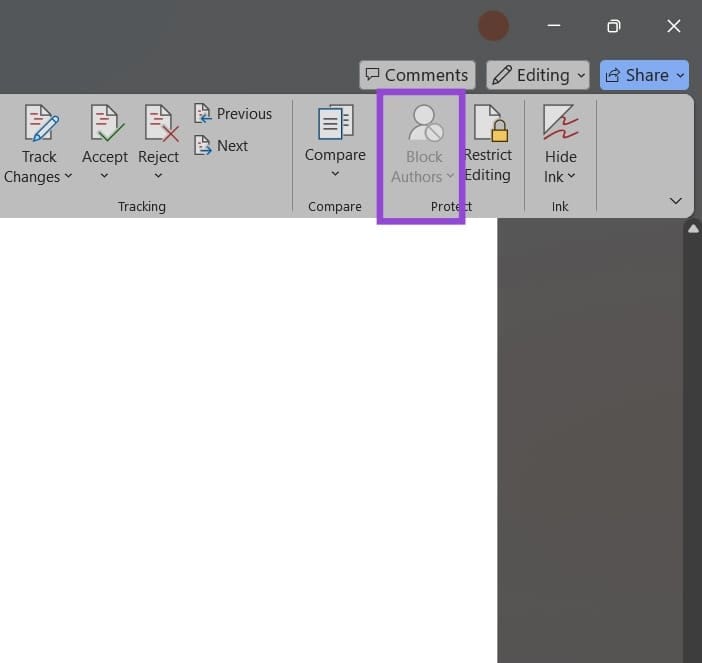
Step 3. If you can click on “Block Authors,” select it and choose “Release All of My Blocked Areas.”
Fix 6 – Change the Default Save Location to Exclude OneDrive
In Windows 11 and newer Word versions, the program will default to trying to save in OneDrive-enabled folders. This can make it easier to switch between devices. On the other hand, it can also mean that the files are technically not where you expect them to be. Word will try to save the file online, and then OneDrive will download it to your device. You can change this by editing the save location.
Step 1. Go to “File” and choose “Options.”
Step 2. In the “Save” tab, go to the “Default local file location” textbox and click on “Browse” next to it.
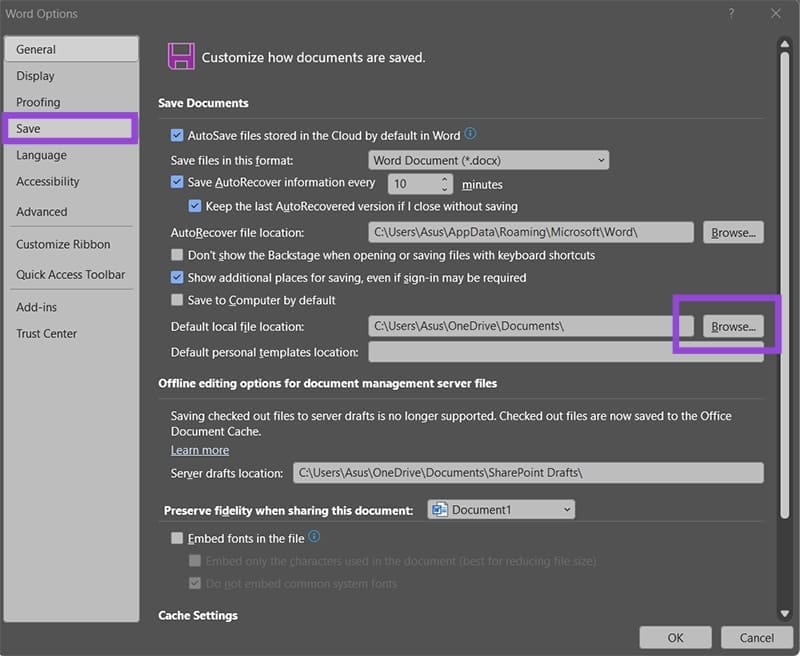
Step 3. Change the location to a different folder on your drive.
Step 4. Find the folder and right-click on it, then choose “Always keep on this device.”

If you’ve done this correctly, the option should have a checkmark later.
Fix 7 – Make Sure AutoSave Is On
If your issue is Microsoft Word not saving files as you type, then you need to check with the autosave settings on the program.
If you’re using an older version of Word, AutoRecover is the only option you might have, but it can generally be unreliable.
For Windows 2019 and later, the AutoSave option requires that you have an active Microsoft account that you’re logged into. If you don’t have an active connection, you won’t be able to turn it on.
Additionally, you can set up Word to autosave on the computer rather than the cloud.
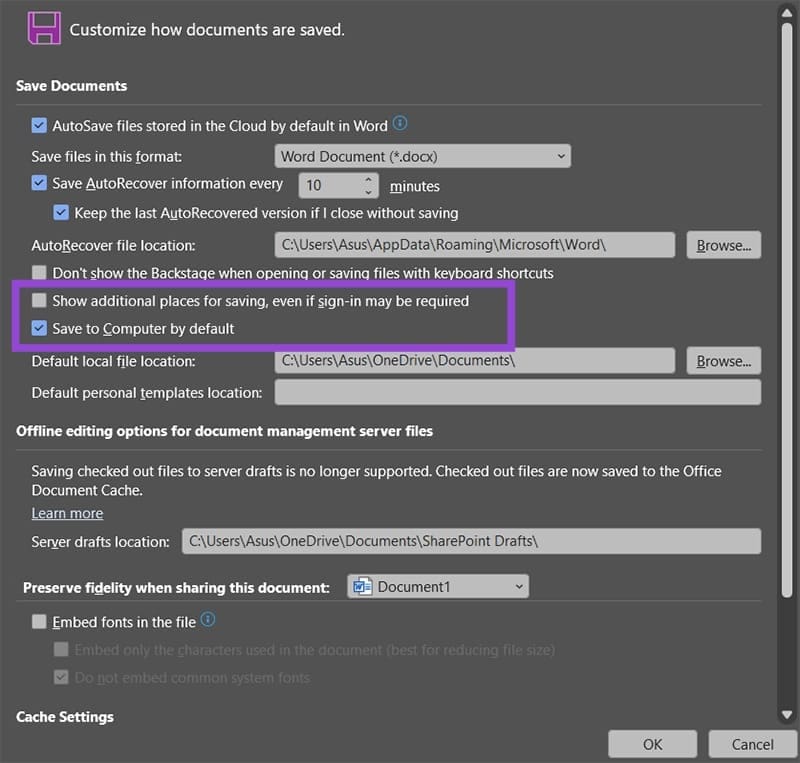
Step 1. Open Word Settings.
Step 2. In the “Save” tab, uncheck “Show additional places for saving” and check “Save to Computer by default.”
Fix 8 – Run Word in Safe Mode
Running Word in Safe Mode removes all add-ons which might be interfering with you saving the file.
Step 1. Open the Run dialog with “Windows + R.”
Step 2. Paste the following command and hit “Enter:”
winword /safe
Step 3. Paste the contents of the file you want to save.
Step 4. Save the file as usual.
Fix 9 – Remove the Normal Template
In some odd cases, if your Word template breaks and you use it to make the file, you might not be able to save files. You’ll need to remove the template and make a new one.
Step 1. Go to the “AppData” folder. You can do this by going to “Run” and entering “%AppData%” into the textbox, then clicking on “OK.”
Step 2. Go to “Roaming” then to “Microsoft.”
Step 3. Enter the “Templates” folder (not “Word”).
Step 4. Rename the “Normal” file into something else. You can also try to go with “Restore previous versions” to revert the file.

The next time you open Word, you’ll get a fresh “normal” template auto-created by the program.