When a section you’ve created in Microsoft Words is not long enough, it can easily get lost with all the other text. But that doesn’t need to happen. You can always add a page break to end a section. If you ever change your mind, you can always go back and erase it.
Contents
How to Add a Page Break in Microsoft Word
Once the Microsoft Word file opens, locate the area where you want to insert the page break and place the cursor there. Keep in mind that everything located to the cursor’s right will be a part of the new section. Once you’ve placed it in the right area, click on the insert tab at the top.
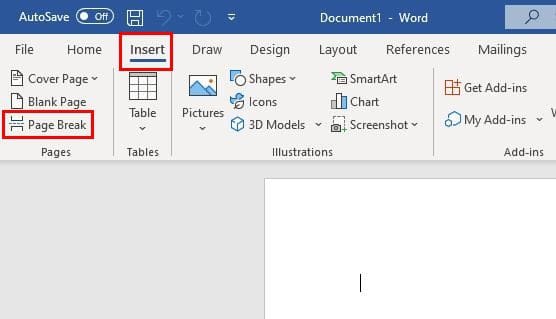
Click on the Page Break option to the left, and the text will separate automatically. That’s all there is to it when it comes to adding a page break in Microsoft Word. But what if you need to delete it? Keep reading to see how you can do that.
How to Find and Erase a Page Break in Microsoft Word
No need to worry if you realized that you weren’t supposed to put a page break there. You can find and erase them by following these steps. Click on the Home tab at the top and select the Show/Hide option. It’s the icon that looks like a backward P (paragraph icon).
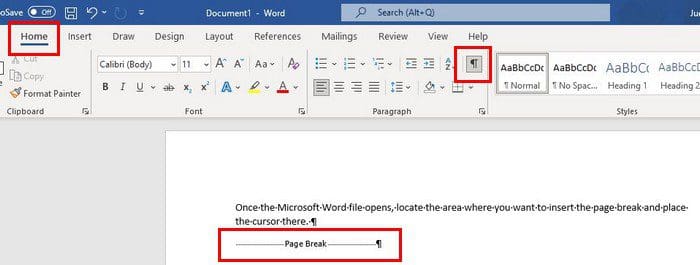
All the page breaks you entered will appear when you click on this icon, like in the image above. To erase it, simply Highlight the page break and press the delete key. You’ll also notice that the paragraph icon will still be there. To make it go away, click on the paragraph icon you clicked on before to find the page break in the first place.
Conclusion
As you can see, adding a page break in Microsoft Word is an easy task. You can add as many as you need, and erasing them is also easy. Simply look for the paragraph icon and erase it. How often do you use page breaks? Share your thoughts in the comments below, and don’t forget to share the article with others on social media.