• Skip to main content
  • Skip to primary sidebar

Technipages

Tutorials and fixes for smartphone, gadget, and computer problems

  • Topics
    • Android
    • Browsers
    • Gaming
    • Hardware
    • Internet
    • iPhone
    • Linux
    • macOS
    • Office
    • Reviews
    • Software
    • Windows
    • Definitions
  • Product Reviews
  • Downloads
  • About
Microsoft Teams: How to Lock Files

Microsoft Teams: How to Lock Files

January 21, 2021 by Madalina Dinita 1 Comment

If you want to restrict access to certain Microsoft Teams files, you can simply edit the access permissions in SharePoint or OneDrive. This will lock the respective files preventing users from editing them.

How to Lock Files in Microsoft Teams

Method 1 – Check Out the File

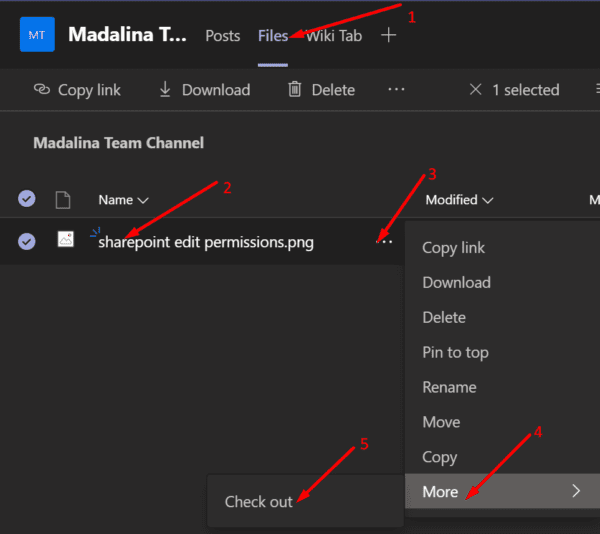
If you don’t want all the team members to edit the file, you can use the Check out option. As long as that file is checked out to you, no one else will be able to edit it.

  1. Open your Teams channel.
  2. Click on Files and hover your mouse cursor over the file you want to lock.
  3. Then click on More options → More.
  4. Select the Check Out option.

microsoft teams check out option

The respective file has been checked out to your account. In other words, you’re the only one who can edit it.

Method 2 – Create a Separate SharePoint Folder

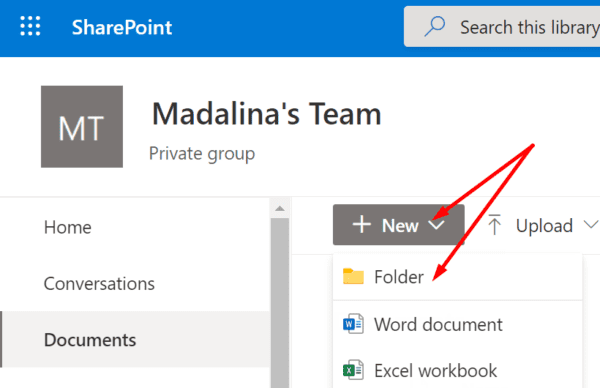
Another method to lock your Teams files consists of creating a separate folder in SharePoint. You can then store all the files you want to lock in that specific folder. In this manner, you can quickly manage the access permissions for all those files and lock them for certain user categories.

  1. Connect to SharePoint and click on New → Folder.sharepoint new folder
  2. Let’s name this folder ‘Locked Files‘. Of course, you can name it whatever you want.
  3. Select the folder you just created and click on the three dots.
  4. Then click on Manage access. Here comes the most important part.sharepoint manage access
  5. To lock those files for a specific user category, use the down-arrow and select Can view.

lock files sharepoint

Simply put, the respective user category can only view the files. They cannot edit them, nor share them.

Method 3 – Edit SharePoint User Permissions

⇒ Note: If your Teams account is managed by an organization, contact your IT department. Most likely, you’re not authorized to edit SharePoint settings.

  1. Login to SharePoint.
  2. Then select Site permissions.
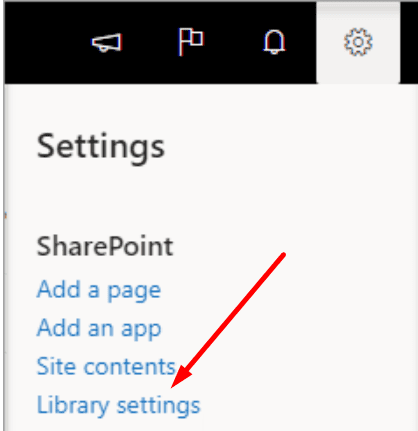
  3. Click on Documents and then click on the gear icon.
  4. Go to Library settings.sharepoint library settings
  5. Locate Permissions and Management.
  6. Then select Permissions for this document library.
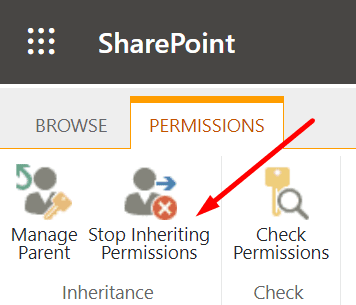
  7. Select Members group and Stop Inheriting Permissions.sharepoint stop inheriting permissions
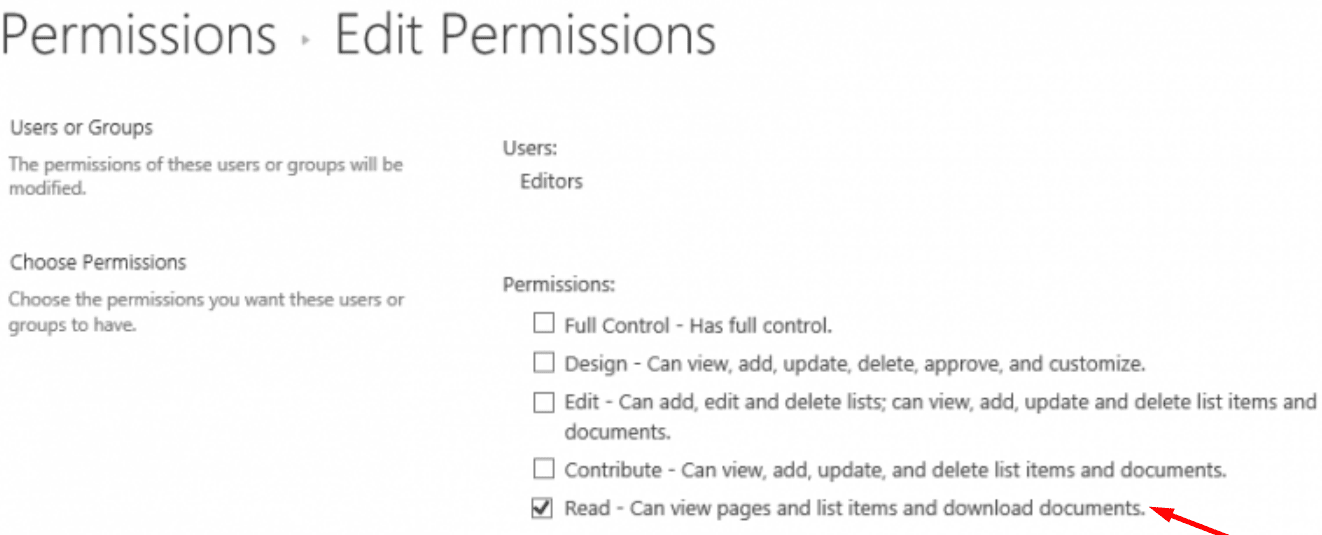
  8. Now, select Edit User Permissions and change the permission type from Edit to Read. Save the changes.
There you have three quick ways to lock your files on Microsoft Teams.

You Might Also Like

  • Microsoft Teams: How to Organize Your Files
    Microsoft Teams: How to Organize Your Files
  • Fix Microsoft Teams Not Downloading Files
    Fix Microsoft Teams Not Downloading Files
  • Microsoft Teams: Cannot Create New Folder in Files
    Microsoft Teams: Cannot Create New Folder in Files
  • Fix: Microsoft Teams Cannot Open Files in Desktop App
    Fix: Microsoft Teams Cannot Open Files in Desktop App
  • Microsoft Teams: Prevent Users from Deleting Files
    Microsoft Teams: Prevent Users from Deleting Files
  • How to Easily Move Files in Seconds - Microsoft Office App
    How to Easily Move Files in Seconds - Microsoft Office App

Filed Under: Software Tagged With: Microsoft Teams

Reader Interactions

Comments

  1. Kat says

    October 19, 2021 at 12:58 pm

    Want to have owners in a team with different access to certain channels (some channels are owned by different groups, each group is to own their own files but not all owners should be able to edit all files)

    Team (has multiple owners) x, y, z
    Channel (has multiple folder with multiple files) A B C D

    Channel A
    (owner Z should have full access. Owner X and Y should have read only access)
    Channel B
    (owner Y should have full access. Owner Z and X should have read only access)

Did this help? Let us know!

Your email address will not be published. Required fields are marked *

This site uses Akismet to reduce spam. Learn how your comment data is processed.

Primary Sidebar

Recent Posts

  • How to Print Labels from Excel Using MS Word Mail Merge
  • What Is NVMe Over TCP (NVMe/TCP)
  • Android Mobile Hotspot: How to Change the Password and Name
  • Windows 10: How to Force Quit and App
  • What is Dumpster Diving?
  • How to Download iOS 16 Beta 3 on iPhone or iPad
  • What is a Security Compromise?
  • Mastodon: How to DM Someone

Who’s Behind Technipages?

Baby and Daddy My name is Mitch Bartlett. I've been working in technology for over 20 years in a wide range of tech jobs from Tech Support to Software Testing. I started this site as a technical guide for myself and it has grown into what I hope is a useful reference for all.

You May Also Like

  • Microsoft
  • Microsoft Windows NT
  • Microsoft Windows
  • Microsoft Word
  • Microsoft Windows 95
  • Microsoft Internet Explorer
  • Best Microsoft Surface Products 2022

© Copyright 2023 Guiding Tech Media · All Rights Reserved · Privacy