

Have you ever wanted to customise the look of your web browser? Themes for Google Chrome can be used to do exactly that. The Chrome Theme Store may have a huge range of options, from space themes to cars and beautiful landscapes, but what if none of those options are quite what you want, or if you want to customise Chrome to have one of your own photos as a background instead? Well, luckily you can do just that.
There are two methods of creating your own theme. Chrome has a simple built-in function that allows you to import a background image for the new tab page and customise the colour scheme of the user interface from a number of presets. If the built-in Chrome feature doesn’t have the amount of customisation options that you want, a website called ThemeBeta has you covered, with a feature-rich, yet easy to use Chrome theme creator, (although the installation process is a little more complex). In this article, we’ll walk you through the process of creating your own Chrome theme with both tools.
The simple built-in Chrome tool
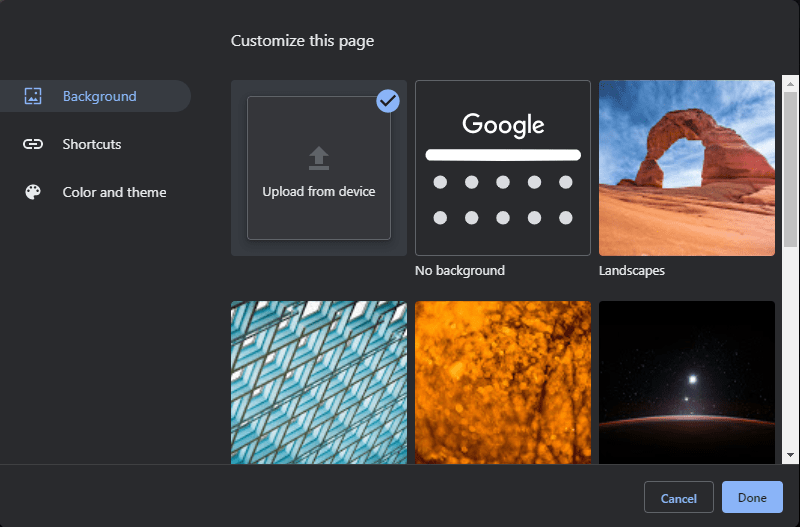
To use the built-in Chrome theme editor, open a new tab. In the bottom right corner of the new tab page is a pencil icon, click on this to customise your Chrome’s appearance.

In the pop-up window that appears once you’ve clicked the pencil icon, your first option is to configure the background picture. Here you can choose between a very limited number of preset options, or you can upload your own image. This background picture will only apply to the new tab page, it won’t become a background on any actual websites.
Once you’ve selected a background image, move to the “Color and theme” tab. Here you can choose from a selection of colour combinations. These colour options affect the colours of the tab and the search and bookmark bars that form the Chrome user interface. In other words, on most sites you visit, these colours will be more noticeable than your background picture just because the top bar of the browser will always be this colour!
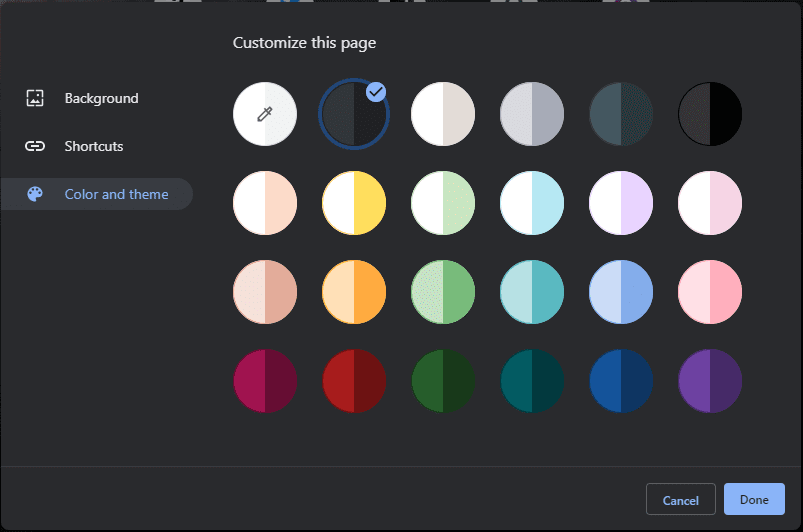
If none of the preset colour schemes are quite what you want, the top left colour option allows you to choose your own colour scheme, with a full spectrum of colour options to choose from. To select a colour, first, click on the top left symbol, then use the popup that appears to pick your colour. Adjust the crosshairs in the colour spectrum to get your shade and the black arrow on the right of the window to choose the brightness of the tone. If you’re not sure how this works – the further up or down you move the black arrow, the lighter or darker your colour gets. For more intense shades set the crosshair near the top and the arrow in the middle. For paler colours, move the crosshairs a little lower and the arrow up.
Once you’ve selected the colour you want, click “Add to custom colours” in the bottom right. Next, select your custom colour from the “Custom colours” list on the bottom left, and then click “OK” to apply. If you’re choosing a custom colour scheme, you can only pick one colour, Chrome will pick a second similar colour to complete the theme with what it thinks will fit best.
Tip: Chrome almost always assumes that the colour you chose is the darker of the two theme colours, and will pick a lighter second shade. Pick accordingly!

Once you’re happy with your background picture and colour set, click “Done” to save your custom theme, and you’re ready to go!
Third-party themes made simple
If you want a simple theme, then the Chrome built-in tool should suffice, but if you want more individuality, ThemeBeta offers more control. The website allows you to manually modify the colours for foreground and background tabs, the text in the tab bars, and more.
First of all, you need to browse to ThemeBeta’s website. You can browse user-submitted themes on their homepage, or you can go straight to their theme creator page to get started with your own. The first step once you’re in the theme creator is to choose a background image. Click “1. Upload an Image” and then upload an image from your hard-drive. This picture will be the basis of your theme and will be the background image on the new tab page.
Tip: Any image you upload must be in either a PNG or JPG file format, as these are the only formats supported. Use an online converter if your image is something different.
If the image that you’ve uploaded doesn’t quite look right, it might be too zoomed in or have bars at the sides or top – then you should try changing the “Background image” options. Respectively, they configure horizontal alignment, vertical alignment, if the image repeats if it is too small for the screen, how the image is scaled to fit the screen, and a manual scaling adjustment. Test the options out until you find something you are happy with!

Once your image is uploaded, the preview on the right-hand side of the page will update to represent what your theme will look like. The second step is to click “2. Generate Colors”, this button will use the colours present in the picture you uploaded, to create a palate of similar colours to use on the rest of the user interface.
If the automatically generated colour scheme suits the look you want, you can skip ahead here to the installation instructions. But if you want to manually configure the colours of things like foreground tabs, background tabs and the toolbar, the details are covered in the advanced configuration section below.
Advanced configuration
There are two tabs of advanced configuration options available in the top left, the first is “Images”. Here you can configure a background image for certain elements. When you mouse-over each of the options, it will highlight the element that that setting would modify in the preview in red.
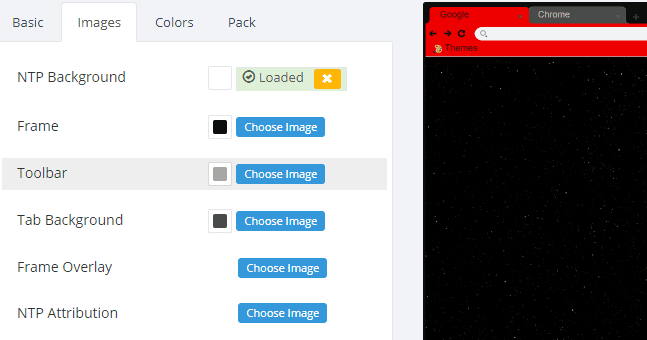
Tip: NTP stands for “New Tab Page”, options starting with this acronym are only present on the new tab page, others are visible on other pages.
- “NTP Background” configures the main background, if you imported an image earlier this will already be “Loaded”.
- “Frame” configures the user interface excluding the tab list, search bar and bookmarks bar.
- “Toolbar” configures the active tab, the bookmarks bar and the area surrounding the search bar.
- “Tab Background” configures the background colour for non-active tabs.
- “Frame overlay” allows you to configure a second image that overlays the image in “Frame”.
- “NTP Attribution” adds an image to the bottom left corner of the new tab page, generally for watermark purposes.
Tip: If you’ve uploaded an image and don’t like how it looks, you can remove it by clicking the “X” button next to the relevant “Loaded” marker. If uploading an image changed the background colour for that element you can either set it back manually or click “Generate Colors” in the “Basic” tab again to reset the colour scheme.
The second advanced tab is titled “Colors”. Here – as with the options on the previous page that had a box next to them – you can use the box to open a colour picker and pick a solid colour for the respective elements. Once again, if you mouse over the configuration option, it will highlight the affected element in the preview in red.

- “Toolbar” configures the background colour of the ThemeBeta attribution label in the bottom left of the new tab page.
- “Tab Text” configures the colour of the text in the currently active tab in the tab list. It also sets the colour of the ThemeBeta attribution text in the bottom left corner of the new tab page.
- “Background Tab Text” configures the colour of the text in the inactive tabs in the tab list.
- “Bookmark Text” configures the colour of the text of items in the bookmarks bar.
- “NTP Text” configures the colour of the text or the recommended/regular page links in the centre of the page.
- “NTP Link” doesn’t have any effect.
- “Control Buttons” configures the colour of the minimise, maximise and close buttons in the top right corner.
- “Buttons” configures the colour of the forwards, backwards, reload and home buttons.
Once you’ve configured all of the advanced options the way you want them, you’re ready to proceed to the installation process.
Installation of a third-party theme
For security reasons, Google now only allows extensions and themes to be installed through the Chrome Webstore. To install your custom theme, you will need to enable a developer feature. Unfortunately, this change means the simple “Pack and Install” button on both the “Basic” tab and the “Pack” tab no longer work. If you try the “Pack and Install” method, you’ll get an error message.

To get around this, go to the “Pack” tab and click “Pack and Download Zip file”

Once the zip file is downloaded, extract the files and save them to your hard drive. Double-click on the file you’ve downloaded and select Extract at the top of your file viewer. You’ll have to select where to extract your files to. Remember where you save them so you can upload them again more easily.
Tip: If you rename the folder to indicate what the theme is, it may be easier to find it again in the future, if you ever want to reuse it.

The next step is the Chrome extensions page. You can access it by clicking the three dots in the top right corner, under “More tools”, then “Extensions”, or you can click here.

Once you’re in the extensions menu, in the top right corner of the page, there is a slider marked “Developer mode”. Enable it. Once the developer mode is enabled, three buttons should appear in the top left corner. The one you need is “Load unpacked”. Click “Load unpacked” and import the folder you extracted from the zip file earlier.

Tip: You want to import the parent folder, not the “images” folder it contains. If you didn’t rename it earlier, it will be named something like “theme1234567890”
Once the theme has imported, an alert will appear in the current tab, confirming that the theme was installed and offering an undo button. Before you close this alert, open a new tab and ensure everything looks as you wanted it to.

If your theme didn’t turn out quite the way you’d hoped, click “Undo” and try modifying your template again. Once you are happy with the results, feel free to close the “Extensions” page and continue browsing with your shiny new custom Chrome theme.


I can’t open the zip file for some reason as it says that the file is invalid
The option has been removed by Chrome..