
One of the ways you can make the most of the pixels on your screen is to tile multiple windows next to each other. Tiling windows is a feature that helps you place windows so their edges touch the edges of the screen and each other rather than just placing a window roughly near the edge of the screen.
This approach lets you make the best use of your screen space and allows you to place two windows side by side, or stacked vertically on top of each other. Alternatively, you can tile up to four windows to take up a quarter of your screen from one of the corners. This also works if you want to tile three windows, one in each of the left corners and one taking up the right half of the monitor for example.
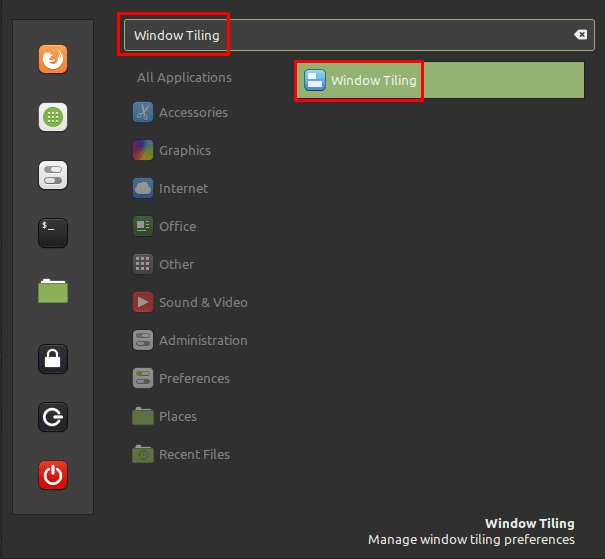
By default, window tiling is enabled in Linux Mint, you can, however, choose to configure the tiling options or to disable the feature entirely. To do so, press the Super key, then type “Window Tiling” and hit enter.
Tip: The “Super” key is the name that many Linux distributions use to refer to the Windows key or the Apple “Command” key, while avoiding any risk of trademark issues.
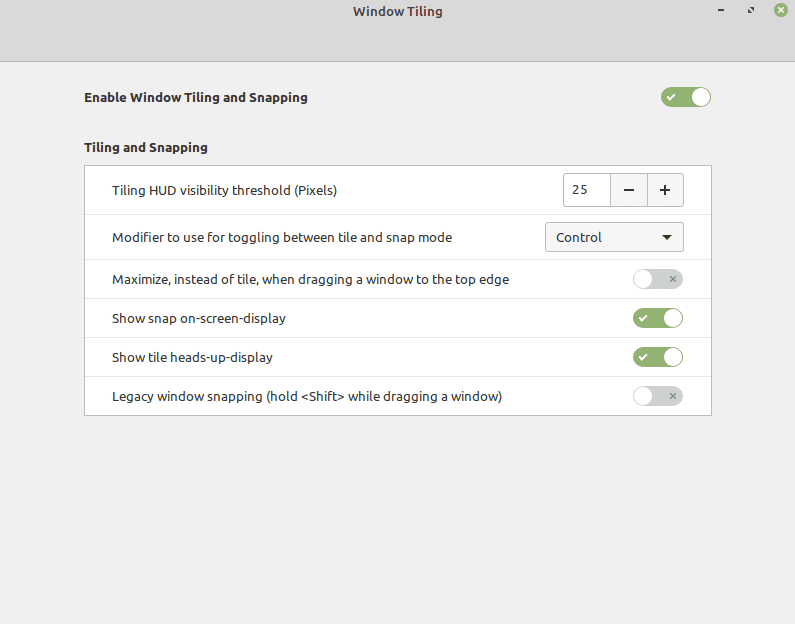
If you want to completely disable window tiling you can do so by clicking the top-most slider, labelled “Enable Window Tiling and Snapping”, to the “Off” position.
The first main option “Tiling HUD visibility threshold (Pixels)” allows you to configure how wide the green indicators on the edge of the screen are that show how the window that you’re clicking and dragging will be tiled.
“Modifier to use for toggling between tile and snap mode” allows you to choose what hotkey, if any, you want to use to switch from tiling a window to snapping it. You can use the dropdown box to choose between Control, Shift, Alt, Super, and disabling the snap mode feature. Snap mode changes how tiling works and makes maximised windows aware of the snapped window. When you hold the Ctrl key, as you tile a window, it is instead snapped, any maximised window will be pushed out of and then avoid occupying the same space.
For example, if you have a window maximised, and tile a window in the top-left corner, the maximised window doesn’t change. If you snap the window in the top-left corner, rather than tiling it, then the maximised window, and any future maximised windows, will fill the bottom half of the screen. Full-screened content like a video will still take up the whole screen.
By default, when you drag a window to the top of the screen it will try to tile to the top half of the screen, if you try to move your mouse a bit further, it will switch to maximising. You can prevent it from offering to tile to the top half of the screen by enabling the setting “Maximize, instead of tile, when dragging a window to the top edge”.
“Show Snap on-screen-display”, shows a reminder of the snap mode hotkey, when you hold a window in a snap location for a second. “Show tile heads-up-display”, doesn’t appear to be a functional setting as disabling it doesn’t change anything, although this may be a bug in the tested version of Linux Mint.
The “Legacy window snapping (hold <Shift> while dragging a window)” option enables a legacy version of window snapping where you simply snapped the window to an arbitrary grid on the screen. In testing, this setting was extremely laggy and glitchy. When combined with the legacy status of this feature, we recommend you keep this specific setting disabled.
NOT in Mint Mate 20.1
and two separate config apps have different & overlapping settings
and NO snap setting except ON/OFF
Bulldrip.
The tiling gui doesn’t work at all. and the gsettings set org.cinnamon.muffin edge-tiling false works for about 30 seconds, then moving around a window makes the dmd thing snap fullscheen again.
Getting tired of idiotware that goes out of its way to be obnoxious. I want stuff that works, not stuff that picks a fight with me while I try to get work done.
Hi Mitch
this don’t work in mint mate… for some reason … under window under “Window Snaping” there is only a check box for “Enable Window Tiling” … Might give it a mention when if I get a chance … and or there isn’t a quick work around ..
cheers!