• Skip to main content
  • Skip to primary sidebar

Technipages

Tutorials and fixes for smartphone, gadget, and computer problems

  • Topics
    • Android
    • Browsers
    • Gaming
    • Hardware
    • Internet
    • iPhone
    • Linux
    • macOS
    • Office
    • Reviews
    • Software
    • Windows
    • Definitions
  • Product Reviews
  • Downloads
  • About
iPhone: How to Make Custom Music Ringtones Using iTunes

iPhone: How to Make Custom Music Ringtones Using iTunes

October 16, 2018 by Morgan Lange 7 Comments

When trying to get ringtones for your Apple iPhone, you have a few different options. You could purchase ringtones from within iTunes, or you can create ringtones from your existing music library using these steps.

Note: These steps will only work for music purchased from the iTunes Store. You can check if an item was purchased by right-clicking the top sort bar and checking the Kind option. Items will show as “Purchased” or “Protected” if they were purchased via iTunes.

  1. From within iTunes, go to “Edit” > “Preferences” > “Import Settings“.
  2. Ensure the “Import Using” setting is set to “AAC Encoder“.
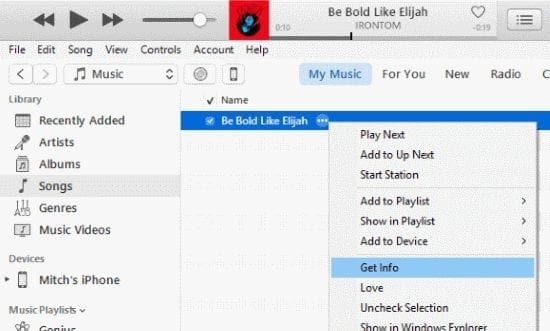
  3. Go to your music library, right-click/ctrl-click the song you wish to use for a ringtone, then select “Get Info“.
    iTunes 12 Get Info Selection
  4. Under the “Options” tab, check the “Start Time” and “Stop Time” boxes, then set the song up to play at a 30 seconds or less interval. In this example, I’ve stopped it at 30 seconds (0:30). Click “OK‘ when finished.
    iTunes 12 Set Song Stop
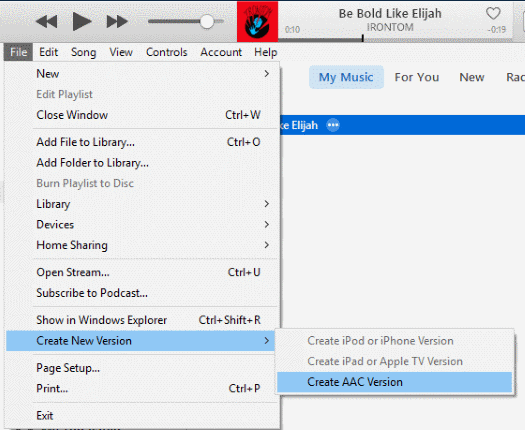
  5. While the song is still highlighted in iTunes, select “File” > “Create New Version” > “Create AAC Version“.
    iTunes 12 Create AAC Version
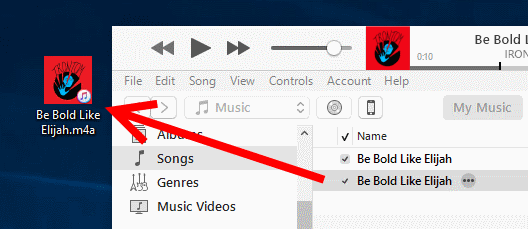
  6. A new 30 second version of the song is created in iTunes. Drag and drop this file to your desktop.
    iTunes 12 Drag Song to Desktop
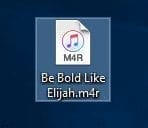
  7. Right-click the file on your desktop and rename it with a .m4r extension.
    Song Renamed with M4R Extension
  8. Connect your iPhone to your computer.
  9. In iTunes, select the icon for your device, then open the “Tones” option under the “On My Device” section.
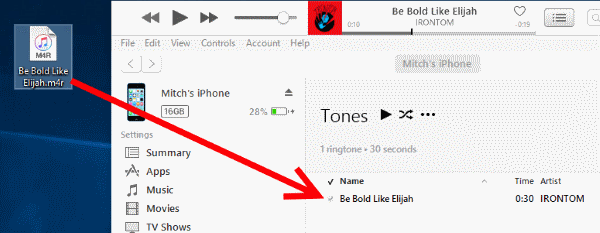
  10. Drag the music file we re-named in step 7 to the “Tones” folder in iTunes.
    Drag Ringtone to iTunes
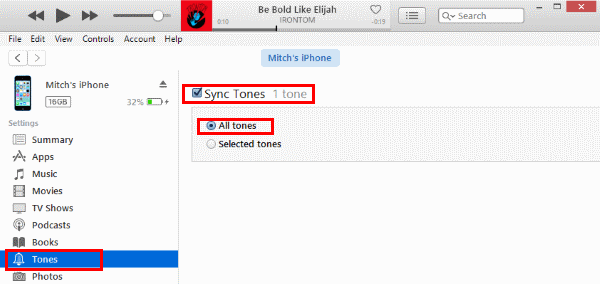
  11. Select the “Tones” option in the “Settings” section and ensure the “Sync Tones” is checked.
    iTunes Sync Tones Selection
  12. Press the “Sync” button to sync iTunes with your iPhone.
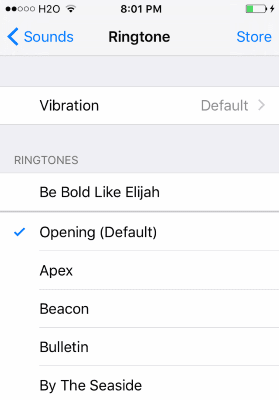
  13. After syncing your device, the song is now available to select as an iPhone ringtone under “Settings” > “Sounds” > “Ringtone“.
    iOS Select Ringtone


Once you’re done with all this, be sure to right-click the song we originally used, choose “Get Info” and set the interval back to normal under the “Options” tab.

These steps work for iTunes for Windows, Linux, and MacOS on your computer and all versions of iOS for your iPhone.

You Might Also Like

  • How to Transfer Music from Computer to iPhone, iPad, or iPod Using iTunes
    How to Transfer Music from Computer to iPhone, iPad, or iPod…
  • Galaxy S10e: How to Add and Set Custom Ringtones
    Galaxy S10e: How to Add and Set Custom Ringtones
  • How to Organize Your iTunes Music Library
    How to Organize Your iTunes Music Library
  • Set iTunes as Default Music Player
    Set iTunes as Default Music Player
  • iTunes: How to Shuffle or Repeat Music
    iTunes: How to Shuffle or Repeat Music
  • How to Show or Hide iCloud Music in iTunes
    How to Show or Hide iCloud Music in iTunes

Filed Under: iPhone

Reader Interactions

Comments

  1. Kimi says

    March 1, 2019 at 2:35 am

    I can’t add the 30 second version to the ‘Tones’ list. I thought it was working up until that step. MEH :/

  2. Rene says

    February 14, 2019 at 1:48 am

    This used to work but it doesn’t on the newest version of iTunes. Please find a way to work around the latest version. I have a couple of songs that I desperately want to make into ringtones but you can no longer change the file type.

  3. Ben says

    April 15, 2018 at 5:39 pm

    I liked it

  4. Terry says

    December 31, 2016 at 4:58 am

    Did not work
    Everything grayed out

  5. Jay says

    August 24, 2016 at 2:59 pm

    Can you post an update as the new version of iTunes this is different.

  6. Nevonline says

    June 20, 2016 at 5:52 am

    This helped me.

  7. Hari says

    May 20, 2016 at 7:47 pm

    Usefull

Did this help? Let us know!

Your email address will not be published. Required fields are marked *

This site uses Akismet to reduce spam. Learn how your comment data is processed.

Primary Sidebar

Recent Posts

  • Microsoft Edge Collections: What It is and How to Use It
  • YouTube Premium: How to Disable/Enable Background Playback
  • How to Update Apps on iPad (iPadOS 16.3.1)
  • How to Fix Outlook Rules Are Not Supported for This Account
  • How to Stop Windows 11 Updates
  • How to Change the Themes on Windows 11
  • How to Use Goal Seek in Excel (With Real-Life Examples)
  • How to Use MiniTool MovieMaker for Stellar Video Editing

Who’s Behind Technipages?

Baby and Daddy My name is Mitch Bartlett. I've been working in technology for over 20 years in a wide range of tech jobs from Tech Support to Software Testing. I started this site as a technical guide for myself and it has grown into what I hope is a useful reference for all.

© Copyright 2023 Guiding Tech Media · All Rights Reserved · Privacy