OneDrive is a fantastic cloud-based solution for storing and accessing your files from wherever in the world you may find yourself. But you may also find yourself in a place with limited connectivity or want to keep the document you’re currently editing stored on the machine you’re using, rather than in the cloud.
Thankfully, you can stop Word from saving to OneDrive automatically. The process is not only possible but very straightforward. In fact, you can do this with all Office programs in general. This article will be your guide.
Contents
Many Ways to Stop Word From Saving to OneDrive
Just as with most problems on Windows, there are a few possible solutions. We’ll be covering a few ways to stop automatic OneDrive saving below. One is bound to work for you:
Disable the Autosave Ribbon
If you’re editing a file from OneDrive itself, then you’ll have the Autosave ribbon at the top of your Word document. To disable this feature, simply drag the Autosave slider to “Off.” You’ll have to manually save your OneDrive file, but you won’t find any unexpected changes to the document if someone else manages to access it.
Disable Automatic Saving in Word
Probably the best place to begin is at the source itself. To disable automatic saving to OneDrive in Word, here’s what to do:
1. Open Word and then the “File” tab.
2. Navigate down to “Options” in the sidebar.
3. In the Options window that pops up, navigate to the “Save” tab.
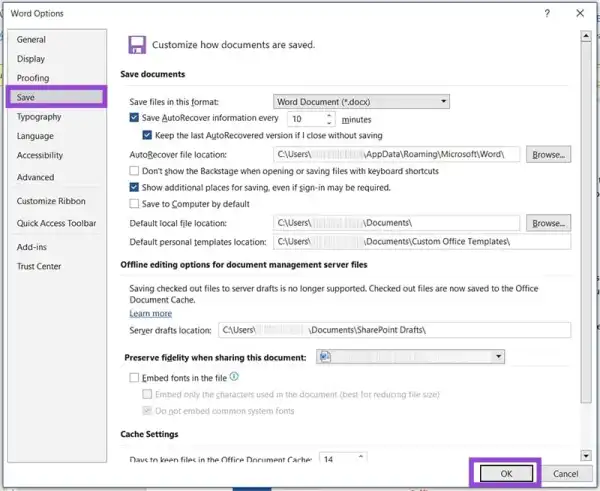
4. Uncheck “Autosave OneDrive and SharePoint Online files by default in Word.”
5. Click “OK” to implement the changes. You’ll also have to restart Word.
Block OneDrive From Word
If you really don’t want to deal with OneDrive, then you can always block Word’s ability to connect to it. Here’s what to do:
1. In Word, open the “File” tab.
2. Click on “Account” from the sidebar.

3. Hit the “Manage Settings” button under “Account Privacy.”
4. In the “Privacy Settings” window that pops up, scroll down to “All connected experiences” and uncheck “Turn on all connected experiences.”
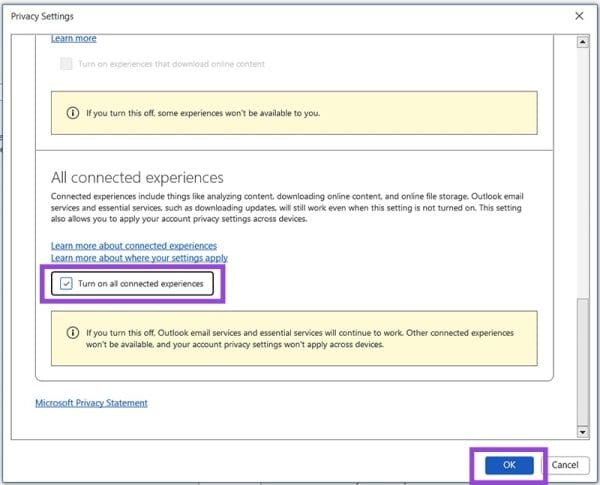
5. Click “OK” when done. You’ll be required to restart Word for the changes to take effect.
This solution is perfect for users who want a more permanent way to disable OneDrive connectivity. The same approach works in all other Microsoft Office programs. If, however, you want to keep the option to save to OneDrive open, you can disable automatic saving via your OneDrive settings.
Disable Automatic Saving via OneDrive Settings
To stop Word and other programs from saving to OneDrive automatically by default, you can disable the process via Settings. Here’s what to do:
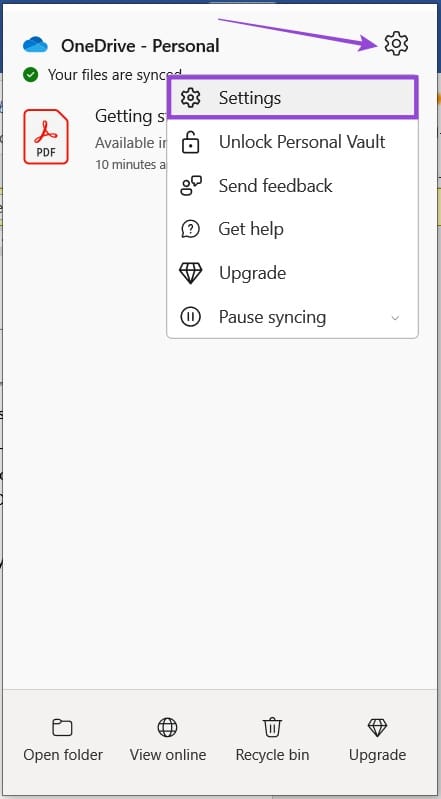
1. Open OneDrive from your system tray.
2. Click the Settings icon in the top right corner.
3. Click the “Manage backup” and “Sync and backup.”
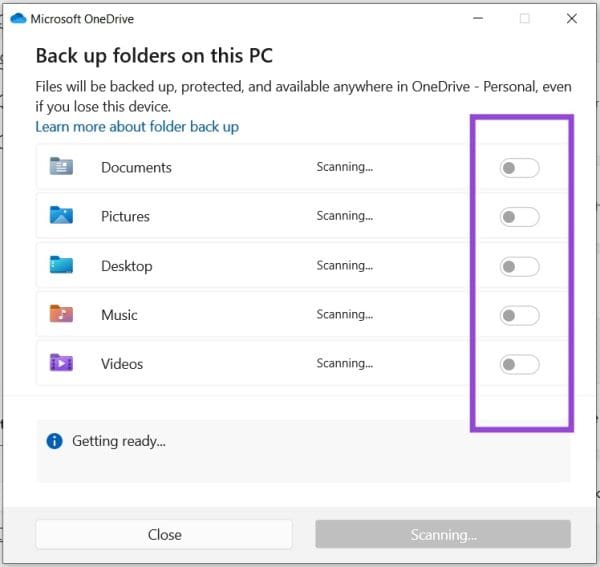
4. Uncheck all backup options by dragging sliders to “Off.”
Bonus: Turning Off Autosave in Word
If you’re more bothered by the Autosave feature itself than the location it’s saving the document to, then you can disable the feature itself in Word. Here’s what you need to do:
1. Open the “File” tab in Word and navigate down to “Options” in the sidebar.
2. In the Options window, click “Save” in the sidebar.
3. Uncheck the “Save Autorecover Information” and click “OK.”
4. You’ll have to restart Word for changes to take effect.
Without Autosave, you’ll have to manually save documents or risk losing any unsaved changes or works in progress.