Whether you’re socially distanced lovers trying out a virtual date, a group of college students connecting for an assignment, or fixing an issue or programming bug, there are several reasons why people share screens with others. While sharing a screen on iMessages for Mac devices may appear straightforward, sharing the screen in iPhone messages is not quite easy.
The good news is, with the help of some third-party apps, screen sharing via iPhone is not as impossible as it used to appear.
Contents
Screensharing via iOS iMessages is as simple as logging into your messages app and inviting the other party to a screen share.
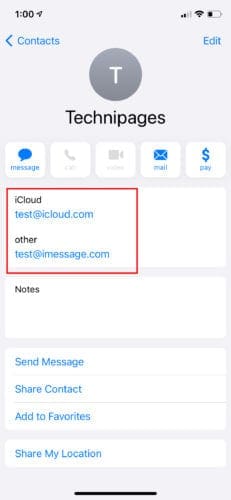
To avoid potential errors when you share your screen, check to see if the other person you want to share your screen with is signed into iCloud. They should use the same ID with which they signed into messages.
If this doesn’t work, try creating a contact card for that person if you don’t already have one.
- Go to phone contacts.
- Tap on the person’s contact card and check to see if it contains the two Apple IDs.
- If the ID they used to sign in to iMessage and the login ID they use to access iCloud is both there, then you can try your screen share.
- If not, just copy and paste both of these IDs there.
Sharing Screens
iOS Messages and Mac iMessages are cousins. While both apps work similarly, Mac has an extra feature that iOS lacks: a screen sharing feature. Below are steps on how to work around this and screen share in iPhone iMessage. Before you start, make sure you have a Lightning cable.
- Log into your iMessage app. At the top righthand corner, hover over the icon that looks like two stacked files. Hovering over it will display two options: Invite to Share My Screen and Ask to Share Screen. Click on Invite to Share My Screen.
- Use the lightning cable to connect your iPhone to your Apple Laptop.
- Click on the Quick Time Player App on your Apple Laptop and select the file option at the top. QuickTime can be found in the apps folder or dock.
- Clicking on the file will display a drop-down menu with options like Movie, Audio, and Screen Recording. Select New Screen Recording.

- This will display a new page with a round button in the middle. Tap on the arrow next to it.
- Your device name should appear under the camera. Select it to start sharing your screen.

When you are done sharing your screen, or you wish to stop viewing another person’s screen, navigate to the share screen icon in the menu bar:
- Select End Screen Sharing if you wish to stop sharing your screen.
- Choose Quit Screen Sharing if you wish to quit viewing someone’s screen.
When All Fails, Try Zoom
If iMessage is not an option for you, there are still other ways to share your iPhone screen using third-party applications. One such app is Zoom, a video conference application. Zoom is one of the most flexible and easy-to-use video conference applications out there. It also has a share screen option embedded in it. To share your iPhone screen via zoom:
- Make sure you both have the Zoom application installed. If that’s not the case, you can install Zoom from Apple App Store.
- After installation, log into the app by clicking on the icon. You should see the following labeled icons displayed on the screen: New Meeting, Join, Schedule, and Share Screen. Your camera doesn’t have to be on during the screen sharing process. You do not need your phone camera to share your screen.
- Once in, select New Meeting, an icon located at the top left corner of the app.
- If you have started a meeting, you can add participants by clicking on the icon labeled Participants. You can find this at the bottom of the screen.
- Select the person you want to share the screen with and click Invite.
- The invite button will give you several options on how to invite the participant. Select Send Email, Send Message, or copy URL. What matters is that you get the invitation to the other person.
- When the other party, or parties, accepts, select Share Content > Share Screen.

- Under the screen, if there are other options available, tap Zoom.
- Click on Start Recording — and hurray! You are good to go.
- If you wish to speak while sharing a screen, turn on the microphone.
- To quit screen sharing, click the clock on your screen, and you will receive a popup confirming your choice to stop screen sharing.


Conclusion
Screen sharing with an iPhone might be tricky, but it has been made easier with some apps. When sharing your screen, be careful with the information you are displaying in the background. Your safety is your responsibility. Share your screen with only people you trust. If there’s a problem you are trying to solve, and screen sharing won’t work, you can just record your screen and send it to the other person instead.