We need updates to keep our Windows PCs running and secure, but sometimes they don’t make things easy for us. Today, we’re looking at an error message you may get either when updating your PC or trying to sign into a Microsoft app, like Outlook, for instance.
In this article, we’ll be showing you how to fix error code 0x80190001 for update and sign-in trouble.
Contents
Fix Error Code 0x80190001 For Network Sign-In
We’re going to be taking a two-pronged approach to troubleshoot this error quickly. The first issue revolves around the error code popping up while trying to sign into anything Microsoft-related.
Check Your Internet Connection
The first fix is very simple: ensure that your internet connection is stable. If need be, restart your router or test your connection on another device. While you’re at it, disable your VPN temporarily and check your firewall settings. If you want a second option, you can also try a different internet connection to sign in.
Clear All Cached Credentials
Sometimes an erratic cache is the cause of sign-in issues. If dealing with error 0x80190001 for login, a great way to delete all cached information is through the Control Panel. Here’s how:
Step 1. Open Control Panel via the search bar.
Step 2. Click on “User Accounts.”
Step 3. Choose “Credential Manager.”
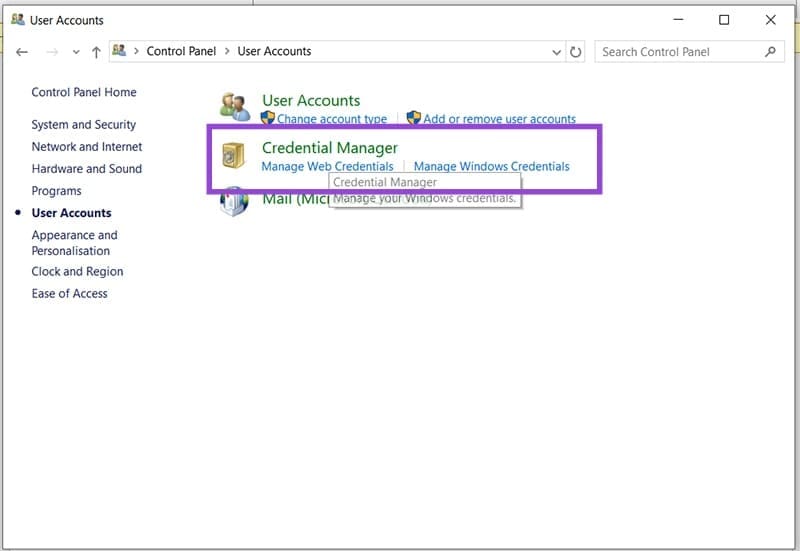
Step 4. In the next screen, click the “Windows Credentials” tab.

Step 5. Scroll down to the “Generic Credentials” section and click any credential related to Microsoft. Click the “Remove” option to delete it.

Step 6. Once done, restart your machine and try the sign-in again.
Flush DNS Cache
Another cache you should look at is your DNS cache, which stores a lot of site information, including domain names. To flush this:
Step 1. Open the Run Dialog (Win + R) and type in “cmd” before pressing (Ctrl + Shift + Enter) to run as Administrator.
Step 2. In Command Prompt, type “ipconfig /flushdns” and hit “Enter.”
Step 3. See if the problem is resolved.
Fix Error Code 0x80190001 For Updates
If you’re experiencing this problem whenever you update your PC, there are a few things to do:
Run the Update Troubleshooter
The Windows Troubleshooters are more helpful than many give them credit for. It’s a good first stop. To use the Update Troubleshooter:
Step 1. Open Settings (Win + I), click “System” in the sidebar, and navigate down to “Troubleshoot.”

Step 2. Then click “Other troubleshooters.”
Step 3. You’ll see “Windows Update” in the list. Click the “Run” button next to it, and the process should start.

Step 4. If the troubleshooter identifies any issues, it’ll try to fix them. Reboot your PC once done and try updating again.
Run a Disk Check
File corruption is a major reason this error occurs. To check that your system files and disk are healthy, run an SFC and DISM check and repair:
Step 1. Open the Run Dialog (Win + R) and type “cmd” then hit (Ctrl + Shift + Enter) to run as Admin.
Step 2. Scan the system files by typing “sfc/scannow” and hitting “Enter.”
Step 3. The process will run. If any issues are detected, a fix will be attempted. Reboot afterwards.
Step 4. If you need to repair, reopen Command Prompt and type “DISM /Online /Cleanup-Image /RestoreHealth” before hitting “Enter.”
Step 5. Let the process run and reboot your machine. Retry the update.
Delete Your Update Cache
Another way to deal with file corruption, especially update files, is to clear them manually via Explorer. Here’s how:
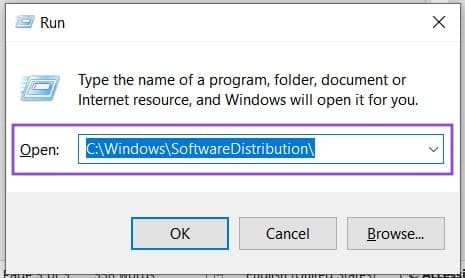
Step 1. Open the Run dialog (Win + R) and enter “C:\Windows\SoftwareDistribution\”
Step 2. Select all the files and folders and delete them. You can press (Shift + Del) to skip sending them to the Recycle Bin.

Step 3. Your files should be deleted and the cache cleared. The deleted folders will be recreated on restart.