Skip to content
LogoTechnipages
LogoTechnipages
  • Topics
        • Android
        • Browsers
        • Gaming
        • Hardware
        • Internet
        • iPhone
        • Linux
        • macOS
        • Office
        • Reviews
        • Software
        • Windows
        • Definitions
        • All Recent Posts
  • Product Reviews
  • About

How to Make Yourself Bigger on Skype

Madalina DinitaFebruary 7, 2021 Comments (3)
make yourself bigger on skype

When you’re in a video meeting, Skype automatically places the video window of yourself on the bottom right corner of the screen. But that image is very small and many users really hate this UI design limitation. Well, if you’re looking for a way to make yourself bigger on Skype, keep on reading this guide to learn more.

Contents

  • 1 How to Enlarge Your Video on Skype
    • 1.1 Split the Screen
    • 1.2 Conclusion

How to Enlarge Your Video on Skype

In the new Skype 8 version, the app automatically makes you smaller by default when the video starts. By comparison, on the classic version, users had the option to make themselves bigger during Skype video calls with just one click.

Split the Screen

As a workaround, you can split the screen and divide the call screen into two parts of equal size. We’ll list the instructions below.

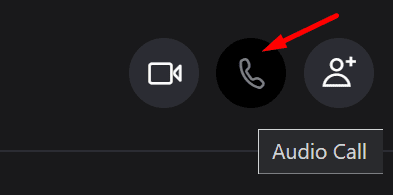
  1. You can ask your Skype contact to call you audio-only.skype launch audio call
  2. Accept the call and your own video will appear on the larger part of the screen. Your contact’s avatar should be visible in the upper right-hand corner of the screen.
  3. You can now simply drag and drop your contact’s avatar to the middle of the screen. This action automatically splits the screen into two parts of equal size. In other words, your own video image and that of your contact are equally split on the screen.
  4. Your contact can now enable the video feature on their end.
  5. Now, go ahead and drag and drop your contact’s video to the upper right-hand corner of the screen.
  6. Your own image should now appear on the larger part of the screen. Your contact’s avatar should be visible as a small circular image in the upper right-hand corner.

Conclusion

If you want to focus more on yourself during Skype calls, you can make yourself bigger on the screen. To do that, split the call screen into two equal parts. Then drag your contact’s avatar to the upper right corner of the screen.

Did this method work for you? Share your thoughts in the comments below.

Categories: Software

Author Madalina Dinita

Madalina has been a Windows fan ever since she got her hands on her first Windows XP computer. She is interested in all things technology, especially emerging technologies -- AI and DNA computing in particular.

You Might Also Like

  • Setting up Houseparty Chrome App

    MonaSoftware
  • How to Always Make Microsoft Edge Open in Private Mode

    Judy SanhzSoftware
  • How To Integrate Monday.com Into Microsoft Teams

    MonaSoftware
  • 100+ Best Snapchat Lenses for Cool Selfies in 2023

    100+ Best Snapchat Lenses for Cool Selfies in 2023

    Tamal DasAndroid

Comments

  1. Sue says:
    September 21, 2022 at 10:17 am

    No.

  2. Sue says:
    September 21, 2022 at 10:17 am

    Can I reinstall the older version (before 8)? I love the feature of adjusting the size of self view image in older version! It puzzles me why the softwear engineers always get rid of the useful and beloved features in the update and upset the users. Are these softwear engineers human or AI?

  3. Sue says:
    September 21, 2022 at 10:14 am

    Can I reinstall the older version (before 8.)? I love the feature of adjusting the size of self view image in older version! It puzzles me why the softwear engineers always get rid of the useful and beloved features in the updates and upset the users. Are these softwear engineers human or AI?

Leave a Reply

Your email address will not be published. Required fields are marked *

  • error 400 when signing in

    Encountered Error 400 When Signing In to Microsoft? Here’s What You Can Do 

  • unable to create notebook error in onenote

    We Were Unable to Create Your Notebook Error in OneNote – Common Fixes 

  • error code 0x800704f8 fix

    Error Code 0x800704f8 – How to Fix 

  • back button in browsers doesnt work

    What to Do if the Back Button in Browser Doesn’t Work 

  • could not find this item

    “Could Not Find This Item” When Trying to Remove Files

profile pic

The Experts Behind Technipages

My name is Mitch Bartlett. I've been working in technology for over 20 years in a wide range of tech jobs from Tech Support to Software Testing. I started this site as a technical guide for myself and it has grown into what I hope is a useful reference for all.

Learn More

technipages logo white
linkedin icon

Technipages is part of Guiding Tech Media, a leading digital media publisher focused on helping people figure out technology. Learn more about our mission and team here.

© 2026 Guiding Tech Media All Rights Reserved

  • About Us
  • Contact
  • Terms of Use
  • Privacy Policy

© 2026 Guiding Tech Media All Rights Reserved

Information from your device can be used to personalize your ad experience.
Do not sell my personal information.

Last Updated on February 7, 2021 by Mitch Bartlett