• Skip to main content
  • Skip to primary sidebar

Technipages

Tutorials and fixes for smartphone, gadget, and computer problems

  • Topics
    • Android
    • Gaming
    • Hardware
    • Internet
    • iOS
    • MacOS
    • Office
    • Software
    • Windows
    • Definitions
  • Product Reviews
  • Downloads
  • About Technipages
Windows 10: How to Configure File Explorer to Launch to “This PC”

Windows 10: How to Configure File Explorer to Launch to “This PC”

By Mel Hawthorne Leave a Comment

File Explorer is a key Windows feature that enables you to easily find and manage your files. The interface for File Explorer is simple and easy to understand, while flexible enough to allow you to do things like pin important directories. File Explorer even does this by default, recent and regularly used folders are automatically listed in the “Quick access” bar so you can quickly get back to them.

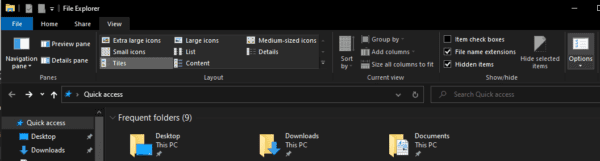
By default, File Explorer opens the “Quick access” screen which lists nine frequently accessed folders as well as 20 recently accessed files. Quick access to these recently used resources can be really helpful and can save you the time of browsing to the correct directory again. Quick access can also help you locate a file if you can’t remember where you saved it.

Some users may not like this system, however, and may want File Explorer to provide less assistance. Perhaps you don’t like the privacy issue of a list of recently access files and folders being visible by default, or maybe you just prefer to manually browse to the files you want to access.

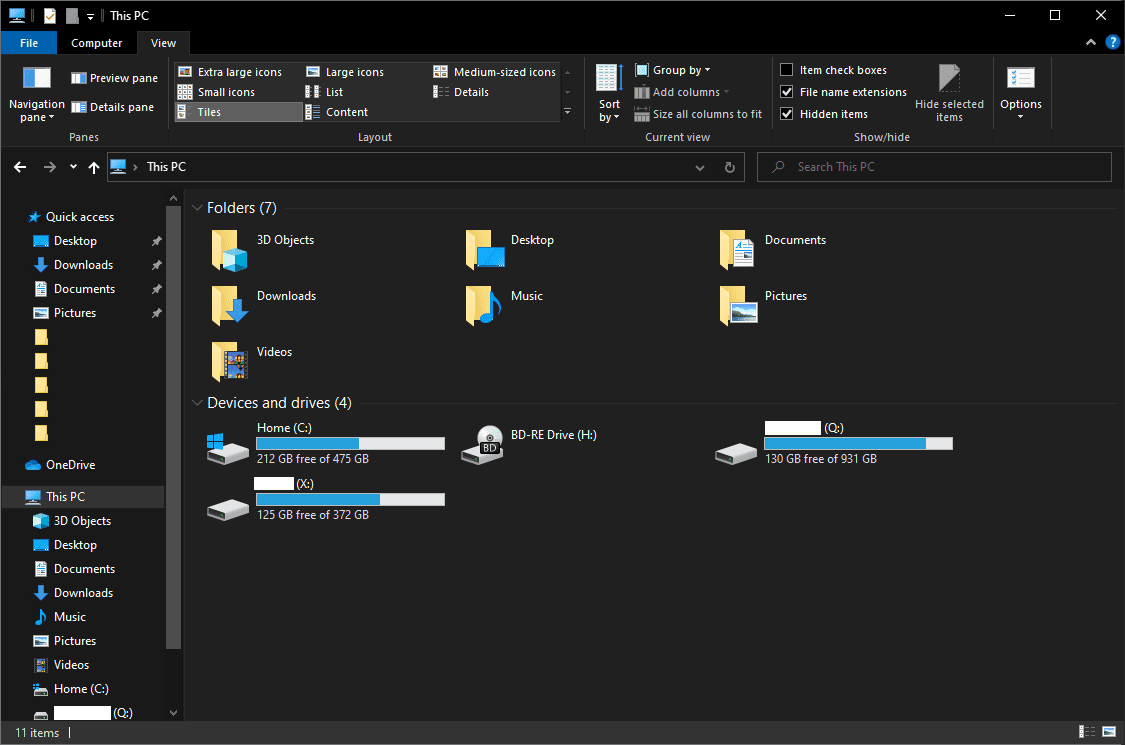
Thankfully for those of you that want to change this behaviour, File Explorer allows you to set “This PC” as the start page instead. “This PC” shows a list of seven core user directory folders and all of the storage drives you have installed in your computer.

How to configure File Explorer to launch to “This PC”

To configure File Explorer to launch to “This PC” rather than “Quick access”, you first need to open File Explorer, then switch to the “View” tab at the top, and click on “Options” in the far-right.

Click on “Options” on the far right of the “View” tab at the top of File Explorer.

Tip: Alternatively, you can press the Windows key, type “File Explorer Options” and hit enter to open the same menu.

In the “General” tab, click on the “Open File Explorer to” drop-down box at the top of the page and select “This PC”. Now, you just need to click “Apply” and “OK” to save the change and all future File Explorer windows will open to the “This PC” view rather than the “Quick access” screen.

Select “This PC” from the “Open File Explorer to” drop-down box in the “General” tab.

You Might Also Like

  • Windows 10: How to Clear File Explorer Search History
    Windows 10: How to Clear File Explorer Search History
  • How to Enable File Explorer Preview Pane in Windows 10
    How to Enable File Explorer Preview Pane in Windows 10
  • File Explorer: PDF Preview Shows Index File Directory
    File Explorer: PDF Preview Shows Index File Directory
  • Alternatives to FX File Explorer
    Alternatives to FX File Explorer
  • How to Fix File Explorer Error 0xc0000409
    How to Fix File Explorer Error 0xc0000409
  • Windows: Unable to Launch Virtual Machines
    Windows: Unable to Launch Virtual Machines
  • Fix: Explorer.exe Stopped Interacting With Windows
    Fix: Explorer.exe Stopped Interacting With Windows
  • Windows 10: Configure Virtual Memory
    Windows 10: Configure Virtual Memory
  • Windows 10: Configure How Often you are Asked for Feedback
    Windows 10: Configure How Often you are Asked for Feedback

Filed Under: Windows

Reader Interactions

Did this help? Let us know!

Your email address will not be published. Required fields are marked *

This site uses Akismet to reduce spam. Learn how your comment data is processed.

Primary Sidebar

Recent Posts

  • Windows 11: How to Add Clocks with Different Time Zones
  • Google Assistant: How to Never Miss a Birthday
  • Windows 11: How to Disable Notifications and Ads
  • How to Use Oculus Quest 2 Air Link
  • How to Create an Avatar in the Oculus Quest 2
  • 5 Free and Fun Math Apps for Kids
  • Windows 11: How to Discover What Graphics Card You’re Using
  • How to Change Display Resolution on Windows 10 and 11

Who’s Behind Technipages?

Baby and Daddy My name is Mitch Bartlett. I've been working in technology for over 20 years in a wide range of tech jobs from Tech Support to Software Testing. I started this site as a technical guide for myself and it has grown into what I hope is a useful reference for all.

You May Also Like

  • Microsoft Internet Explorer
  • Encapsulated Postscript (EPS) File
  • File Compression Utility
  • Windows 95/98
  • Microsoft Windows NT
  • Microsoft Windows
  • Microsoft Windows 95
  • Windows Media Player (WMP)

© Copyright 2022 Technipages · All Rights Reserved · Privacy