
Windows 11 has brought many new features to the table, including practical multitasking improvements. You can now use snap layouts to quickly arrange multiple windows on your desktop. The new options are better than the good old Alt and Tab shortcut. In this quick guide, we’ll show you how to use and customize this new feature.
Contents
Windows 11: Enhance Your Productivity With Snap Windows
Navigate to Settings, select System, and then scroll down to Multitasking to customize your snap layouts.
If you want to automatically resize and rearrange windows on your screen, enable the Snap windows option. Use the drop-down menu to further customize your snap layout settings.
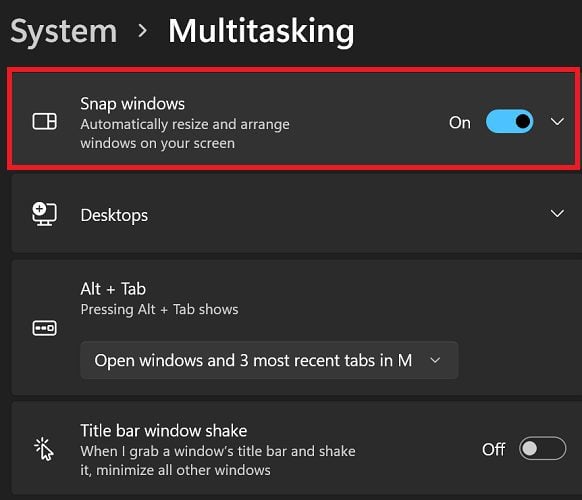 If you don’t really like the snap layout system, you can simply disable the feature.
You can quickly access snap layouts by hovering over the maximize symbol. Then select the grid layout you want to use. Select the area you want your active app to be in.

There Will Be a Learning Curve

Getting used to the new snap layout system may take a while. But once you get the hang of it, you’ll notice that snap windows help you monitor other background activities while actively focusing on the main task. For example, you can divide the screen into two sections and work on a document while keeping an eye on the latest news – all at the same time.
Snap layouts are great for bigger screens or multiple monitor setups. As a matter of fact, you have six grid layout options on larger monitors. If you have a smaller display, you only have four grid options. If you own a 13-inch laptop, things may feel a bit cluttered when opening more than three windows simultaneously.
Conclusion
Windows 11’s new snap window system lets you display multiple windows on your desktop simultaneously. To customize snap layouts, go to Settings, select System, and then scroll down to Multitasking. This productivity feature is handy on large displays.
Do you often use snap windows on Windows 11? What’s your favorite grid layout? Share your thoughts in the comments below.


happy I found this page. At last! Now I know how to switch off this annoying feature.
I’m glad to see that MS are making the snapping of windows more useful, especially on bigger monitors. I’ve long wanted to be able to have my IDE take up more than half and use the remaining space for browsers or similar. There are two things I’d still like to see – a shortcut for the 2/3 vs 1/3 snap (currently there’s only a shortcut for 1/3 vs 1/3 vs 1/3 snap) and I’d like to see consistent behaviour when snapping. Some apps, when I use the 1/3 snap shortcut, I can keep moving the app around – left, middle, right, etc. But other apps immediately go to “right, you’ve placed that one, now place others in the available space.” But at least the experience is improving.
Again and again. Why do they have to make this so complicated? It was easy navigating the windows from the taskbar and now I just give up
Not sure what issues Boz had but i found it very helpful. Hadn’t really used the new Windows 11 windowing because i knew it was very different; but this article helped immensely. I’m a fan now – big improvement.