When you’re writing something, sometimes you need to separate your work into one or various sections. The way you separate your work is up to you, but did you know that one way is to add a dotted line. How you can add that doted into any Word document is easier than it sounds. With a few clicks here and there, you’ll be able to add your dotted line in more than one way.
Contents
How to Add a Dotted Line to a Word Document with a Keyboard Shortcut
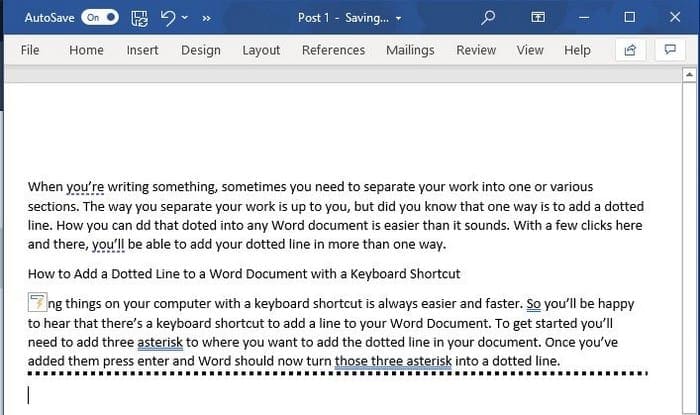
Doing things on your computer with a keyboard shortcut is always easier and faster. So you’ll be happy to hear that there’s a keyboard shortcut to add a line to your Word Document to help you divide your work into as many sections as you need. You’ll need to add three asterisks to where you want to add the dotted line in your document to get started. Once you’ve added them, press enter, and Word should now turn those three asterisks into a dotted line. Other symbols you can use are tildes and pound signs as well.
Suppose you have the asterisk button broken on your keyboard and need to use another key. The trick also works with dashes, equal signs, underscores, hashes, and tildes. Remember, you need to add three of whatever you choose and then press the Enter key. If you change your mind and want to try another character, you can erase what you did by pressing CTRL + Z for Windows and if you’re on Mac. Another way you can remove the line is by placing the cursor above the line you want to remove. Click on the Home tab, go to Paragraph, click on the down arrow for Borders, and choose No Border.
How to Add a Dotted Line In Word Using Shapes
The more options you have for doing something, the better, right? In Word, you can also use shaped to add dotted lines to your documents. You can do this by clicking on the Insert tab, followed by the Shapes options.
Click on the first option under the Lines section. The good thing about this option is that it allows you to make the line as long as you want. Draw your line and then click on the line to select it. Choose Shapes Format from the options. Go to the Shapes Styles and click on the More icon with the shape of an upside-down pyramid with a line above it. In the presets section, choose the dotted line-listed. Now, the line you drew before will turn into the dotted line to choose recently. When you think you’ve had enough of these dotted lines, you can disable them in Word’s Settings.
How to Turn off Automatic Horizontal Line in Word
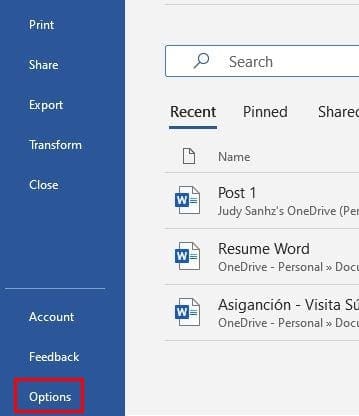
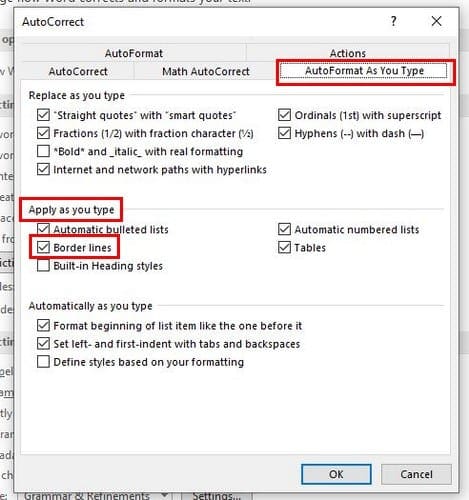
To turn off this option, you’ll need to click on File, and when the side menu appears, click on the Options button that’s all the way at the bottom. Once you’re in Options, click on Proofing from the options to the left and click on AutoCorrect Options. When the new window appears, click on the AutoFormat As You Type tab. In the Apply as you type section, uncheck the Borderlines option. You’ll go back to Word Options and click on OK to close everything.
Conclusion
Users have their ways of separating their work into different sections. But, if you were looking for more ways, hopefully, you found it in this article. You can choose to add the line by using shapes or other symbols. How do you think you’ll be adding the lines to your Word Document? Share your thoughts in the comments below, and don’t forget to share the article with others on social media.