• Skip to main content
  • Skip to primary sidebar

Technipages

Tutorials and fixes for smartphone, gadget, and computer problems

  • Topics
    • Android
    • Gaming
    • Hardware
    • Internet
    • iOS
    • MacOS
    • Office
    • Software
    • Windows
    • Definitions
  • Product Reviews
  • Downloads
  • About Technipages
How to Add a Custom Autocorrection to Word

How to Add a Custom Autocorrection to Word

By Mel Hawthorne Leave a Comment

Spell check is a key feature of Microsoft Word. By checking your spelling as you type, you can see if you’ve made any mistakes or typos. Spell check even suggests corrections, so you don’t have to separately search for the correct spelling of a word. One of spell check’s coolest features though is AutoCorrect.

AutoCorrect comes pre-configured with a number of common typos and automatically applies the correction rather than requiring you to confirm the suggestion. A common example of that AutoCorrect just fixes by default is “don’t”. If you forget the apostrophe, AutoCorrect will automatically insert it for you. AutoCorrect makes replacements without any sort of notification, so you may not even notice it fixing some typos.

One of the cool things you can do with AutoCorrect is creating your own custom entry. For example, if you often make a specific typo, you can add an entry to AutoCorrect, so it is automatically fixed.

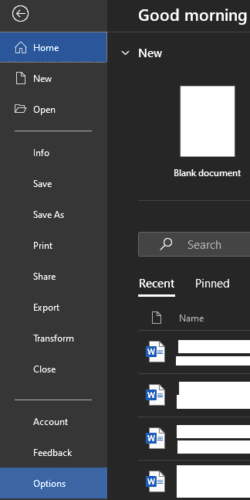
To open AutoCorrect’s settings, you can go through Word’s options by clicking “File” in the top-left corner, then “Options” in the bottom-left corner.

To open Word’s options, click “File”, in the top-left corner, then “Options” in the bottom-left corner.

To open Word’s options, click “File”, in the top-left corner, then “Options” in the bottom-left corner.

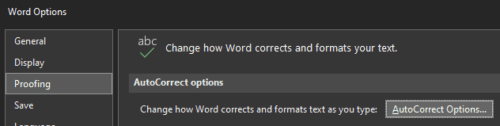
Once in Word’s options, switch to the “Proofing” tab and click “AutoCorrect Options”.

In Word’s options, switch to the “Proofing” tab and click “AutoCorrect Options”.

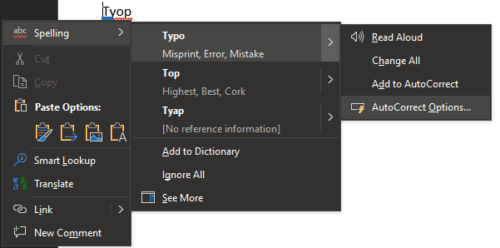
Alternatively, if you have a typo with a suggested replacement, you can get to the AutoCorrect options by right-clicking the typo. You then have to click on the arrow next to a suggestion and click “AutoCorrect Options”.

You can also get to the AutoCorrect options by right-clicking on a typo.

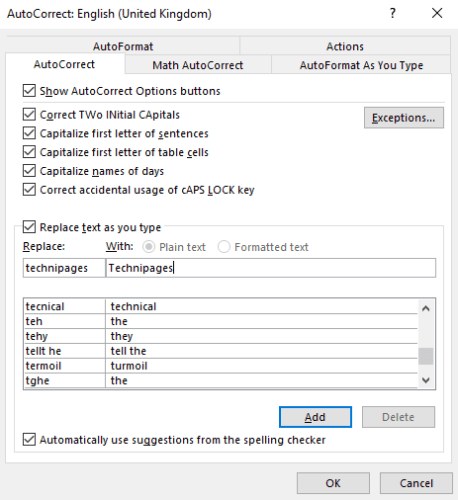
To add a custom entry to AutoCorrect, enter the typo you want to be automatically corrected in the “Replace” box, and the correction in the “With” box. Once you’ve double-checked you’ve not made a mistake, press enter, or click “Add” to save your custom AutoCorrect entry, then click “OK”.

Enter the typo you want correcting in the “Replace” box, and the correction in the “With” box, then press enter, or click “Add”.

You Might Also Like

  • Microsoft Word: How to Create a Custom Dictionary
    Microsoft Word: How to Create a Custom Dictionary
  • Word 2016 & 2013: Find Word Count
    Word 2016 & 2013: Find Word Count
  • How to Get Custom Filters For Snapseed
    How to Get Custom Filters For Snapseed
  • Trello: How to Add Custom Fields
    Trello: How to Add Custom Fields
  • Discord: How to Set a Custom Status
    Discord: How to Set a Custom Status
  • Protonmail: How to Add a Custom Signature
    Protonmail: How to Add a Custom Signature
  • How to Set Custom Screen Resolutions in Windows 10
    How to Set Custom Screen Resolutions in Windows 10
  • Firefox for Android: How to Set a Custom Homepage
    Firefox for Android: How to Set a Custom Homepage
  • Custom ROM and Kernel Options for the OnePlus 7T
    Custom ROM and Kernel Options for the OnePlus 7T

Filed Under: Office Tagged With: Word 2019

Reader Interactions

Did this help? Let us know!

Your email address will not be published. Required fields are marked *

This site uses Akismet to reduce spam. Learn how your comment data is processed.

Primary Sidebar

Recent Posts

  • Windows 11: How to Fix Windows 11 Won’t Connect to a Network
  • What to Do When Firefox Won’t Load a Page
  • Chrome: How to Refresh Various Tabs Simultaneously
  • The Latest Foldable Phones – A Look At The Huawei Mate X2
  • Everything Announced at Google I/O 2022 That You Should Care About
  • How to Build the Best High-Spec PC for Your Budget
  • Google Shows Off Pixel 7 and Pixel Watch Ahead of Fall Launch
  • Windows 11: How to View Saved Passwords

Who’s Behind Technipages?

Baby and Daddy My name is Mitch Bartlett. I've been working in technology for over 20 years in a wide range of tech jobs from Tech Support to Software Testing. I started this site as a technical guide for myself and it has grown into what I hope is a useful reference for all.

You May Also Like

  • Microsoft Word
  • Word Processing Program

© Copyright 2022 Technipages · All Rights Reserved · Privacy