Most of the time, the ominous whirring inside your PC means the graphics card or RAM is running at high capacity. However, if your disk bandwidth ends up getting fully used, you might be unable to get anything done as your PC slows to a crawl trying to fetch the data it needs.
Here are some of the quickest options you can try to fix Windows 11 100% disk usage.
Contents
Fix 1 – Fix Windows 11 100% Disk Usage by Disabling SuperFetch
Ideally, SuperFetch allows the PC to preload common apps by fetching vital information on frequently-used non-gaming apps or those that require extreme amounts of resources, like editing software. However, the service might also continuously poll your HDD for more data, preventing the rest of the system from using the disk.
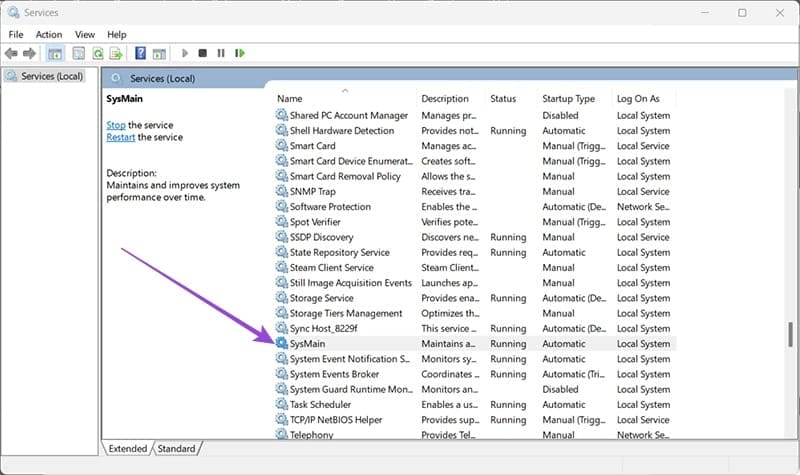
Step 1. Hit “Windows + R” to open the “Run” prompt.
Step 2. Input or paste in “services.msc” and hit “Enter.”

Step 3. Scroll down to reach “SysMain,” which is where the service is categorized.
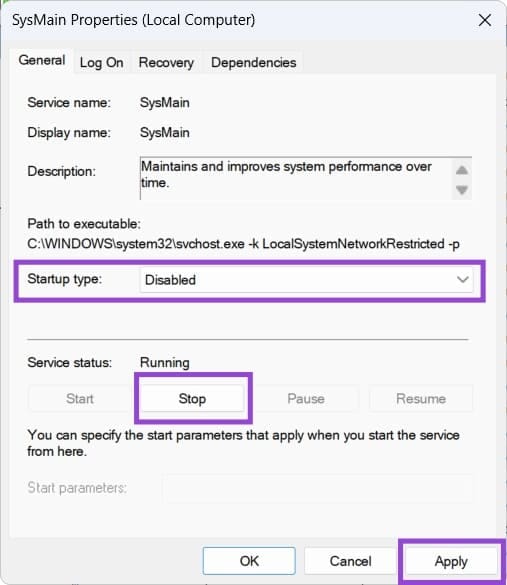
Step 4. Double-click on the option to open it.
Step 5. Change the “Startup Type” to “Disabled,” then click on “Stop” to close the service. Hit “Apply” and “OK” to save the changes.
Fix 2 – Fix Windows 11 100% Disk Usage on Startup
If your PC reports that it’s using 100% of the disk bandwidth, that’s indicative of a failing HDD, particularly one that stores the operating system or vital applications. There are a few ways to check this, but the most common solution is through the CHKDSK service.
Step 1. Open the Command Prompt.
Step 2. Enter the following command:
chkdsk c: /scan
Replace the “c” with another drive name if needed.
Step 3. When you hit “Enter,” you should get a detailed report of the disk’s current status. If you get a lot of errors in the log, the HDD should be repaired or replaced.
Step 4. To attempt a fix, enter the following command:
chkdsk c: /f
However, note that CHKDSK might make the disk worse if you attempt to repair it, and the process can take a while and might not even work entirely. If you do get many errors, back up the most important files to another drive and completely replace the failing one.
Fix 3 – Remove Connected User Experiences and Telemetry
“Connected User Experiences” is a fancy name for the diagnostic data that your PC stores and sends to Microsoft. Since this is done automatically at all times, it can cause a spike in disk activity, especially during startup when many other programs are launching.
Step 1. Open “services.msc” via the Run console.
Step 2. Find and open “Connected User Experiences and Telemetry.”

Step 3. Put “Startup type” to Disabled and force stop the service with “Stop,” then hit “Apply” to save the changes (similar to fix 1).
Fix 4 – Check for Malware
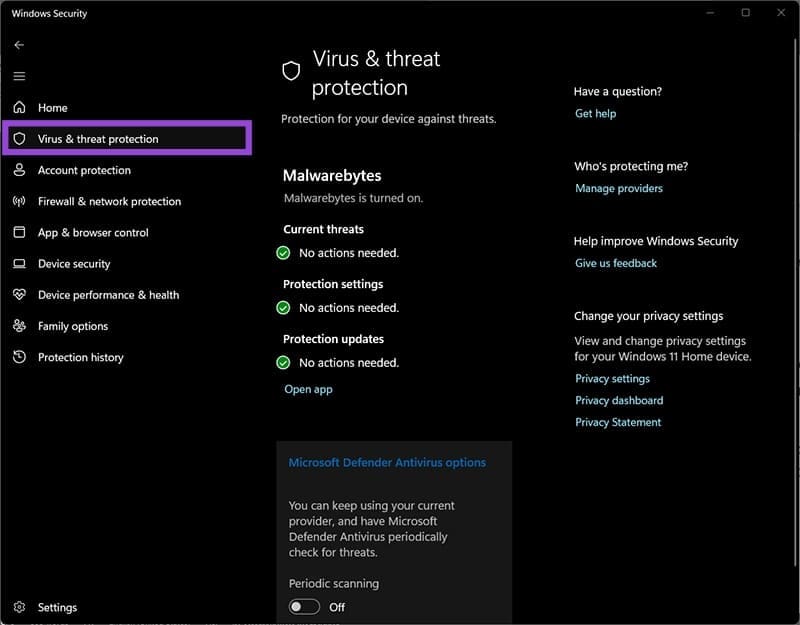
If you’re unsure what’s causing the issue, and the HDD or SSD that is reporting high usage seems fine, it’s best to check your PC for malware. For the most part, the stock protection system in Windows 11 should work fine, but a third-party option like Malwarebytes can be incredibly powerful, even a free or trial version.
You can open Windows Virus and Threat Protection through the security icon in the toolbar, then run a safety scan from there. Malwarebytes and similar software can even register as default options, showing the most recent scan results.
Fix 5 – Reset Virtual Memory
Virtual memory is a bit like RAM in that it gets used for quick data access. However, unlike RAM, virtual memory is technically a closed-off part of the HDD that Windows uses when it runs out of “regular” RAM. Since it’s slower, it can cause bottlenecks when you have a lot of programs running.
Step 1. Enter “System Properties” in the Windows search bar and select the only option that shows up: “View advanced system settings.”

Step 2. In “Advanced,” click on “Settings” in the “Performance” category.

Step 3. Go to “Advanced” (again), and select “Change” for the “Virtual memory” category.

Step 4. Click on “Automatically manage paging file size” at the top to reset the PC’s recommendations based on your existing RAM and usage. Alternatively, uncheck it and select “No paging file” to completely remove virtual memory (this might have unintended effects like not being able to open huge programs).

Step 5. Click on “Set” and then on “OK” and close the dialog windows.