
Enable a battery percentage meter to appear in the upper-right corner of your Apple iPhone, iPad or iPod Touch and know precisely how much battery power you have left.
Contents
iOS 12
- From the Home screen, tap “Settings“.
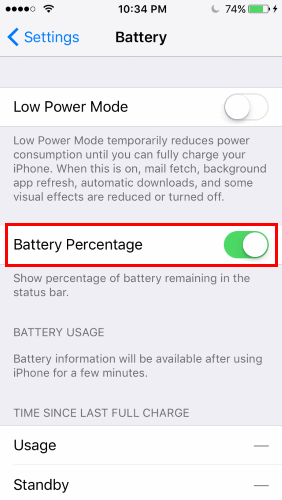
- Select “Battery“.
- Switch “Battery Percentage” to “On“.
iOS 10 and iOS 11
- From the Home screen, tap “Settings“.
- Choose “General“.
- Select “Battery“.
- Switch “Battery Percentage” to “On“.

iPhone or iPad iOS 4 to iOS 8
- From the Home screen, tap “Settings“.
- Choose “General“.
- Choose “Usage“.
- Switch “Battery Percentage” to “On“.
iPhone, iPad with iOS 3 & Lower or iPod Touch
You’ll have to hack the device using iBackupBot. Please be careful if you intend to follow these steps as doing the wrong thing can damage your device.
- Connect and sync your iOS device with iTunes on your computer.
- Download and install iBackupBot on your computer.
- Disable automatic syncing in iTunes by going to “Edit” > “Preferences” > “Devices” and check “Prevent iPods, iPhones and iPads from syncing automatically“.

- Close iTunes and launch “iBackupBot“.
- Connect your device to the computer using the USB cable. iBackupBot should detect the device.
- Select the latest backup you have on the left side.
- Expand “System Files” > “HomeDomain” > “Library” > “Preferences“.
- Open the “com.apple.springboard.plist” file by double-clicking on it. Click “Cancel” on the dialog that appears afterwards.
- Scroll down to the bottom and place this line right before the </dict> tag:
<key>SBShowBatteryLevel</key>
<true/>

- Close and save the file.
- Check the box next to the line that says “Library/Preferences/com.apple.springboard.plist“, then click the “Restore” button at the top bar.

- Your device will now go through a restore process. When it restarts, the battery meter will appear at the top right portion of the screen.


How else could we take advantage of this to do something else that would add efficiency to the device?
Nope , it didn`t help. Are you missing something between point number 10 & 11 ?
When I close & save that as given in the point 10 then nothing happens. I don`t see any boxes to check.
Any advise will be appreciated. Thank you.
Till number 10 , all was well but couldn’t proceed to number 11 as i donot see the box to check. I can see the restore button but can`t locate the box to check. There isn`t any box to check. Please advise.
Can you please help.
Thank you
dipen