I have had so many of my friends and family call or text me, asking how to create photo albums on Facebook. I am sure some of you out there are confused by this process, as well. The social media giant comes with several pre-loaded albums for you, such as Profile Pictures, Cover Photos, Photos of You (these are the ones people have tagged you in on their own timelines) and Uploaded Photos. However, what if you want to have an album that only includes your family vacation or your sister’s wedding?
Thankfully, whether you are on a desktop or your phone, the process is fairly painless. I’m going to walk you through both so that you can easily keep all of your photos separated in the way you choose.
How to Create a Facebook Album on Desktop
After logging into Facebook, select your profile. From there, select the ”Photos” button:

You will automatically be shown the ones your friends have tagged you in. Just above those on the right, choose ”Create Album”.

A box will open up for you to choose which photos you wish to create the album with. Don’t worry: you can go back and and delete more any time. Choose the photos you wish to get your album started.

After your photos have uploaded, fill in some details for each picture where it says ”Say something about this photo”. Add a short description of any names, dates, places and so forth. Now, over on the left of the screen, choose an ”Album Name”.
After that, you can add an album description if you like. Next, decide whether or not you wish to add a location to the album. For instance, if you are sharing the snaps from your recent trip to the Grand Canyon, you may want to tag that iconic landmark.
Now, you can tag friends and family, if you like. If not, skip this step! Otherwise, tap anywhere within that particular photo and tag away!
Next, you will see an option to allow your Facebook friends to add photos to that album (only that one!). This could be useful for snapshots from a party, wedding, vacation or other event where a large group had gathered. Otherwise, leave this blank.
Now, choose the album date. You can leave it as the date you posted, or manually change the date to an event date.
The last thing to do is to check over on the bottom-right, just under the photos. Choose the audience for your photo album: do you want it to be public? Friends only? Just yourself? Make your selection now! Once you have, select the ”Post” button, and you are finished!

How to Create a Facebook Album on Mobile
Creating a photo album on your phone is actually a little bit easier than on the desktop. Head into the app and tap onto your own profile. Once there, open your photos. At the top, you will see where it says ”Photo Tools” and ”Photos of You”. Hold your finger down on one of those words and scroll all the way to the right, then tap on ”Albums”. You will see the square with the words ”Create Album” at the top.

Instead of adding photos first, you will enter album details right away on your mobile device. Go ahead and name your album and give it a description. After that, choose your intended audience (friends, public, etc) and decide if you wish to allow contributors. Once you have finished these tasks, tap on the word ”Create” at the top-right of the screen.

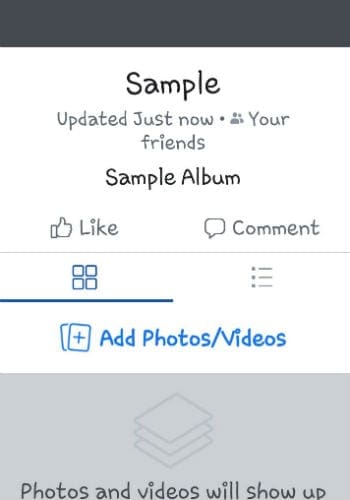
Now it is time to add photos! As soon as you have created the album, the next screen you will see looks like this:

Select ”Add Photos/Videos” in the middle of the screen to start adding photos or videos. As they upload, they will begin to show up just below those words. For each photo you upload individually, it will act as if it is a “post,” and you will be prompted to describe the photo. You’ll notice that the default album audience is already selected and cannot be changed, but you can change the target album from this screen.
Once you select the ”Post” button at the top-right of the screen, the photo/s shows up in the selected album.
One quick note: if at any time you wish to delete an entire album from your phone, tap on the folder and select ![]() at the top-right of the screen. You can choose ”Edit” (change the name, audience and more) or ”Delete”. Be aware: choosing delete will get rid of every photo within that album!
at the top-right of the screen. You can choose ”Edit” (change the name, audience and more) or ”Delete”. Be aware: choosing delete will get rid of every photo within that album!
I hope this small tutorial made it easy for you to create separate photo albums on Facebook! If you have any other questions, don’t hesitate to ask, as always.
Happy Facebooking!


Your instructions seem simple enough but I am not getting a box with Create Album on it in my Photos or Album, though once upon a time I could do it. I’m now using the Facebook App on my iPad if that makes a difference. I have a screenshot but can’t see that I can share that with you.
Next to the comment box on the left there is a camera this camera gives you access to all your photos I have 3000 photos in my gallery but they are in album form how do I go to a particular album to save time in searching from 3000 photos.Thanx