• Skip to main content
  • Skip to primary sidebar

Technipages

Tutorials and fixes for smartphone, gadget, and computer problems

  • Topics
    • Android
    • Gaming
    • Hardware
    • Internet
    • iOS
    • MacOS
    • Office
    • Software
    • Windows
    • Definitions
  • Product Reviews
  • Downloads
  • About Technipages

Bitwarden: How to Manually Autofill a Login Form

Posted on April 13, 2021 by Mel Hawthorne 1 Comment

One of the best features that password managers offer is autofill. The concept of automatically entering your login details is straightforward, but having the feature work is a really great user experience. To ensure that credentials entered are for the correct website, autofill only works for configured entries with a URL. It also requires you to use a site that matches the URL in the entry to have the autofill option.

If you’ve not configured URLs for some or all of your entries, you may feel like you can’t use auto-fill. Indeed, you won’t be able to have your browser automatically enter credentials when the page loads. Nevertheless, you don’t have to copy and paste both the username and password by hand; you can still manually select an entry to autofill.

How to Manually Autofill a Login Form with Bitwarden

To use Bitwarden’s autofill functionality, you need to sign into the Bitwarden browser extension. If you haven’t already got that installed, download the extension for the browser of your choice.

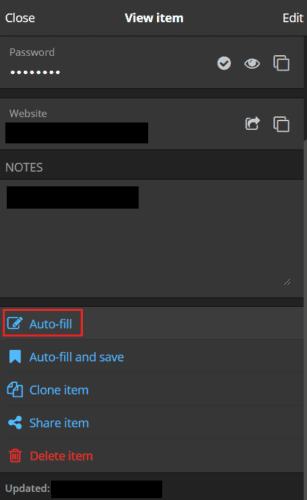
Once the extension is installed and you sign in, click on the Bitwarden extension icon to open the extension pane. Next, find the entry you want to autofill either in the “My vault” tab or via the search bar and open it by clicking on it.

Open the entry that you want to auto-fill.

Scroll to the bottom of the entry page, then click “Auto-fill.” The extension will then autofill the data in the entry into the login form on the page you’re on.

Scroll to the bottom of the entry and click “Auto-fill.”

Autofill is one of the most useful features of a password manager. It provides an excellent user experience, saving you the effort of manually copying and pasting or even typing your credentials. By following the steps in this guide, you can auto-fill data from entries not configured with URLs. They can’t be automatically auto-filled.

You Might Also Like

  • Ecosia for Android: How to Configure Form Autofill
    Ecosia for Android: How to Configure Form Autofill
  • Dolphin for Android: How to Disable Form Autofill
    Dolphin for Android: How to Disable Form Autofill
  • Bitwarden: How to Manually Synchronize Your Vault
    Bitwarden: How to Manually Synchronize Your Vault
  • Bitwarden: How To Disable “Add Login” Notifications
    Bitwarden: How To Disable “Add Login” Notifications
  • Roku: Manually Set Connection Speed
    Roku: Manually Set Connection Speed
  • Dropbox: How to Clear Your Manually Added Contacts
    Dropbox: How to Clear Your Manually Added Contacts
  • Upgrading Pixel 4 Phone to Android 11 Manually
    Upgrading Pixel 4 Phone to Android 11 Manually
  • How to Update Android Apps Manually and Automatically
    How to Update Android Apps Manually and Automatically
  • What is The Next Form Factor After Phones?
    What is The Next Form Factor After Phones?

Filed Under: Internet Tagged With: Passwords

Reader Interactions

Comments

  1. Mike Churcher says

    June 17, 2021 at 10:07 am

    Yes, this is interesting as I was concerned about security of my sensitive information if my bitwarden vault is open for several hours at a time. By manually auto-fill makes me more comfortable.
    A fellow on the forum suggested manually appending each password which sounds like a great idea. He suggested I could use the same 3 or 4 letters at the end of each password.
    Can you explain how I would go about that?

Did this help? Let us know!

Your email address will not be published. Required fields are marked *

This site uses Akismet to reduce spam. Learn how your comment data is processed.

Primary Sidebar

Recent Posts

  • Excel: Useful Tips Every User Should Know About
  • Microsoft Excel: How to Enter Basic Formulas
  • Windows 11: How to Change the Keyboard Layout
  • Security Tips to Keep Your LinkedIn Account Safe
  • What Is DIMM?
  • SATA Vs NVMe SSDs
  • How to Block Someone on LinkedIn
  • LinkedIn: How to Remove a Connection

Who’s Behind Technipages?

Baby and Daddy My name is Mitch Bartlett. I've been working in technology for over 20 years in a wide range of tech jobs from Tech Support to Software Testing. I started this site as a technical guide for myself and it has grown into what I hope is a useful reference for all.

© Copyright 2022 Technipages · All Rights Reserved · Privacy