The screen on an Android device is probably the most fragile component. It’s very common for Android owners to end up stranded with a device that has a broken, black, or non-functional screen. What do you do though when all of your data is left on the device? If the device still powers on, there are a few options to try.
Note: If your device runs Android 4.0 or higher, you can backup your device using the Android SDK to get data off your phone to use on another Android device.
Before performing any of the steps below, you may want to remove the SD Card. The SD card has much of your personal data like music and photos. Some apps even use the SD card to store app data.
Some Android devices mount internal memory as a removable disk when you connect them to your PC. From there you can drag data over to your PC or delete it.
Wipe Data Using One of These 6 Options
Option 1: Wipe From Device Manager
If you have setup your Android to use Android Device Manager, you might be able to wipe the device from there. Ensure your device is powered on. Hopefully it will connect to the Internet just fine. Then from a computer, open Android Device Manager, and select the option to “Erase” your device.
Option 2: Wipe Via Android Lost App
Login to Google Play via a computer, and attempt to push install the “Android Lost” app to your device. If it installs successfully, you may be able to power on your device and wipe it remotely from the Android Lost website.
Option 3: Attempt to Figure Out the Button Sequence for a Hard Reset
You may want to figure out the exact button sequence for hard resetting your device. Each device’s hard reset sequence is different. If you can perhaps find a friend with the same device, or access a device at a local dealer, you can then perform the steps on the other device, then follow along on yours.
Another good option for learning the steps would be to visit YouTube and search for a video on how to factory reset or hard reset your specific model Android. You may then be able to follow along with the video on your own device. It’s difficult to do, but possible!
Option 4: Use the Android SDK (root only with USB Debugging enabled)
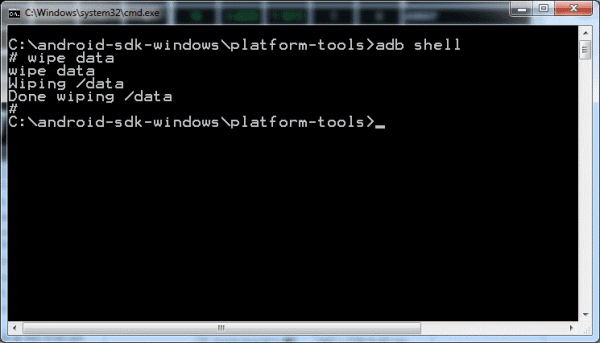
If you have rooted your Android and happen to have enabled USB Debugging on the device before you lost the ability to use the screen, you’re in luck. You can simply install the SDK Tools or Android SDK on your computer, then use an ADB command to wipe data.
- From the platform tools folder, type:
“adb shell“ then press “Enter“. - From the ADB prompt, type:
“wipe data” then press “Enter“.
If you see a message that says “Done wiping /data“, you have wiped data from the device.
Option 5: Replace the Screen
Of course, there are many places that replace phone and tablet screens. People who are savvy enough may want to purchase a replacement screen from one of many websites that sell and replace them. There are also do it yourself sites that show you how to replace the screen. There is always a chance that may not work though, and it’s a very expensive way to find that out.
Option 6: Physically Damage the Device
Last but not least, you can physically damage the device. Smash it into little bits. Some people believe that there is no real way to be sure the device is damaged to the point where data is not recoverable. But who is going to bother messing with your smashed up device just to see your pictures from Christmas 3 years ago?
You’re in a tough spot. Nobody wants to risk leaving data on a device. I’m hoping one of the above steps helped you. If you came up with your own solution, please share it in the comments section below.


Learning the specific button sequence definitely worked for me!
As simple as it was, I hadn’t thought of push-installing Android Lost. Now with the replacement phone it won’t even need to be push installed. (an ounce of prevention…)
Yes thanks.