
User Account Control is a feature in Microsoft Windows 11, 10, 8, and 7 that warns users with a dialog whenever a program tries to make changes to the system. The dialog will ask “Do you want to allow the following program to make changes to this computer?“, then provide details about the program name and publisher along with a selection to choose Yes or No.

For many users, this feature is just an annoyance. You can enable or disable UAC using these steps.
Windows 11, 10 & 8
Option 1 – From Control Panel
- Select the “Start” button, then type “User Control“. An option should appear that says “Change User Account Control settings“. Select that option.
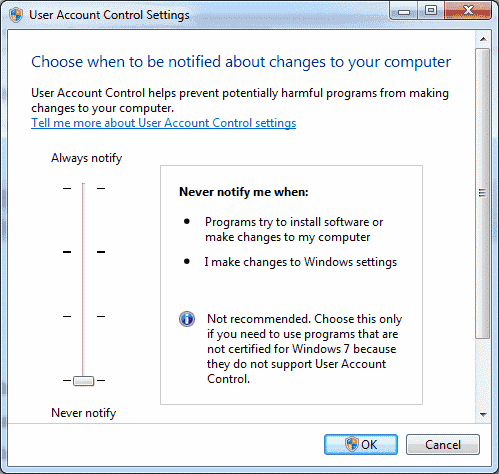
- A screen will appear, where you can choose any of the following selections using the vertical slider:
- Always notify me when – Programs try to install software or make changes to my computer and when I make changes to Windows settings.
- Notify me only when programs try to make changes to my computer – Don’t notify me when I make changes to Windows settings.
- Notify me only when programs try to make changes to my computer (do not dim my desktop) – Don’t notify me when I make changes to Windows settings.
- Never notify me when – Programs try to install software or make changes to my computer and when I make changes to Windows settings.


From MSCONFIG
- Hold the Windows Key down and press “R” to bring up the “Run” dialog.
- Type “msconfig“. An option for “System Configuration” should appear. Select it.
- Select the “Tools” tab.
- Select “Change UAC Settings“, then select the “Launch” button.
- You can choose one of four levels. The bottom option completely disables UAC.
Windows 7
- Click the “Start” orb, then type “UAC” in the Start Search box.
- The result of “Change User Account Control settings” should appear at the top of the area. Select it.

- Click “Yes” if a dialog appears.
- You can choose 1 of 4 settings. From top to bottom they are:
- Always notify me when – Programs try to install software or make changes to my computer and when I make changes to Windows settings.
- Notify me only when programs try to make changes to my computer – Don’t notify me when I make changes to Windows settings.
- Notify me only when programs try to make changes to my computer (do not dim my desktop) – Don’t notify me when I make changes to Windows settings.
- Never notify me when – Programs try to install software or make changes to my computer and when I make changes to Windows settings.


Choose a selection, then select “OK“, and your UAC setting is set.
I hope this post has helped you how to control the UAC settings in Microsoft Windows. Have questions or comments? Drop one in the comments section below.


it worked
I do not get a screen for ‘yes’ or ‘no’ answers, just a blank screen. I am going to have to uninstall a game because I can’t update the game and I can’t play the game until I do update it. It keeps telling me I don’t have enough space and when I look there, I have plenty of space! I always have trouble with updates on this game (Seeker Notes) anyway. I just wish I don’t get any more updates from Mytona.
I think people are forgetting that this may have to be done as administrator
they can log in and change their user to admin account for a short while and then change back to normal
for best safety against virus/trojan attacks you should always use normal login in every day use and not be logged in as administrator or have your normal every day user set to admin priviliges
When I try to do this it doesn’t allow me to press yes please I need help very fast
When I try to do this it doesn’t allow me to press yes
When I try to go to user control I get the same windows error saying I may not have permission to do this.
I do not understand this
it’s working
Posts identified my problem – unable to Type YES in greyed box when asked if I want to make changes …”.
Unfortunately no answers given as how to resolve this problem.
when i tried try to open user contril setting it ask password but i can’t put passwrod
I am having a serious issue with the UAC on windows 7. I am having the message “do you want to let the following program…” but my yes button is greyed. I tried the “user account control settings” and change “your account type” but it didn’t work. I also typed the following command prompt on cmd “net user administrator / active:yes” and I still get nothing. The problem all started when I went on computer management/Users/check boxed account is disabled for administrator and another account.an someone get me a hand here? Thank you
I am having the same problem with “do you want to allow………”. This has just recently started showing up on my PC. Mine asks “do you want to allow Google app to make changes…….” I do not have a Google app, I only use Google search and Gmail. I have Windows 10 Creators Update. Could this be another problem caused by the Creators Update?
Thanks for the reply. I have tried your instructions but still the same results. ” Do you want to allow this app ………….etc ” with only the no button option. It is happening with all I try to launch.
Tried all the tips I can find with zero results. Try to run apps/mscconfig/command prompt admin etc.
I always get the message ” Do you want to allow this app to make changes to your device ” In the pane the is only one choice ” NO ” A window will flash up and disappear.
Help please
There are not wholesale MLS Jerseys Tim Duncan Retire for sale,
but wholesale NBA equipment Tim Duncan Retire 2016 for cheap free
shipping.
I have changed the UAC, NEVER NOTIFY to ON (other than NEVER NOTIFY) and the computer has been requested to RESTART. After RESTART, UAC setting has been changed back to the NEVER NOTIFY. Why?
What parameter to set in my Windows group policy, to make every computer to be set default as othet then NEVER NOTIFY