The benefit of creating an account for other family members is that they can get their things done without using your account. If you’re not using the computer, they can simply turn on the computer and log into their account. But, after a while, having that extra account is no longer necessary.
How to Remove an Account on a Windows 11 Computer
There are various ways you can delete an account you don’t need on Windows 11. One way is to erase the account through the Settings app. Go to Settings > Accounts and click on Family and other users on the right.

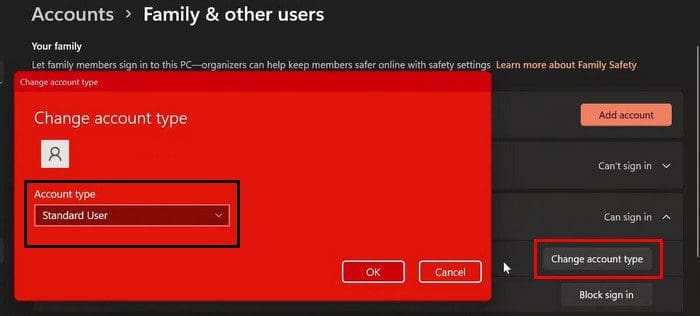
Choose the account you want to erase, and the Remove button should be to the right of the account and data option. Click on the Delete account and data button to finish erasing the account. That’s all there is to it. If you happen to be in Settings for some other reason and need to erase an account, follow these steps.
If you want to change the account type, there is no need to erase it. Simply click on the Change account type button, followed by the dropdown menu of the same option, and choose administrator or standard user.
Erase a Windows 11 Account Through Computer Management
Search for Computer Management using the search option. Once you have it open, go to:
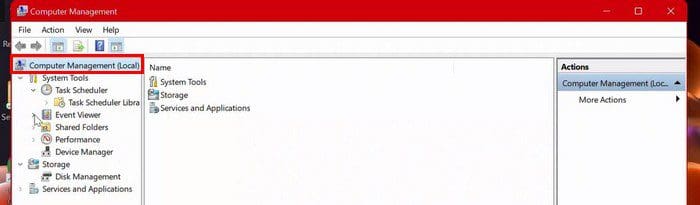
- Computer Management
- System Tools
- Local Users and Groups
- Users
- Right-click on the user account you want to erase and click on the Delete option.
Remove a User Account on Windows 11 Using the Control Panel
Search for and open the Control Panel. Once it’s open, go to User Accounts.
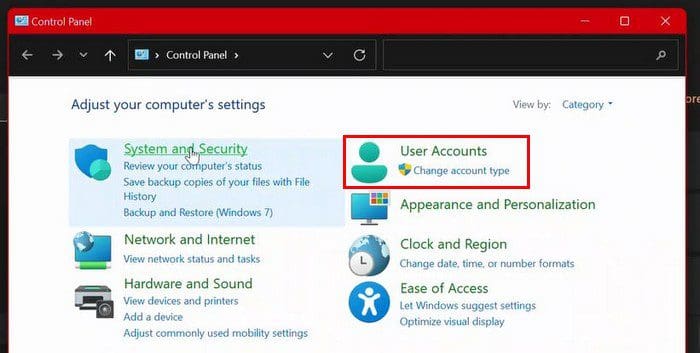
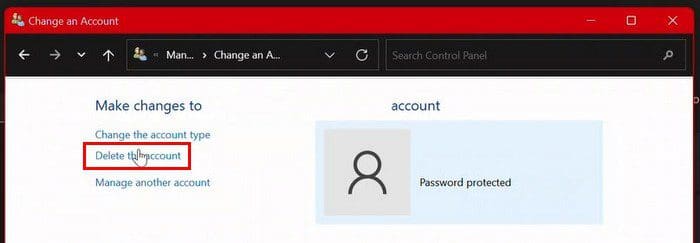
User Accounts should have a new option on the next page: Remove user accounts. Click on this option. Choose the account you want to erase and click on the Delete the Account option.
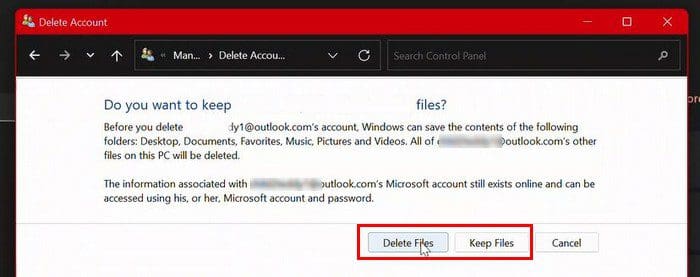
To make your choice final, you’ll need to click on a few more options. You’ll need to click on Delete files to erase the account and files. But, if you want to erase the account but keep the files, click on the Keep Files option. Once you pass this step, the account will be removed.
Delete a Windows 11 Account Using the User Account
To erase an account using the User Account option, you’ll need to enter netplwiz into the search option. When the User Account interface appears, click on the account that you want to erase. To finish up, simply click on the Remove button at the bottom right. You’ll also need to click on yes > Apply > OK. That’s all there is to it.
Erase Windows 11 Account Using the Command Prompt and PowerShell
Search for and open the Command Prompt as an administrator. Once it’s open, type: net. In the following command, you’ll need to replace the words USER-NAME with the account name you want to erase. The command you’ll need to enter is net user USER-NAME /delete.
If you’re using PowerShell, make sure to also run it as an administrator. TypeGet-LocalUser and press the Enter key. Now type Remove-LocalUser -Name ¨USER-ACCOUNT¨. Don’t forget to replace where it says USER-ACCOUNT with the account name you want to remove.
Conclusion
As you can see, when the time comes to erase an account, there are different ways you can do it. If you are already in Settings for something else, that’s one option to erase that unnecessary account. How many accounts do you have to erase? Share your thoughts in the comments below, and don’t forget to share the article with others on social media.