If you’re trying to update your old PC with some new disk drives to extend memory space and make room for large files, videos, and games, SSDs are much more reliable and faster than HDDs. However, if the rest of the PC’s hardware is a bit older with Windows 11 tacked on later, the system might fail to recognize it, and it won’t show up in “This PC” or even “Disk Management” sections. Here are some common troubleshooting steps that should solve the issue where Windows 11 doesn’t recognize SSD additions.
Contents
Fix 1: Check the Connection inside the PC Case
In a vast majority of cases, an SSD might not show up anywhere in software because it’s not properly connected to the hardware. Disconnect the SSD from the port, clean it from any dust (typically with an air compressor or a can you can buy in hardware stores), then reconnect the SSD. Alternatively, try another slot that’s compatible with the SSD (usually a SATA slot, but this might vary depending on your SSD’s exact make and model).
Fix 2: Manually Initialize the Drive
If the SSD is properly connected to the motherboard, the operating system might not have initialized it, which means it hasn’t created an actual memory partition that it can load data onto. This can be done in the Disk Manager.
Step 1. Search for “Disk Management” and open the first result (called “Create and format disk partitions). The option is also available by right-clicking the Start icon. You should get a dashboard listing all hard drives and peripheral data disks connected to the PC.
Step 2. Check the color of the label of the disk in the bottom half of the screen. A black color indicates unallocated or uninitialized space.
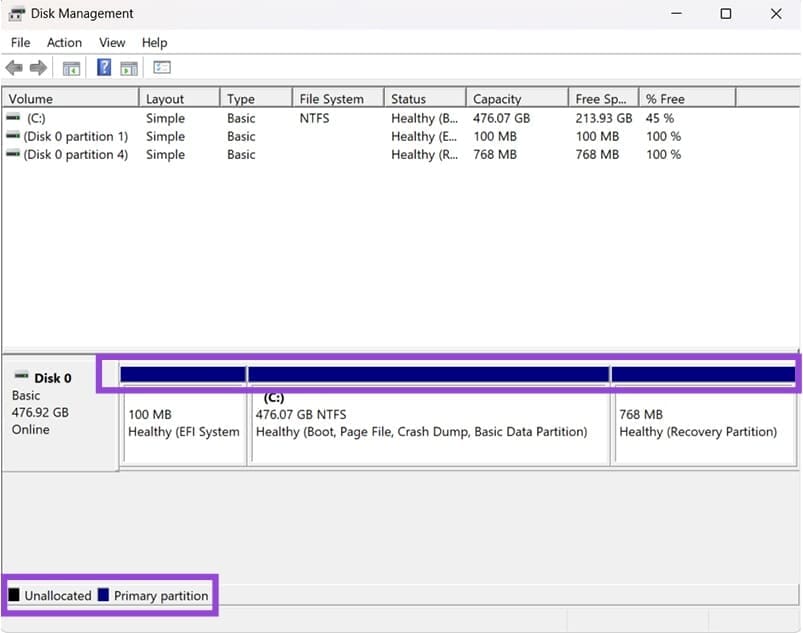
Step 3. Right-click on the uninitialized disk and select “Initialize Disk.” Select GPT boot style, which will allow you to repartition the drive later if needed.
Step 4. You can then right-click on the same drive, select “New Simple Volume,” then follow the on-screen instructions. Most of the time, the default values will do just fine for setting up the drive.
Fix 3: Update Drivers
SSDs have their own drivers, and some Windows updates might become incompatible with old driver versions, causing the issue where an old SSD doesn’t show up in Windows.
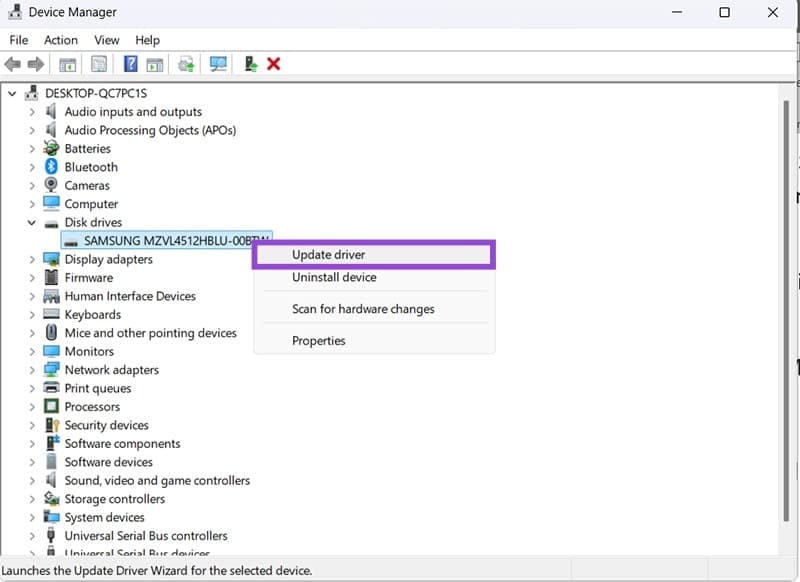
Step 1. Right-click on the Start menu icon and select “Device Manager.”
Step 2. Expand the “Disk Drives” section.
Step 3. Right-click on the drive that doesn’t have an associated partition, then select “Update driver.”
Step 4. Follow the Update Driver Wizard’s instructions. You’ll need to have an internet connection to perform the automatic download.
If the Wizard can’t find the drive, you might be able to do so manually by checking the manufacturer’s website. Use the information listed in the “Properties” tab to search for your device’s drivers online.
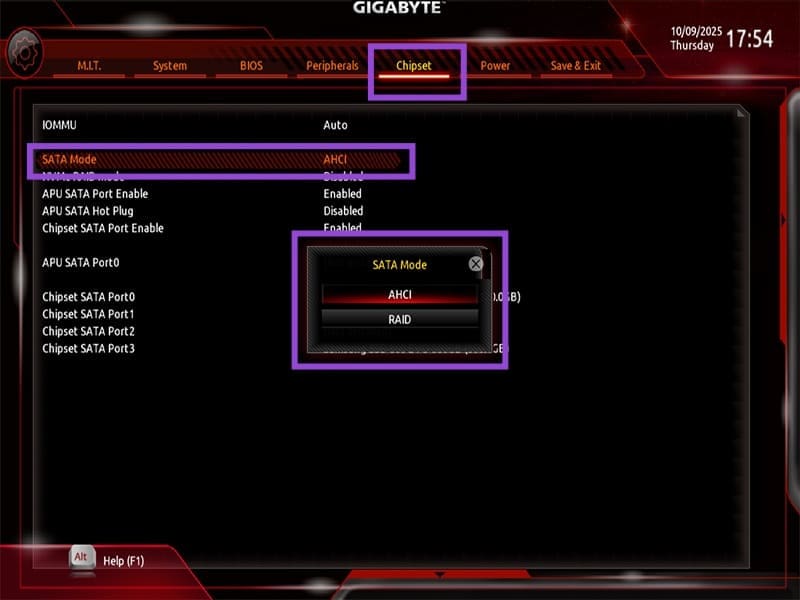
Fix 4: Update BIOS SATA Settings
If Windows 11 doesn’t see SSD at all, the BIOS might not be recognizing it.
Step 1. Go to Settings, enter the “System” tab, and choose “Recovery.”
Step 2. In “Advanced startup,” hit “Restart now.”
Step 3. Your PC will boot into WindowsRE. Go to “Troubleshoot,” then to “Advanced options,” and choose “UEFI Firmware settings,” then hit “Restart.”
Alternative: If you can’t access Windows, you can boot into BIOS by pressing the button displayed on the screen during boot (usually “Esc,” “Del,” or one of the “F” keys).
Step 4. In BIOS, find options related to “Storage” or “Chipset.” What you’re looking for is the “SATA mode” setting. Change it to “AHCI” if it’s already not on that.
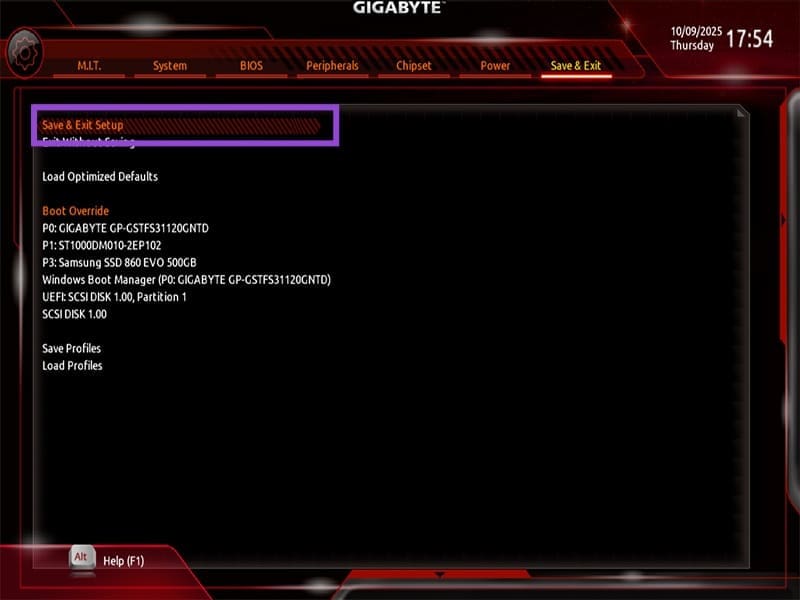
Step 5. Find the option “Save & Exit” or similar, select it and confirm. Your PC will restart.
Step 6. Initiate and update the drive if needed (Fixes 2 or 3).