You may need to turn your Windows 11 computer into a WiFi hotspot for several reasons. Maybe there is no reliable WiFi nearby, and a friend needs to use yours. Whatever the reason, you need to turn your computer into a WiFi hotspot, and you need it now. Even if you’re not tech-savvy, you can do this without worrying about misconfiguring something on your computer. You’ll also see how to prevent your computer from turning off the Mobile hotspot when no devices are connected.
Contents
How to Generate a WiFi Hotspot on Your Windows 11 Computer
By generating a WiFi hotspot, you control when someone can use your WiFi. If you don’t have it enabled on your computer, no one can connect, but if you give out your WiFi, anyone with it can join even if they are not inside your home. Keep reading to see what steps to follow to enable the Mobile hotspot option on your computer.
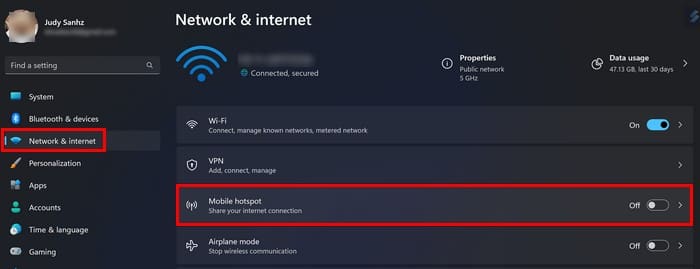
You must go into your computer’s settings to create that WiFi hotspot. To do this, press the Windows + I keys for the fastest access. You can also click on the Windows Start menu, followed by Settings. In Settings, click on Network and Internet and look for the Mobile hotspot option and click on it.
The Mobile hotspot option will have different options for you to choose from. Click on the dropdown menu for Share my Internet connection from and choose from the available options. Toggle on the Mobile hotspot option at the top, and you’re good to go. You can also change the name if you want your mobile hotspot to be easier to find. You can do this by clicking the Edit button in the Properties section.
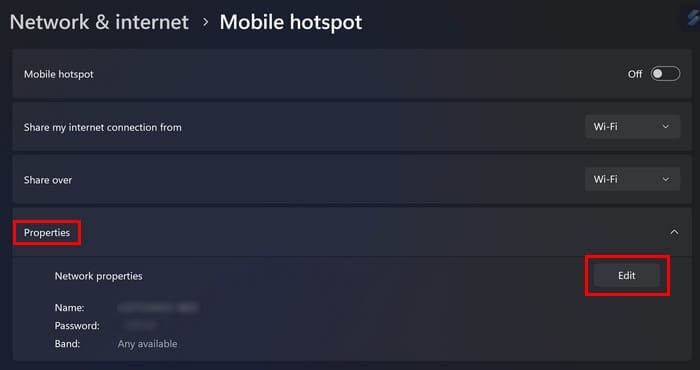
When the window opens, you’ll; you can change things such as:
- Network name
- Network password
- Band
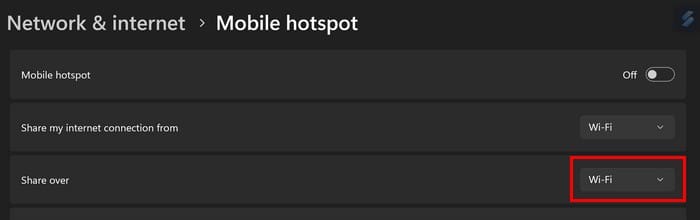
The password must be at least eight characters, and once you’re done, click the Save button. You can also choose if other devices can connect using Bluetooth or WiFi. To change this, click on Share over dropdown menu. Remember to pair the devices if you decide to choose the Bluetooth option. If you’re unsure which band option to choose, you can always set it to Any available.
How to Check How Many Devices Are Connected
You’ve had the Mobile hotspot on for a while and want to check how many devices are connected. You can do this by going to Settings > Network and Internet > Mobile hotspot. Below in the Properties section, you’ll see the number of connected devices. You’ll see the maximum number of devices you can connect is eight.

How The Other Device Will Connect to Your WiFi Hotspot
You’ve done everything to make it possible for the other device to connect. But how does the other device connect to your WiFi hotspot? Let’s say it’s an Android phone trying to connect to your WiFi hotspot. You must go to Settings > Network and Internet > WiFi on the Android device and choose the WiFi hotspot. The password must be entered, and you’ll only see the option to connect (at the bottom right) if the correct password is entered.
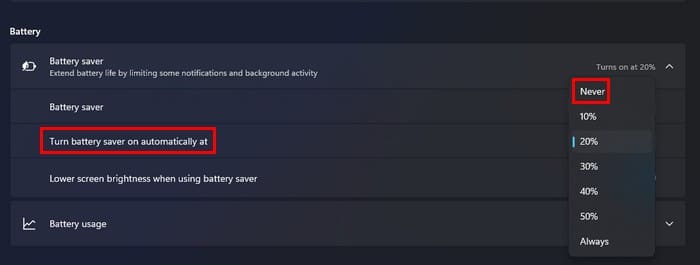
That’s all there is to it. When you’re done sharing, don’t forget to turn off the Mobile hotspot option. If you have Power saving mode, the feature will be turned off when no devices are connected. You can turn the feature on or off by going to Settings > System > Battery. Click on the dropdown menu for the Turn battery saver on automatically at option and choose the Never option. You can allow up to eight devices to connect to your Mobile hotspot.
Conclusion
Turning your Windows 11 computer into a mobile hotspot is easy, even if you’re not too tech-savvy. You can also do things such as change the name to make your computer easier to find. And, if you want to feel more secure after letting someone connect, you can always change the password. You can also choose if the other person will connect through WiFi or Bluetooth. Once you’re done making those changes, things are ready for others to connect. So, how many devices will be connecting to your computer? Let me know in the comments below, and don’t forget to share the article with others on social media.