

Hard drive partitions are an effective way to manage how data is stored on your hard drives. For example, you can use partitions to separate and encrypt important data, or to install a second operating system. There are many third-party tools that can be used to create and manage hard drive partitions, but Windows has a built-in tool that is perfectly functional. The process for creating partitions is not too complicated, and this guide will cover how to use the default Windows tool.
The point of these partitions is to split the available space on a physical disk into separate sections that can be dedicated to different purposes. Technically you can also install another physical disk, but often, a partition is a better way to make ‘another disk’ available to the computer. If you partition your C: drive, for example, your computer will treat the result as two separate drives – for example, C: and D:.
Before modifying your hard drive partitions, it is recommended that you back-up the data on the drive you’ll be editing. It is possible, if unlikely, for data loss or corruption to occur during the process. You only need to back-up data from hard drives that you will be modifying, other hard drives will not be affected.
There are two quick ways to open the default Windows partition manager. One way is to press the Windows key, type “Create and format hard disk partitions” and press enter. The other way is to press the Windows key+X hotkey combination and then click on “Disk Management”.
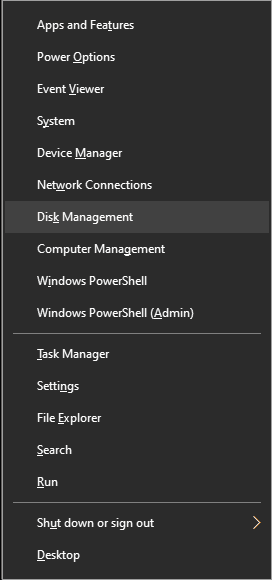
Once you’ve opened it, have a look around at what’s there. The “Disk Management” tool has two separate displays showing the partitions on the system.
The top panel shows a textual representation of the partition data. The data is displayed in a table that shows the partition label (the name of your partition) and the respective drive letters (C:, D:, E:…). Other data shown includes the file system format, status, capacity, and unused space – in other words, information about the drives and disks you currently have. Unfortunately, the textual representation doesn’t show any unallocated space, which makes it impossible to use it to create new partitions.
The bottom panel is a graphical representation of the partitions, although the partitions are not displayed to scale. Each row shows a physical disk in the computer. Those rows are split into columns, one for each partition that the disk has. If there aren’t any, it’s a solid line showing only one entry – the entire disk. The partition data shown includes the partition label and drive letter, along with the partition capacity and file system format. The free space on each partition is not shown in the graphical representation.

Resize the current partitions
If the partition you want to change is labelled as “Unallocated”, you can skip to the “Create new partition” section – the instructions here won’t apply. This will be the case if you have never used partitions before, and your disk is in its default state.
Otherwise, if the entire disk is already partitioned, you’ll need to resize a current partition to make space where you need it. To shrink a partition, you need to right-click on it in the overview screen and then click “Shrink Volume…” from the drop-down box.

The popup window to shrink the partition has four measures of the disk’s size. The two most important measures are the second and third. The second measure shows the amount of space that the current partition can be shrunk by. The third measure is used to specify how much the partition should be shrunk by. Configure the amount of space that the existing partition should be shrunk by, to be as large as you want the new partition to be.
In other words, if you have a partition with 300000 MB and the new one you want to create should be 130000 MB, the third value should be 130000.

Click on Shrink when the values are to your liking – you’ll get a preview of how big the remaining section will be. Make sure that matches what you expect – if not, you may have made a typo in the size somewhere.
Shrinking the existing partition may take some time to complete. It depends on the speed of the hard drive and the amount of data that needs to be moved for the process to complete.
Create new partition
The process for creating a new drive partition is similar to the process of shrinking an existing partition. To do so, right-click on the “Unallocated” section and then select “New Simple Volume…” from the drop-down box.

A wizard will open to guide you through the process of creating a new partition.
Click “Next” when prompted to start the process. The first step is to specify the intended size of the new partition’s volume, which should be the size of the remaining space on the drive. Once you’ve configured this, click “Next”.
The second step is to assign a drive letter to your partition, as your computer will view it as its own drive. Select one from the drop-down box – it has to be a letter not already used. The letter choice is entirely personal choice, it has no bearing on the operation of the system, so pick whatever you want. Click “Next” once you’ve chosen.
The final settings in the wizard configure how the new partition will be formatted. The “File system” should be set to NTFS and the “Allocation unit size” left at default. Configure the “Volume label” to be any label you want; this is just a name for the partition.
Tip: If your partition has a specific purpose – let’s say you want to use it as a recovery drive – you can give it a name like Recovery Drive to make it easier to recognise. Especially if you have a lot of partitions, it’s a good idea to name them well!
You can leave “Perform a quick format” enabled and “Enable file and folder compression” disabled, and click “Next”. The last screen is just a confirmation of the changes. Click “Finish” to apply the changes.
The changes will not take long to apply. Once they’ve been made, the previously “Unallocated” section will be updated to have the new volume label and letter.


Amazing advices! Problem solved!
thanks a lot