

Windows 11 is having a hard time indexing your files. Users have been complaining about this issue since Microsoft released the OS. Windows 11 may take days to index your files, but some files simply refuse to be indexed. When this issue occurs, the OS restarts the indexing process from scratch. As a result, you can’t use the Search option to find files and folders. Long story short, Windows doesn’t have a clue where your files are located.
Contents
Fix: Windows 11 Indexing Is Not Working
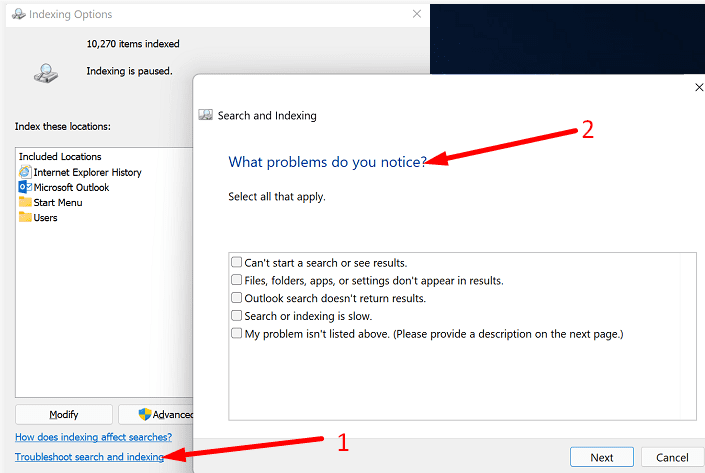
Run the Search and Indexing Troubleshooter
Use Windows 11’s built-in Search and Indexing troubleshooter to solve the problem.
- Click on the Search icon.
- Type indexing in the Search field.
- Select Indexing Options.
- Click on Troubleshoot search and indexing.

- Select the issue you’re experiencing.
- Follow the on-screen steps to complete the troubleshooting process.
⇒ Note: You can also use Command Prompt to run the troubleshooter. Enter the msdt.exe -ep WindowsHelp id SearchDiagnostic command and hit Enter.
Use PowerShell to Repair Indexing Issues
- Launch PowerShell with admin rights.
- Run the following command: dism /online /disable-feature /featurename:SearchEngine-Client-Package
- Restart your computer.
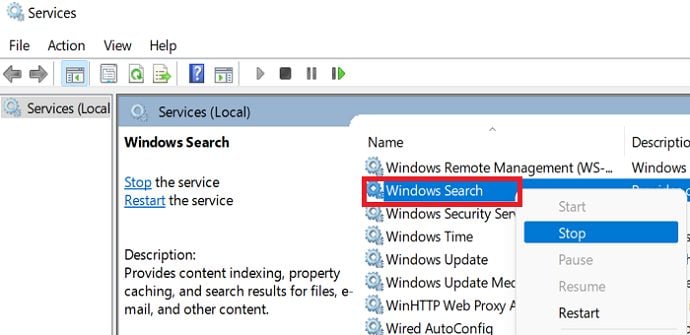
- Then, click on the Search icon and type services.
- Double-click on the Services app.
- Locate and stop Windows Search.

- Navigate to C:\ProgramData\Microsoft\Search.
- Delete all the files from the Search folder.
- Launch PowerShell and run this command: dism /online /enable-feature /featurename:SearchEngine-Client-Package
- Check if Windows can index your files properly.
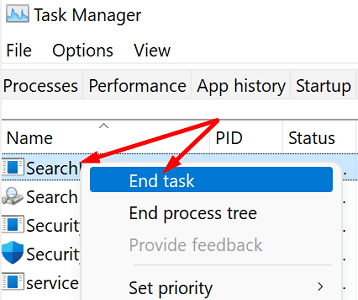
Restart Windows Search via Task Manager
- Click on the Search icon and open Task Manager.
- Click on the Details tab.
- Locate SearchUI.exe in the Name column.
- Right-click on the process and select End task.

- Select End process when prompted.
- Restart your computer, and check the results.
Force Outlook to Use Built-in Search
If the indexing problem affects Outlook, create a particular Registry key that disables Windows Desktop Search and instructs Outlook to use built-in search instead. Here’s how to get the job done:
- Click on the Search icon and type regedit.
- Open the Registry Editor.
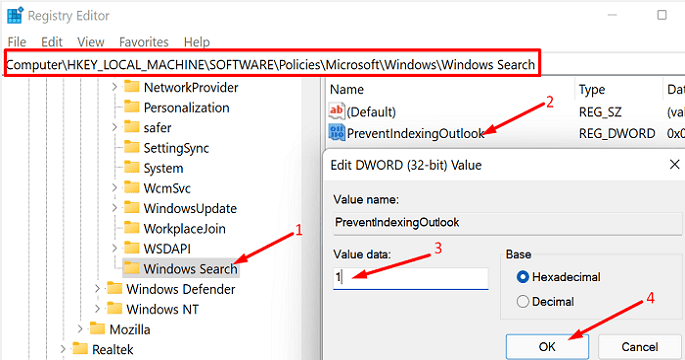
- Navigate to
HKEY_LOCAL_MACHINE\SOFTWARE\Policies\Microsoft\Windows - Right-click on the Windows key, select Edit → New → Key.
- Name the new key Windows Search.
- Double-click on the Windows Search key you just created.
- Then, right-click on an empty read and select Edit → New → DWORD Value.
- Name the new key PreventIndexingOutlook and hit Enter.
- Double-click on PreventIndexingOutlook.
- Change its value to 1.

- Close the Registry Editor, restart Outlook, and check if the indexing issue persists.
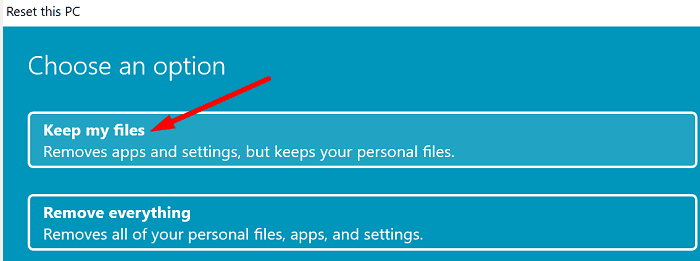
Reset Windows but Keep All Apps and Files
During the upgrade process from Windows 10 to Windows 11, unexpected events and glitches can mess up the indexing system. One quick way to solve the problem is to reinstall the OS while keeping your apps and files.
- Go to Settings.
- Click on System.
- Then, scroll down to Recovery.
- Select Reset this PC.
- Be sure to select the option to keep your apps and files.
Restart your computer after the reset process completes, and check if the indexing issue persists. If it does, create a Windows 11 Installation Media on USB. You can download Windows 11 from Microsoft. Then, click on setup.exe from the USB stick, and reinstall the OS keeping your apps and files.
Conclusion
To fix search and indexing issues on Windows 11, run the built-in Search and Indexing troubleshooter. Then, stop Windows Search and use PowerShell to repair indexing issues. Restart Windows Search via Task Manager. If this issue affects Outlook, tweak your Registry to force the email client to use built-in search instead of Windows Search. If nothing works, reset Windows but keep your apps and files.
Did you manage to solve the problem? Which of the solutions above did the trick for you? Let us know in the comments below.


You cannot ‘Reset Windows but Keep All Apps and Files’
Even in your picture, that’s not what it says. It only keeps your files, but it will remove ALL your apps and you’ll have to reinstall them again.