• Skip to main content
  • Skip to primary sidebar

Technipages

Tutorials and fixes for smartphone, gadget, and computer problems

  • Topics
    • Android
    • Browsers
    • Gaming
    • Hardware
    • Internet
    • iPhone
    • Linux
    • macOS
    • Office
    • Reviews
    • Software
    • Windows
    • Definitions
  • Product Reviews
  • Downloads
  • About
Slack: How To Configure the Default “One-Click Reactions” in Your Workspace

Slack: How To Configure the Default “One-Click Reactions” in Your Workspace

January 29, 2021 by Mel Hawthorne 1 Comment

Slack is primarily designed as a text-based communications platform, users post messages and reply to messages in kind, where appropriate. Often, in conversations, replying involves a full response, for example providing the extra requested details, or asking further questions. Occasionally, however, responses don’t need to be anywhere near as detailed and can simply be an acknowledgement.

In a face-to-face conversation, you can make small gestures with your hands and head that indicate that you’re listing and whether you agree or disagree with what’s being said. This sort of interaction is missing in most text-based communication channels. Slack offers a version of these quick interactions and responses through message reactions.

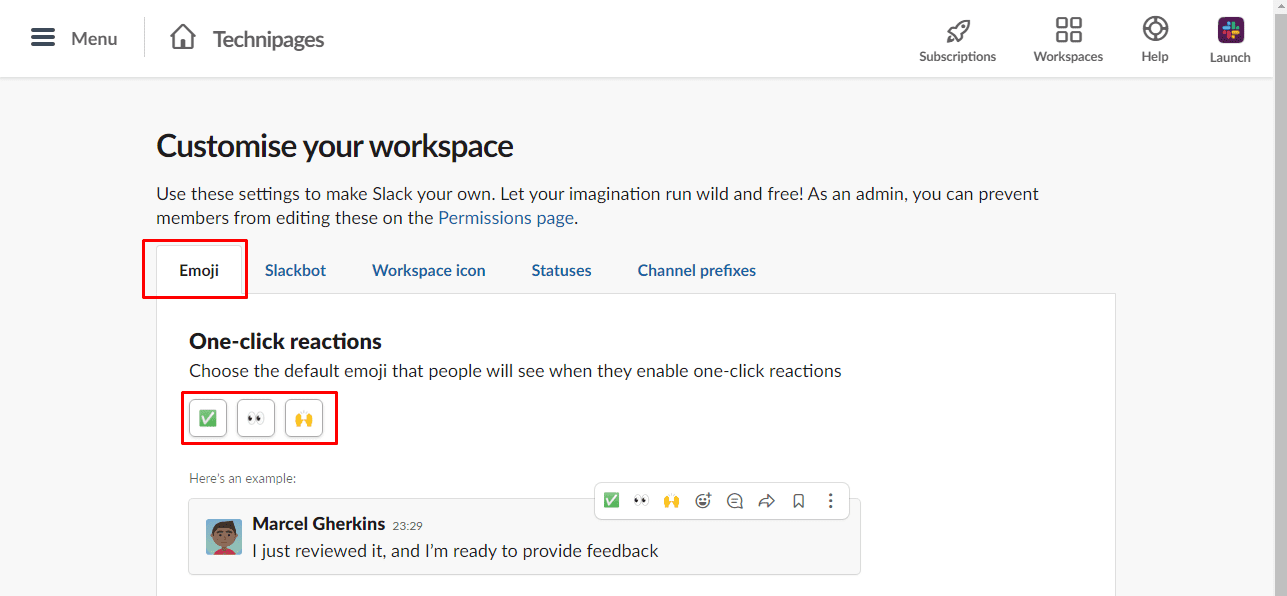
Message reactions allow you to respond to a single message through the use of emoji. You can choose to react with any emoji via the emoji picker or you can use one of the three “One-click reactions”. These one-click reactions default for each workspace and user account to the “:white_tick:”, “:eyes:”, and “:raised_hands:” emojis which are intended to represent “Completed”, “Taking a look…” and “Nicely done” respectively.

Each user can change their own set of one-click reactions through their preferences, but members with administrative permissions can also change the workspace default one-click reactions. If the workspace default one-click reactions are changed then all users who haven’t customised their own one-click reactions will be switched to the new workspace defaults.

To change the workspace one-click reactions, you need to go into the workspace customisation settings. To do so, need to first click on the workspace name in the top-right corner. Next, in the dropdown menu, select “Settings & administration”, then “Customise <workspace name>” to open the workspace customisation settings in a new tab.

To get to the workspace customisations settings, click on the workspace name in the sidebar, then select “Settings & administration” and “Customise ”.

In the default “Emoji” tab of the workspace customisation settings, click on each of the three emoji under the “One-click reactions” header to configure the used emoji via the emoji picker. Each change you make automatically applies immediately, so once you’re happy with your configuration you can just close the tab and continue using Slack with the new one-click reactions.

Click on each of the three emoji under the “One-click reactions” header to configure the available emoji via the emoji picker.

One-click reactions allow a quick and easy way to respond to a message that only requires a passing acknowledgement, minimising potentially excess messages. By following the steps in this guide, you can configure the default one-click reactions for your workspace.

You Might Also Like

  • Slack: How to Configure the Slack Call Settings for Your Workspace
    Slack: How to Configure the Slack Call Settings for Your…
  • Slack: How To Configure How People Can Join a Workspace
    Slack: How To Configure How People Can Join a Workspace
  • Slack: How To Configure Who Can View the Workspace Analytics
    Slack: How To Configure Who Can View the Workspace Analytics
  • Slack: How To Configure Who Can See the Email Addresses of Workspace Members
    Slack: How To Configure Who Can See the Email Addresses of…
  • Slack: How To Configure Automatic Slackbot Responses for Your Workspace
    Slack: How To Configure Automatic Slackbot Responses for…
  • Slack: How to Configure Workspace Wide Do Not Disturb Hours
    Slack: How to Configure Workspace Wide Do Not Disturb Hours

Filed Under: Internet, Software

Reader Interactions

Comments

  1. vitally says

    November 1, 2022 at 6:08 pm

    This option is not there anymore, no one click reactions.

Did this help? Let us know!

Your email address will not be published. Required fields are marked *

This site uses Akismet to reduce spam. Learn how your comment data is processed.

Primary Sidebar

Recent Posts

  • How to Make a Drop-Down List in Excel: 2 Best Methods in 2023
  • Can You Mix RAM Brands: A Guide for RAM Mix and Match
  • Google Photos: How to Recover Erased Pictures
  • New Galaxy S23: Full Specs, Features, and More
  • How to Block Calls on Android
  • Mimecast for Outlook: Everything You Need to Know
  • What Is PoE?
  • Excel Calendar Template 2023: The 9 Best Sources You Must Know

Who’s Behind Technipages?

Baby and Daddy My name is Mitch Bartlett. I've been working in technology for over 20 years in a wide range of tech jobs from Tech Support to Software Testing. I started this site as a technical guide for myself and it has grown into what I hope is a useful reference for all.

© Copyright 2023 Guiding Tech Media · All Rights Reserved · Privacy