

Knowing how to get back delete sticky notes on your Windows computer can be a real lifesaver. Maybe you erased the wrong sticky note, and know you don’t know what you can do to get it back.
The following tips will help you get back those sticky notes you didn’t mean to erase. The methods don’t require that you be a tech genius, the methods that are easy to follow.
Contents
Look In the Outlook Trash Folder
When you sync the sticky notes to your Outlook account, everything you erase goes to the trash folder. So, all the sticky notes you thought you lost are sitting in the trash folder waiting for you to recover them.
If you haven’t synced your sticky notes with your Outlook account, all the sticky notes you’ve erased won’t be in the Outlook trash folder.
To sync your sticky notes with your Outlook account or sign in, click on the icon to the left of the cog-wheel.

If you don’t see the icon, click on the cogwheel and scroll down to the Help and feedback section, the sync now button will be there. Once the sticky notes are synced to your Outlook account, head over to Outlook.
On the left column, click on the Deleted Items option, and the sticky note you erased will be there. Click on the sticky note you want to recover and click on the restore option at the top.

If you click on the filter option, it will be a lot easier to find the erased notes. You can filter your erased content by:
- Unread
- To me
- Flagged
- Mentions
- Attachments
If you place the cursor on the Sort option, additional options will appear such ash:
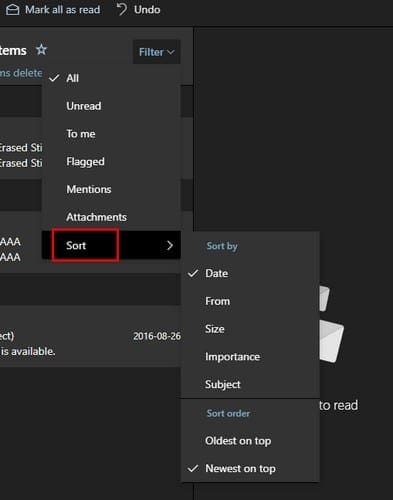
- Date
- From
- Size
- Importance
- Subject
- Oldest on top
- Newest on top
How to Prevent Accidentally Erasing Future Sticky Notes
In the Sticky Apps options, there is a way you can prevent yourself from accidentally easing any future notes. Open the app and click on the cogwheel to go into the app’s settings.
Under the General section, there is an option to enable a delete confirmation before you delete any future notes. That way, if it wasn’t your intention to erase a note, you can always click on the cancel option.

Enable the Confirm before deleting option, and it will go into effect immediately.
Conclusion
Since having your notes on your phone is more useful than having them on your computer, you’re better off using Google Keep. As long as you’re signed in to the account you have the notes on, you’ll always have access to them. It also has a bin that is on from the very instant you start using the app.


no it was of no help at all. you seem to be using an earlier version of outlook in your example. I have LOST dozens of sticky notes, they are important. I’m afraid your help is irrelevant