
To turn your local account into an administrative account, the administrator will need to make the change. There’s nothing you can do on your end to make any significant changes without the administrator’s help.
By having your account changed to an administrative account, you’ll have full system control, perform more complicated tasks, install new apps, etc. This is a massive change from a standard account that’s a to more restrictive. To get administrative privileges, the following will need to be done.
Contents
How to Change a Standard User Account into an Administrative Account
The easiest way to change the account type is in Settings. A quick way into Settings is by pressing the Windows and I keys. Once you’re in Settings, go to Accounts > Family and other users > Below Other Users/Your Family > Click on Change account type > Choose Administrator.

Click OK to save your changes, and you’ll also need to restart your computer.
Using the Control Panel
Type Control Panel in the search bar to find and open it. Once it’s open, go to User Accounts > Change account type (small blue letters under User accounts option)
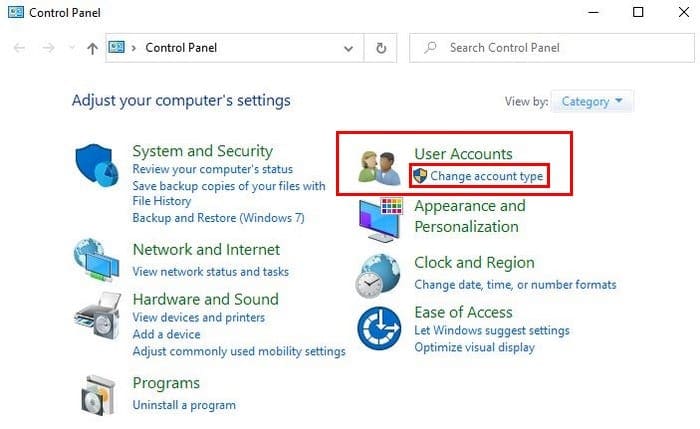
Choose account > Change account type > Click on Administrator option > Click on Change account type button at the bottom.

Using User Accounts
In the search bar, type netplwiz and go to User Accounts. Click on the account you want o make the changes to and click on Properties. Go to Group Membership and click on the Administrator option.

There are more options in the third option. The Other option allows you to choose groups such as Remote Desktop Users, Power Users, Backup Operators, etc.
Once you’ve chosen your option, click on Apply > OK > Apply (again) > OK. You’ll need to restart your computer to start using your new Administrator account.
Using the Command Prompt
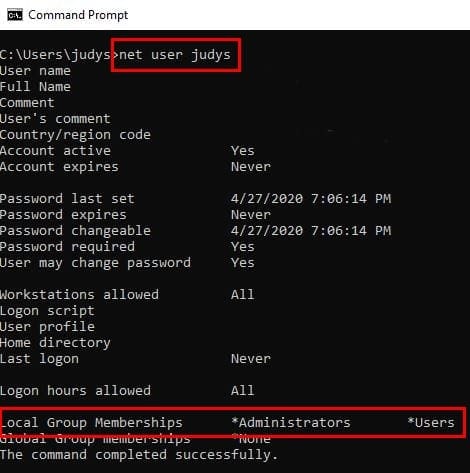
If you feel more comfortable using the Command Prompt, you can change the account type by typing net localgroup administrators ¨Account name¨/ delete. Where it says account name make sure to check that you’ve added the name of the account you want to change. Don’t forget to press Enter.
The next command you’ll need to enter is net localgroup administrators ¨Account name¨ /add. To check that everything is done correctly, type net user account name in the command prompt. If at the bottom where it says Local Group Memberships, you see listed both Administrators and Users, you now have administrative privileges.
Using Windows PowerShell
To open PowerShell, Right-click on the Windows Start menu and click on the PowerShell (Administrator) option. To change the local account to an administrative account type Add-LocalGroupMember -Group ¨Administrators¨ -Member ¨Account name¨. Remember not to type the account name; you’ll need to change this for the account name you want to change.
Conclusion
The more options you have when doing something, the better. Depending on what you’re more comfortable using will determine which one you go with. How will you be changing the account type?