
One of the first and most important steps you should take when you get your new Galaxy J7 phone is installing the SIM and SD card. The process is very easy that nontech-savvy people will have an easy time installing them.
It may sound pretty straightforward, but there are some things to keep in mind before and while you handle the SIM and SD Cards. The following guide will inform on everything you need to know so you don’t run into any problems.
Contents
How to Insert/Remove the SIM Card
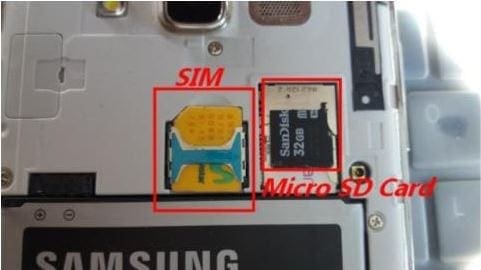
Inserting the SIM card is easy, but first, you need to find the slot. The SIM slot is the small metal slot next to the taller one right above the battery. Grab your SIM card and make sure that the gold contacts are facing down.
Slide it in, but don’t be surprised if you have to force it just a little. If you’re having too much trouble, then you might need to cut it a bit but be careful not to cut too much.
To remove the SIM card make sure that you’ve turned off your phone. Gently remove the back cover the best way you can to locate the SIM Card slot. If you try to remove the SIM card while it’s still on you could end up damaging your phone and the SIM card beyond repair.
How to Correctly Insert and Remove an SD Card
Your Samsung Galaxy J7 can support a memory card with a maximum of 128GB. Be careful when shopping for an SD card since some cards may not be compatible with your phone. Before buying a memory card, make sure to do your homework on the ones that are compatible with your phone.
When inserting your memory card, make sure that the company logo is facing right-side up. The gold-colored contacts need to be facing down and remember not to force it. The slot for the memory card will be right above the battery and the biggest of the two slots.
The Galaxy J7 supports FAT and exFAT file systems for memory cards. If the card you’re using is in a different file system, your J7 will ask you to reformat it. When you’re inserting the SD card, you’re going to find the file directory in “My Files” > “SD card” folder.
Note: Continual erasing and writing of data shortens your memory card’s life span.
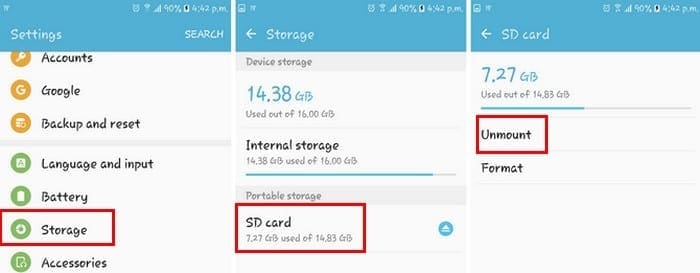
Before removing the memory card, you need to unmount it. You can do this by going to Settings > Storage > SD card > Unmount. Once you’ve done this, turn off your phone > remove the back cover > pull out the battery and pull out the memory card.
It’s important that you never remove the memory card while you’re accessing or transferring data. Doing so can result in loss or corrupted data or damage to the card or your phone.
Conclusion
As simple as something may sound, it’s always a good idea to read up on how to properly insert and remove an SD and SIM card, just to refresh your memory. You never know when you might remember something that could have easily gotten past you. Did I miss a tip you have in mind when dealing with a SIM and SD Card? Leave a comment and share your thoughts with us.


I was able to remove it with a small pair of needle nose pliers. It came out easily.
Hi dear
my samsung J7 doesnt have “portable storage” menu or any menu for sd card
how can i fix problem?
tanks
I have a Samsung J 7 Crown with no battery access. The card apparently slides in the slot located above the power on/off button on the upper right side of phone.Is there more to installing than simply inserting the card?
Nice information. I will use these tips. Thanks.
I needed to pull out my SIM and move to a new phone. But your phone is not at all like my J7. Mine has one socket for both MicroSIM and MicroSD. The MicroSD is on top and easily removed. But the SIM is in bracket underneath with no way to pull the SIM out that I can see. The SIM is recessed all the way into this socket so nothing exposed. It doesn’t pop in or out and doesn’t pull up. TMobile has no idea how to do it either even though it was bought from them in November 2016.