Xbox Party Chat on PC runs through the Xbox app, which has its own audio device preferences separate from the Windows system defaults. As such, plugging in a new microphone or headset might not immediately make it sync with the Xbox app. The result: You’ll hear game sound on one device and voice chat on another. Here’s how to change sound in Xbox party chat on PC and troubleshoot some common problems you might encounter.
Contents
Option 1 – Change Sound in Xbox Party Chat via Game Bar Settings
The Xbox app has a dedicated audio section where you select your audio output and input separately from the rest of the system.
Step 1. Open the Xbox app or hit “Win + G” to open the Xbox Game Bar.
Step 2. Click on the party chat icon at the top (located to the left of the clock), then click on the cogwheel for the settings.
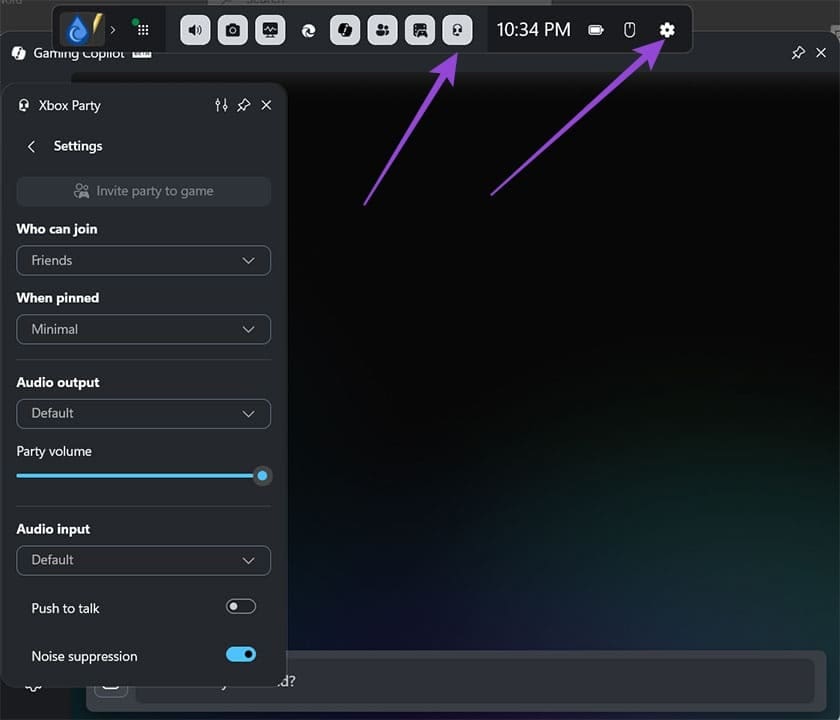
Step 3. In the “Audio input” section, select the device you want to use as input (microphone).
Step 4. In the “Audio output” section, choose the device you want to use as a main speaker or headphones for the voice chat.
Leaving both options to the system default can sometimes work if you only have one of each device connected. Alternatively, if you change the audio input or output settings in Windows, the “default” option might change, but this is not certain.
You can use the sliders below each option to control the volume of the output or the sensitivity of the input (how loud a sound has to be to be picked up by the mic).
Option 2 – Set Your Device as Default in Windows Sound Settings
If a headset or microphone isn’t appearing in the Xbox app’s audio dropdowns, it’s usually because Windows hasn’t registered it as an available audio device. To fix this:
Step 1. Right-click the sound icon in the taskbar and choose “Sound settings.”
Step 2. Under “Output,” select your headset or intended playback device and click “Set as default sound device.”

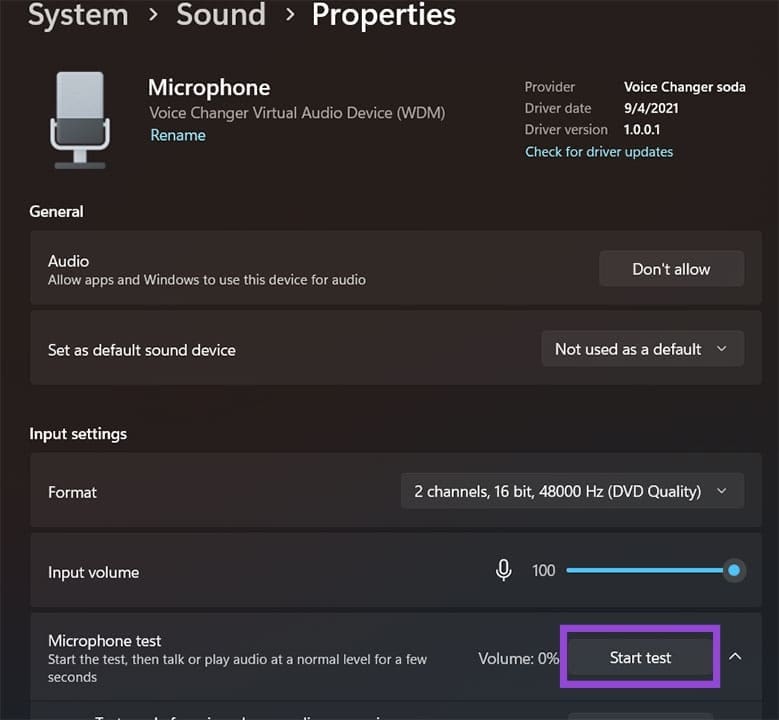
Step 3. Go back to the “Recording” tab (or “Input”) and select your microphone. Click on “Start test” to check if the device registers sound and Windows can play it back (which means it can transfer it).
Step 4. If the device doesn’t appear at all, unplug it and plug it back in to force Windows to re-detect it. For Bluetooth headsets, you’ll likely need to remove and re-pair the device.
Step 5. Once the device is confirmed in Windows Sound settings, go back to the Xbox app’s Audio settings, and it should now be listed in the drop-downs.
Fix 1 – Enable Microphone Access for the Xbox App
Even with the correct mic selected in the Game Bar or the Xbox app, your voice won’t transmit if Windows privacy settings are blocking PC Xbox Party Chat sounds audio devices.
Step 1. Go to “Settings,” then to “Privacy & security” and choose “Microphone.”
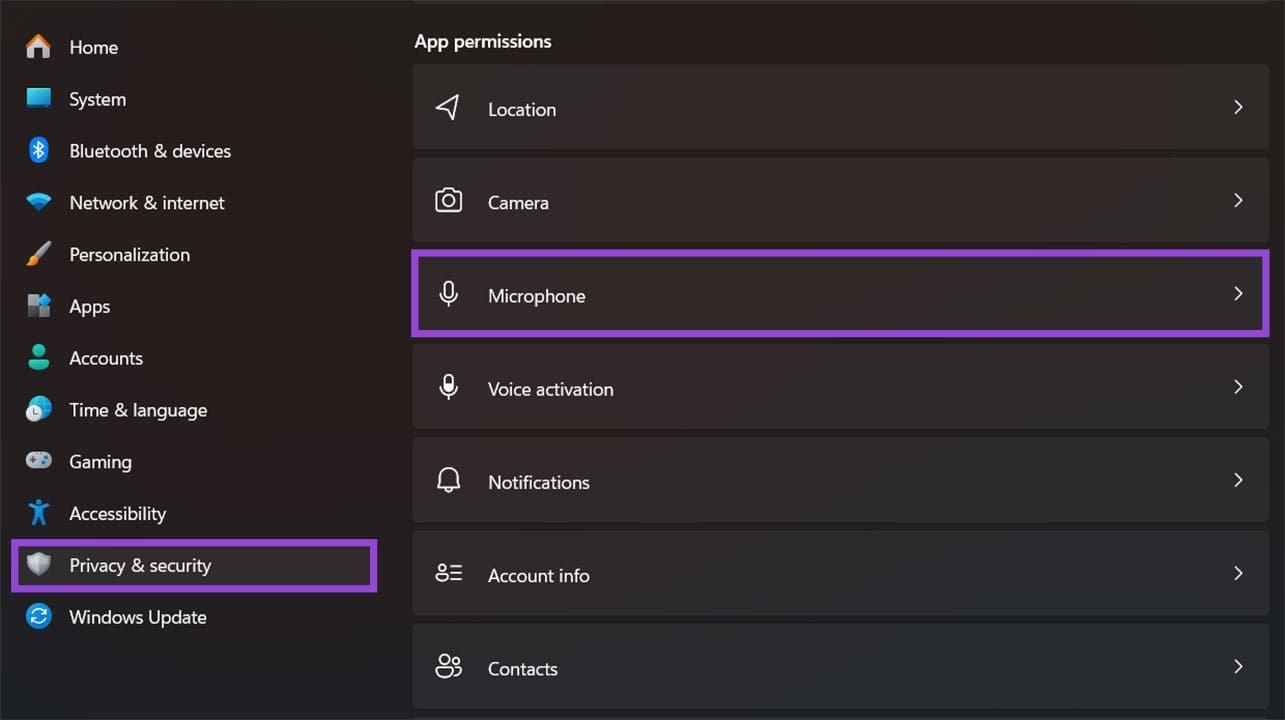
Step 2. Make sure “Microphone access” is toggled on at the top of the page. Also, toggle on “Let apps access your microphone” to enable.
Step 3. Find “Xbox” or “Xbox app” in the list of apps and make sure its individual toggle is turned on.

Step 4. As a final check, open the Xbox app and go to its settings to confirm that microphone access is enabled there.
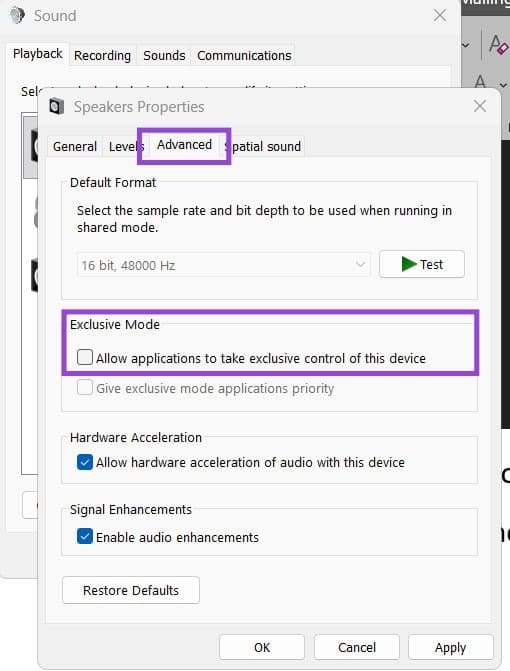
Fix 2 – Disable Exclusive Mode and Reset the Xbox App if Needed
If Party Chat audio is erratic, this might be due to another app trying to take control of an input or output device and “cutting it off” from Xbox.
Step 1. Go to Settings > System > Sound.
Step 2. Click on “More sound settings.”

Step 3. Find the device you want to use for the Xbox Party Chat and double-click on it.
Step 4. Go to the “Advanced” tab and uncheck “Allow applications to take exclusive control of this device.”