

One quick way to increase your productivity is to add the apps you frequently use to your desktop. In this manner, you can quickly launch them when you need to use them. If you’re on Chrome OS and you don’t know how to add apps to your desktop, follow the steps below to get the job done.
Contents
How Do I Put Apps on My Chromebook Desktop?
Chromebooks have a desktop. However, you can’t put any apps or icons on it. While you can’t technically add apps to your Chromebook desktop, you can pin them to the Shelf to access them quicker. The Shelf is a row of apps located at the bottom of the screen. Think of it as the equivalent of the Windows taskbar.
Steps to Pin Apps to Chromebook Shelf
- Click on the Launcher and then select the Up arrow.
- Locate the app that you want to add to your Shelf.
- Right-click on the app icon and select Pin to Shelf.
- Your app should now be visible on the Shelf at the bottom of your screen.

You can then change the order of the apps. All you need to do is select and hold the app you want to move and simply drag it to a new position. Then release the mouse button to drop the app to its new spot.
To remove an app from your Chromebook Shelf, right-click on it and select Unpin. Your app will instantly disappear from the Shelf.
How to Pin a Webpage to Shelf
If you often visit the same webpage, you can pin it to your shelf to access it quicker.
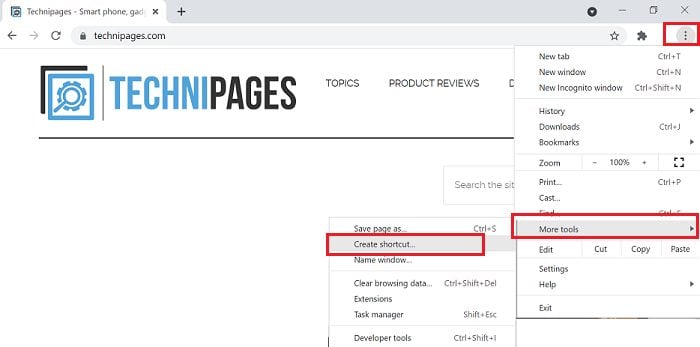
- First, launch Chrome and open the webpage you want to pin.
- Select More, and click on More tools.
- Then select Create shortcut.

- Right-click the shortcut icon and select Pin to shelf.
By the way, you can also hide the Shelf if you prefer a minimalist, clutter-free desktop. To do that, right-click on the Shelf and select Autohide shelf. To see your apps, simply move the pointer to the side of the screen.
Conclusion
You can’t add apps to your Chromebook desktop just as you would on Windows. However, you can pin them to the Shelf to access them quicker. To do that, right-click on your app and select the “Pin to Shelf” option. You can also pin webpage shortcuts to the Shelf.
Do you have a lot of apps pinned to your Shelf? Let us know in the comments below.


This did not help. I don’t want to “Pin to shelf” I want to edit the 8 icons on a new-page ChromeOS desktop to go where I want them to go.
I have a Chromebook 315H. I can only have 20 Apps pinned to shelf without having to use arrows to scroll through. I have more than 20 apps but have to pick and choose. Just wondering if there is an option for two rows or anything else (like grouping)