
Google Maps keep a history of everywhere you’ve been. This might be useful to some since you never know when you might go to that place again. But, some might not like the idea of Google keeping that information and now want to erase their Google Maps history after every use.
To erase your Google Maps history, first, you’ll need to know how to access it. The good news is that the steps are easy to follow, and you’ve erased your history before you know it. So, if you don’t have much time to do this, you’ll still be done with time to spare.
Contents
How to Access Your Google Maps Timeline
Whether you’re using Android or iOS, you’ll be happy to know that the steps are the same. All you need to do is open Google Maps and tap on your profile picture. When the new window appears, choose Settings.

Once you’re in Settings, the Maps History option will be towards the bottom without swiping. On the next page, tap on the dots to the right of where it says Search your activity. If you swipe down just a tad more, you can see a list of the places you’ve been.

If you only want to erase that one visit you don’t want anyone to see, accidentally tap on the X to the right of it, and it’ll be erased.
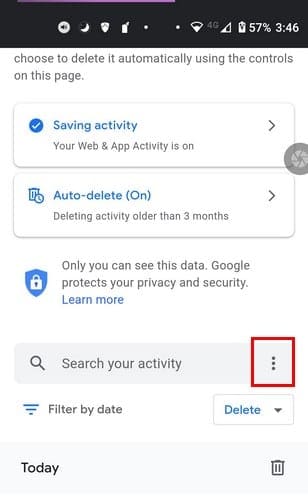
You’ll see options such as:
- Bundle view
- Delete activity by
- Keep activity for
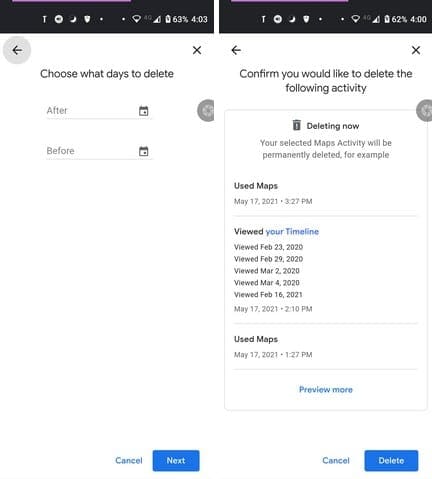
You can choose to erase your activity by as little as an hour, Last day, All Time, and Custom range in delete activity.

In Custom Range, you’ll need to set the start and end dates when you want the data erased. Once you’ve set the dates, tap on the Next button, check the date to make sure there aren’t any mistakes. Choose the Delete button, and you’re good to go.
If you have trouble with that option, you can always try:
- Tapping on your profile picture
- Settings
- Personal Content
- Location history is on
- Choose a Google account

Here you can disable location history or go down just a tad and manage your activity or adjust the auto-delete option to your liking.
How to Program Auto-Deleting for Google Maps
When you access Maps Activity, tap on the Auto-delete option. If you’ve never touched this option before, it should be set to off by default.

On the next page, tap on the dropdown menu for the first option. It’ll say Auto-delete activity older than, and in the drop-down menu, you’ll see options such as three months, 18 months, and 36 months. At the bottom, you’ll see a section called Common Questions. You can get answers to What’s Web and App Activity; how long is right for me? How else can I control my data?
Once you’ve chosen a time frame for your data to be erased, tap on the Next button at the bottom right to continue. You’ll see a message letting you that your preferences have been saved. Tap on the Got it button at the bottom right to leave.
How to Erase Offline Google Maps Downloads
So, you think you’ve downloaded one too many maps. Not to worry since the process of erasing all those downloaded maps is easy. Open Google Maps and tap on your profile picture. Tap on the Offline Maps option.

On the next page, you’ll see all the maps you’ve downloaded. Locate the map you want to erase and tap on the dots to the right and choose the delete option. Below the name of the map, you’ll see the expiration date. If your goal is to erase maps that have expired, that info is beneficial.

Conclusion
When you only have the maps you need, it’s easy to find the map you need when you need it. But, if you only erase your maps once a year, for example, it can be difficult to find certain maps to erase. Did you have a lot of apps to erase? Let me know in the comments below. Also, don’t forget to share the article with others on social media.