In a computer, one of the most important factors in performance is cooling. If your CPU doesn’t have enough cooling it will overheat and thermal throttle, reducing your performance. The most obvious factor in cooling is the cooler itself, however, it isn’t the only factor. Between your CPU and CPU cooler, you also have a layer of thermal paste. This paste is designed to help efficiently conduct heat from the CPU to the cooler – and while it may seem insignificant, it’s actually very important.
How is thermal paste supposed to work?
As much as they may look it, the top of your CPU and the bottom of your cooler aren’t perfectly flat, which leads to tiny pockets of air that can’t escape and get very hot during operation. Thermal paste is designed to fill those tiny imperfections on the surface of the CPU leading to a better connection and thermal conductivity.
Thermal paste is thermally conductive, allowing for heat transfer between the CPU and cooler. It is also generally electrically insulating; this prevents it from causing any short circuits if it gets squeezed out onto any components. Some thermal pastes include metals such as silver to conduct heat better, however, this also runs the risk of short circuits as it is electrically conductive too – that’s why the non-conductive type is generally the standard.
The “best” form of thermal “Paste” is a liquid metal compound made of a mixture of gallium, indium, and tin. This liquid metal is a liquid at room temperature, as the name suggests. It conducts heat very well, but is also electrically conductive, difficult to apply evenly, and is corrosive to aluminium. Liquid metal is almost exclusively used by experienced enthusiasts looking to get the best possible performance and is not recommended for beginners. If you are looking to have this high-performance type used in your computer, always consult an expert or retailer.
Application techniques
There are many techniques for applying thermal paste, with some being more suited to larger or smaller CPUs – and many PC-builders have strong opinions on the ‘right’ way.
Thermal paste generally comes in small syringes for easy application, which gives the user some leeway on technique.
Tip: You should not try to get a thick layer of thermal paste when applying – you want the minimum possible to cover the CPU or the base of the cooler, whichever is smaller.
The most commonly advised method to apply thermal paste is the “pea” method. In the pea method, you apply a single dot of thermal paste around the size of a pea to the centre of the CPU, then attach the CPU cooler. This method is ideal for standard size CPUs as the pea will easily spread to cover the entire CPU without much (or any) spillage.
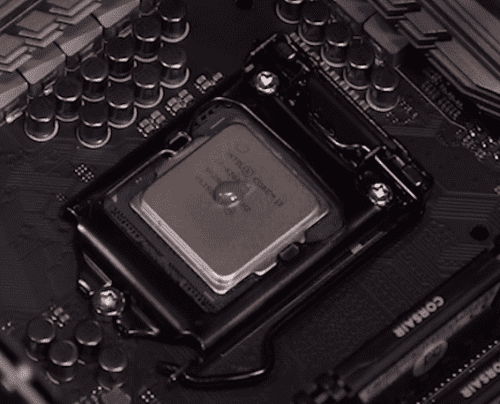
Tip: Whenever you place the cooler on the CPU and attach it to the motherboard you want to be sure to place it down as flat as possible. This will help to get an even covering and not miss one side or corner.
The “X” method has two variants, in one you draw an “X” shape from corner to corner, in the other you place a small dot in each corner and one in the middle. These two patterns are designed with larger CPUs in mind such as those found at enthusiast, workstation, and server tier builds. For these methods, you shouldn’t place the thermal paste all the way to the edge of the CPU, as placing the cooler on the CPU will effectively spread the paste, and going too close to the edge will increase how much gets squeezed out.
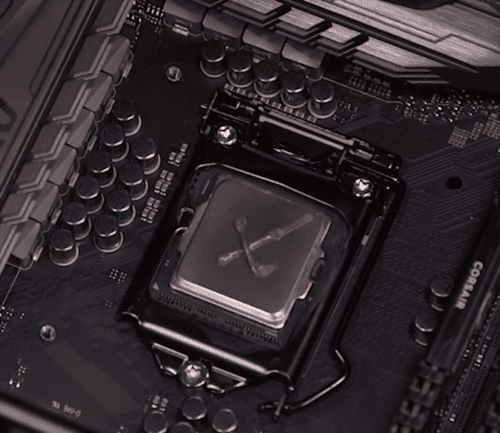
Instead, you place the dots or lines just a little in from the edge, going for an even distribution of the paste before you combine the parts.
The final common method to apply thermal paste is to just apply some, then manually spread it out to be a thin covering, a little like how you might butter a sandwich.

This spreading is usually performed with a small card or something else with a flat edge. This method can make it easier to clean up any excess thermal paste, as this can be done before the cooler is applied. The downside of this method is that if your spreading isn’t even you can end up with air bubbles causing high temperatures – yet for beginners, this method can be a good choice as it lets them see where their paste is and what is happening.
Tip: The main goal of any thermal paste is to have a thin layer with no air bubbles. To this end, you only want to apply a minimal amount of thermal paste, and you want the pattern you use to not surround a pocket of air.
Things to look out for:
Here are some things you should look out for when you apply thermal paste:
- Less is more – too much can spread to the underside of your CPU and potentially ruin it entirely if it gets between the pins and connectors.
- Don’t cheap out – there can be considerable price differences between cheap and high-quality thermal paste – don’t go cheap just to save money!
- Ask for advice – applying thermal paste can be sticky business – so be sure to ask for help from experts or PC builders in your area if you are unsure. Many PC building shops will even apply it for you if you ask.
- Expiry dates – if you’re not sure how old your thermal paste is, don’t use it – it’s better to buy a new pack than to use potentially dried out or separated paste that will harm your system.
- Follow the recommendations – often motherboard or CPU providers make recommendations regarding brands or application techniques of thermal paste (some even offer video tutorials). You don’t have to follow them, but they can be a big help when you are trying to make a decision!