• Skip to main content
  • Skip to primary sidebar

Technipages

Smart phone, gadget and computer tutorials

  • Topics
    • Android
    • Gaming
    • Hardware
    • Internet
    • iOS
    • MacOS
    • Office
    • Software
    • Windows
    • Definitions
  • Product Reviews
  • Downloads
  • About
How to Configure Burp Suite to Intercept Network Traffic

How to Configure Burp Suite to Intercept Network Traffic

Posted on November 16, 2020 by Mel Hawthorne Leave a Comment

As a proxy Burp Suite is designed to intercept your web traffic. This is a key part of being able to use Burp to manipulate your web traffic as you’re using it to test a website. It’s not just a click-and-play tool though, you need to configure Burp and your device to work together.

Configuring Burp

The first thing you need to do is ensure that you have Burp installed, you can download the free “Community” edition from PortSwigger’s website. Once it’s installed and you’ve started the application, you can look to the “Options” sub-tab of the “Proxy” tab to find the details for the proxy listener.

You can find the details of the proxy listener in the Options” sub-tab of the “Proxy” tab.

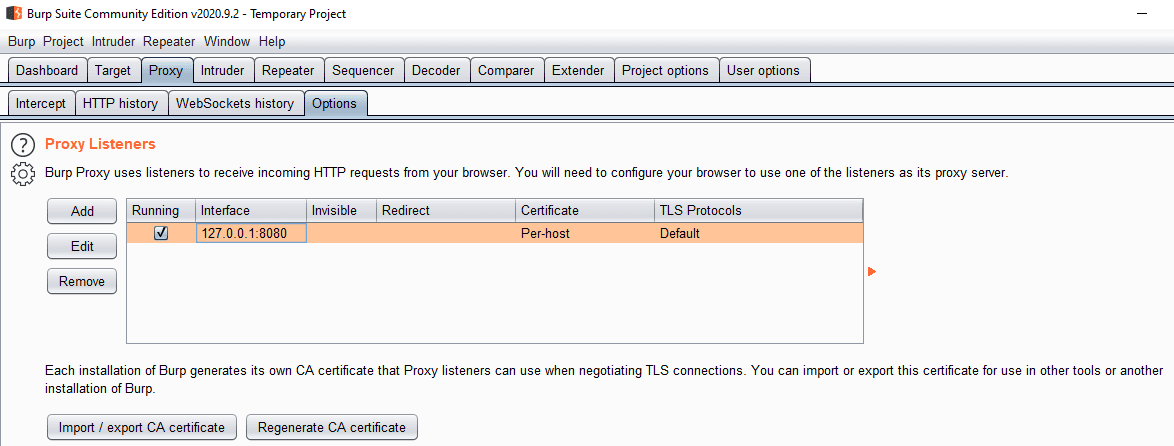
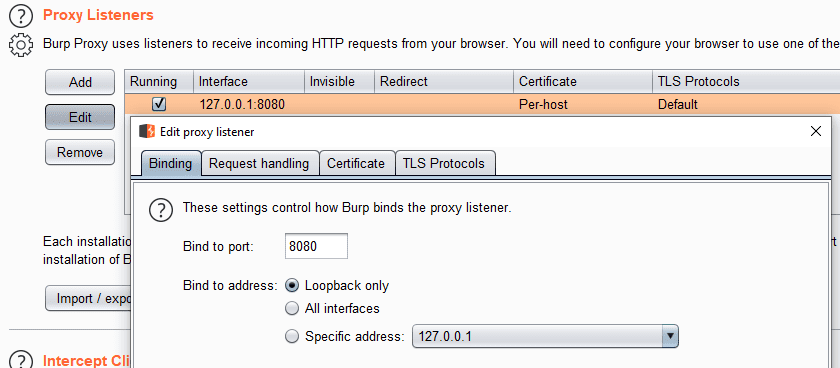
The proxy defaults to listening on port 8080 of the IPv4 loopback address “127.0.0.1”, although this will fail if you have another service using that port. If you want to configure which interface or port number Burp listens on, you can either edit the default listener or add a new one.

Tip: You will need to change the interface that Burp listens on if you want to monitor the traffic of another device.

You can configure the existing listener or add a new one.

Configuring your device

The first thing you need to do on your device is to add the Burp certificate to your trust store, so you can intercept HTTPS traffic without constant certificate warnings. To do so, start by browsing to the IP and port of the proxy listener e.g. 127.0.0.1:8080, and downloading the “CA certificate”. Once it’s downloaded, double-click on it, then install it to either the “Current User” or “Local Machine” store’s “Trusted Root Certification Authorities” list.

Tip: You will need to restart your browser for this change to take effect.

Import the certificate to the “Trusted Root Certification Authorities”.

Finally, you need to configure your device to use the proxy listener as a proxy server. The exact method of doing so will depend on your operating system, the setting can generally be found in the networking settings, or in the connection settings to your current network.

In Windows 10, you can access the proxy configuration page of the Settings app, by pressing the Windows key, then typing “Proxy settings” and hitting enter. In the “Manual proxy setup” section you need to click the “Use a proxy server” slider to the “On” position, enter the IP address and port number of your proxy listener, then click “Save” to enable the proxy.

Configure the IP address and port number of the listener in the Proxy settings of the Settings app.

Once you’re finished intercepting traffic you will need to stop Windows from using the proxy. To do so, you just need to click the “Use a proxy server” slider to the “Off” position on the “Proxy settings” page of the Settings app.

You Might Also Like

  • How Does Burp Suite’s Intercept Function Work?
    How Does Burp Suite’s Intercept Function Work?
  • What Is Burp Suite?
    What Is Burp Suite?
  • How to Use Burp Suite Repeater
    How to Use Burp Suite Repeater
  • How to Use Burp Suite Decoder
    How to Use Burp Suite Decoder
  • How to Set up a Proxy Listener in Burp Suite
    How to Set up a Proxy Listener in Burp Suite
  • How to Filter the HTTP History in Burp Suite
    How to Filter the HTTP History in Burp Suite
  • How to Add Websites to Burp Suite’s Target Scope
    How to Add Websites to Burp Suite’s Target Scope
  • How to Import Burp Suite’s HTTPS Certificate in Windows
    How to Import Burp Suite’s HTTPS Certificate in Windows
  • How to Automatically Replace Data in a Web Response With Burp Suite
    How to Automatically Replace Data in a Web Response…

Filed Under: Internet, Software

Reader Interactions

Did this help? Let us know! Cancel reply

Your email address will not be published. Required fields are marked *

This site uses Akismet to reduce spam. Learn how your comment data is processed.

Primary Sidebar

Recent Posts

  • Fix Skype Error: Exchange Needs Your Credentials
  • Fix Skype Notifications Not Working on Windows 10
  • Teams in Outlook: We Couldn’t Schedule the Meeting
  • VR Oculus Quest 2: How to Configure a New Room-Scale Boundary
  • VR Oculus Quest 2: How to Adjust Boundary Sensitivity
  • Dropbox: How To Change the Date Format
  • Microsoft Teams: There Was a Problem Saving the Photo
  • VR Oculus Quest 2: How to Set up Oculus Link

Who’s Behind Technipages?

Baby and Daddy My name is Mitch Bartlett. I've been working in technology for over 20 years in a wide range of tech jobs from Tech Support to Software Testing. I started this site as a technical guide for myself and it has grown into what I hope is a useful reference for all.

Follow me on Twitter, or visit my personal blog.

You May Also Like

  • Ring Network
  • Physical Network
  • Class B Network
  • Public Data Network (PDN)
  • Packet-Switching Network

© Copyright 2021 Technipages · All Rights Reserved · Privacy