

You can’t help ask but ask for the WiFi password every time you visit a friend or family member. It’s not like you’re going to download content in 8K or anything, right? After a while, a WiFi connection may not be necessary, or the password is no longer valid. If you only like to have WiFi passwords that work, here’s how you can erase the ones you don’t need anymore.
Contents
How to Remove Unnecessary WiFi Connections
You try to save as much mobile data as possible. Every time you visit a friend, you ask if you can connect to their WiFi. That way, you have more possibilities of having enough mobile data until the end of the month. But, for some reason, you don’t want to continue using that WiFi connection. Maybe you feel a little guilty, or you upgraded your plan.
To forget a WiFi connection, swipe down from the top of your display and long-press on the WiFi icon. If you’re having trouble with that, you can open the Settings app and go to Network and Internet.
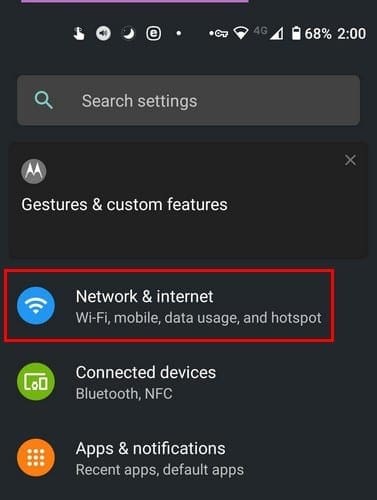
Tap on the WiFi option, followed by the WiFi connection you want to forget. If long-pressing on the WiFi icon worked for you, you should automatically be in the WiFi settings.

Long-press on the network you want to erase, and a new window will appear. On that window, you should see the option to forget the network.

If you got rid of that one WiFi network and you want to add another one.
How to Add a WiFi Network on Android 10
Now that you’ve gotten rid of that network, it’s time to add the one you do care about. Hopefully, you’re still on the WiFi network. If so, you can add a WiFi network by tapping on the option that says Add Network.

With this option, you’ll need to enter the information manually. For example, you’ll need to type info such as the Network name and password. But, there’s an easier way. To the right of the Add network option, you’ll see a barcode icon. Tap on the icon to scan the barcode that’ll give you the info to access that specific network.

How to View Your Saved WiFi Networks – Android 10
After a while, you’d be surprised as to how many WiFi networks you’re connected to. To see which networks you’re a part of, go to Settings > Network and Internet > WiFi > Saved Networks.

Before you access this option, you can see how many WiFi networks you have saved. As you can see, I have a total of 18 networks saved; some connections need to be erased. When you see the list of saved WiFi networks, it won’t let you forget the network by long-pressing on it. Tap on the network you want to forget and tap on the Forget option, which will be the first one to the left. The Saved Networks option will show you three options: Forget, Connect, and Share.

To finish things up, tap on the forget option, and you’re good to go. You can finally say goodbye to those unwanted WiFi networks.
Conclusion
Sometimes you want to save as many WiFi networks as possible just in case you ever return to that area. But, sometimes, things can get a little out of control, and you have way too many. How many WiFi networks do you have to remove? Share your thoughts in the comments below.


no this does not help me at all I have done all these things many times and the old networks still show up on the available networks area. on Samsung galaxy a21 cell phone
l have very old wifi networks that I have turned off auto connect and they still show up also these old networks don’t have any ” forget ” or delete options and these wifi networks have not been used in at least 10 years and the modems and routers have been disconnected and gone from my residence totally. I want to get rid of these networks. how can I do it