Microsoft Copilot is an AI-powered tool that summarizes notes, gives a round-up of internet search results, and even helps draft documents. However, if you prefer the human touch only, you might want to deactivate Microsoft Copilot. Because it’s not always obvious how to do this, we’ve brought together a short guide that explains how.
Contents
Method 1: Deactivate Microsoft Copilot from Windows via Registry Editor
Step 1: Head to the search bar and type regedit. When you see Registry Editor on the left of the pop-up window, click it. Click “Yes” if prompted to allow Registry Editor to make changes.

Step 2: Click on the folder named HKEY_CURRENT_USER. It’s in the list of folders on the left-hand side, near the top.

Step 3: Click Software, then Policies.

Step 4: Under Policies, look for Windows. Right-click here and select the option “New” then “Key.”

Step 5: This will create a new folder which you should rename Windows Copilot.

Step 6: Right-click on this new Key called Windows Copilot and select “New” then “DWORD (32-bit) Value.”

Step 7: This will create an entry in the main box which you should name “TurnOffWindowsCopilot.” Be sure to type it exactly like that.

Step 8: Double-click on the new entry called “TurnOffWindowsCopilot” and change the highlighted value from 0 to 1. This lets your computer know to activate this instruction. Click OK once you’ve done this.
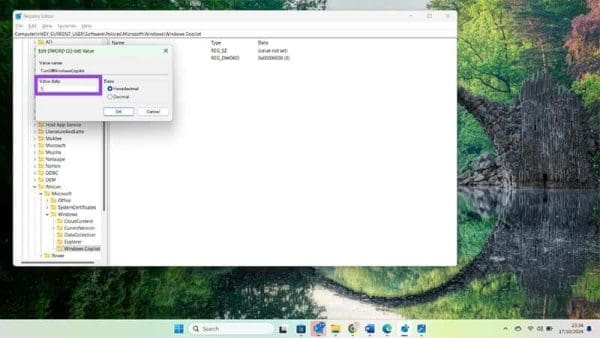
Restart your computer and Copilot will no longer appear on the taskbar or in your personalization settings.
Method 2: Deactivate Microsoft Copilot on Your Edge Browser
Step 1: Even if you’ve removed Copilot from your computer, it may still be active in your browser settings for Microsoft Edge. To deactivate Microsoft Copilot on Edge, start by opening an Edge browser window.

Step 2: Head to the three dots in the top right corner. Click here and look for “Settings.”

Step 3: Click “Settings” then “Sidebar “which is usually the fourth option down on the left-hand side.

Step 4: Click “Copilot” which appears under “App and notification settings.”

Step 5: Slide the toggle button next to “Show Copilot” to the right to disable Copilot in searches.

Now, instead of getting a Copilot-powered summary to the right of your search, you’ll get the conventional list of results and top answers instead.
Method 3: Deactivate Microsoft Copilot in Office
Step 1: If you signed up for the premium Copilot service, it will be active in any Office applications you have. To check if it’s active, look for the Copilot icon in the top right corner of the Office taskbar.

Step 2: To remove Copilot from Office applications, you have to cancel your subscription. Start by heading to the Microsoft website: https://www.microsoft.com/

Step 3: Sign in if you’re not already logged in using your usual Microsoft account details, then click your icon, then “My Microsoft Account.”

Step 4: Click Services & subscriptions on the left side of the screen to show all your active Microsoft paid services.

Step 5: Check if your Microsoft Copilot Pro subscription is active. If it is, simply click “Manage” and “Cancel Subscription.”

Microsoft will now give you a date when your Copilot Pro subscription will expire. After this date, Copilot will simply remove itself from all your Office applications.
Frequently Asked Questions
Yes, because once Microsoft runs Windows updates, it will install Copilot even if you’ve never had it before. Follow the above steps to remove it if you don’t want it.
Not at this time, however, it will automatically deactivate once your subscription runs out.
You can follow the steps for any of the above methods in reverse to reactivate Copilot.
While Copilot may be useful in some situations, it’s great to know that you’re not forced to have it. Follow the above steps to deactivate Microsoft Copilot as needed for maximum control over your Windows, Edge, or Office experience.