Swiftkey is definitely a good choice when it comes to keyboards. Whether it can be considered the best keyboard out there depends on whether it has everything you need a keyboard to have.
If you decided to make your default keyboard, it must have enough of your favorite features, right? If you want to get the most out of SwiftKey, you’ll need to go into the keyboard settings to make the features you need most more visible.
Contents
- 1 How to save Your SwiftKey Typing Style to the Cloud
- 2 How to Change SwiftKey Themes
- 3 How to Add Multi-Language Support in SwiftKey
- 4 How to Change SwiftKey Keyboard Modes
- 5 How to Change Keyboard Layout
- 6 How to Enable and Manage SwiftKey Clipboard
- 7 How to Use SwiftKey’s Built-in Translator
- 8 Other Included SwiftKey Goodies
- 9 Conclusion
How to save Your SwiftKey Typing Style to the Cloud
If you’re going to use Swift one another device, you should enable the Backup and Sync option. By turning on this feature, your typing style is saved to the cloud, and when you sign in to SwiftKey on another device, you don’t have to start from scratch.

To turn on Backup and Sync, tap on the dots to the right of the keyboard. Tap on the profile icon that has your email on it and then on the Backup and Sync option. The option will be the first one on the list, make sure it’s toggled on.
How to Change SwiftKey Themes
Looking at the same keyboard design for too long can get boring after a while. To switch themes whenever you want, tap on the dots to the right and go to Themes.

In the Themes section, you’ll see three tabs: Gallery, Yours, and Custom. Browse through the large variety of themes, and when you see one that you like, tap on the cloud with the download icon in it. When it’s done downloading, you’ll automatically see what your new keyboard will look like.
In the Yours tab, you’ll see all the keyboard themes you’ve downloaded. If you ever decide to go back to a theme you’ve already downloaded, the Yours tab is where you need to look.
You’ve looked at every single theme SwiftKey has, and you don’t see a theme you like. By going to the Custom tab, you can create your own personal theme. Tap on the Start button to customize your keyboard. You can add an image, adjust key borders, and symbols. As you create your keyboard, you’ll see a preview below.

How to Add Multi-Language Support in SwiftKey
If you speak more than one language, then turning on the keyboard’s multi-language feature will come in handy. To add a language to your keyboard, tap on the dots to the right, and go to Settings. Select languages, and at the bottom, SwiftKey will suggest some languages for you.
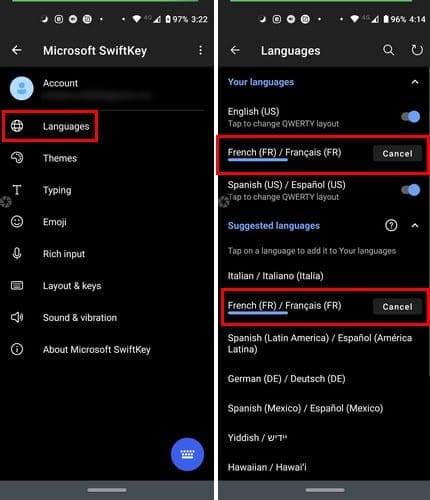
To add a language that is not suggested, swipe all the way down and tap on All Languages. Swipe up once more to see all the languages the keyboard accepts (which is quite a lot). If you ever want to temporarily disable a language, just follow these exact same steps and toggle off the language.
How to Change SwiftKey Keyboard Modes
Your SwiftKey keyboard comes in four different modes. You can choose between Full, One-hand, Float, and Thumb. Tap on the dots, followed by Modes, and tap on the one you want to use.

How to Change Keyboard Layout
Most users use QWERTY when it comes to choosing a keyboard layout. But, if you want to try something new, tap on the dots to the right and tap on layouts. You can choose between AZERTY, Bépo, Colemak, Dvorak, QWERTZ, and QZERT.

How to Enable and Manage SwiftKey Clipboard
One feature I think you’ll like about SwiftKey is that it has an integrated clipboard. Accessing clipboard is more comfortable since the clipboard icon is visible in the top-middle of the keyboard. Here’s where you’ll see everything you copy. To the right of the copied text, you’ll see a pin, just in case you want to keep an essential text at the top.

Tap on the Manage option at the top right of the keyboard to disable the clipboard and to add a new clip. When you create a new clip, all you have to do is type a shortcut for a longer text. For example, if you type NN for not now, the clipboard will paste a message that you previously created to send to someone when you’re too busy to talk.
How to Use SwiftKey’s Built-in Translator
Right next to the clipboard icon is the translator icon. Tap on the icon, and when you type in the language that’s indicated to the left, it will be translated to the one on the right.
![]()
To change any of the two languages, tap on the drop-down menu and choose your new language. What you type in one language in the keyboard will be typed on the app you have open in the other language.
Other Included SwiftKey Goodies
If you do a little exploring, you’ll see that SwiftKey also has excellent options when it comes to GIFs, stickers, autocorrect, and calendar view.
Conclusion
Whenever you want to take a break from Gboard, SwiftKet is definitely worth a shot. What features would you like to see in SwiftKey soon?