
Windows 10 comes with a long list of preinstalled apps that users never asked for. All these apps that Microsoft is trying to shove down your throat are called bloatware. Since you don’t really need them, the best approach is to simply uninstall them from your computer. One way to do that is to manually locate and delete them. But some of these apps are so deeply rooted in your system that the only way to remove them is to run a series of specific PowerShell commands.
Contents
How Do I Remove Preinstalled Windows 10 Apps With Powershell?
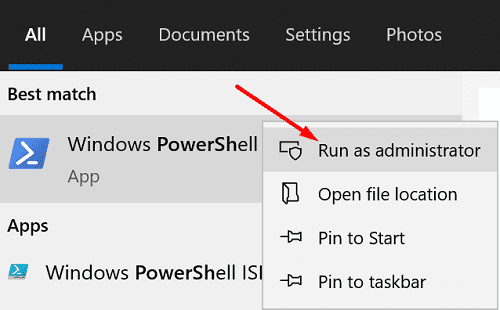
First things first, type PowerShell in the Windows search bar and right-click on the PowerShell app. Select Run as administrator to ensure you have permission to edit or delete the apps you identified as bloatware.
Use DISM Command to Delete Bloatware
If you really want to delete bloatware apps from your computer, you need to use the DISM command in PowerShell.
- First, run the DISM /Online /Get-ProvisionedAppxPackages | select-string Packagename command to list all the bloatware installed on your computer.

- Locate the name of the app you want to delete and run the DISM /Online /Remove-ProvisionedAppxPackage /PackageName:PACKAGENAME command to complete the process.
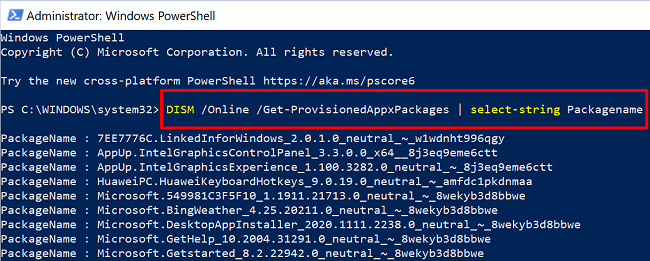
Replace PACKAGENAME with the app’s complete name. In other words, copy the entire string of characters as they appear after the PackageName line.
For example, if you want to delete Bing Weather, run this command: DISM /Online /Remove-ProvisionedAppxPackage /PackageName: Microsoft.BingWeather_4.25.20211.0_neutral_~_8wekyb3d8bbwe.
Hide Your Apps
You can use the Get-AppxPackage *AppName* | Remove-AppxPackage command to hide bloatware from sight. Keep in mind that this command doesn’t permanently remove the respective apps from your system. It simply hides them allowing you to easily restore them later on if you need them back.
If you want to hide all the preinstalled apps for all the user accounts created on your computer, you can run this PowerShell command: Get-AppxPackage -AllUsers | Remove-AppxPackage.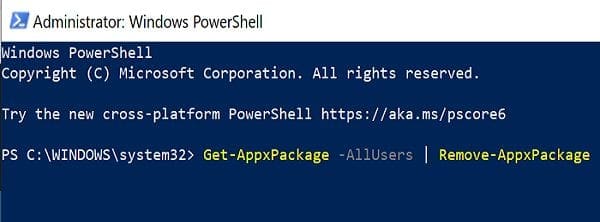
On the other hand, if you only want to hide specific apps, you need to run this command: Get-AppxPackage *AppName* | Remove-AppxPackage. Of course, you need to replace AppName with the name of the app you want to hide. For example, let’s say you want to remove Solitaire. The command you need to run is this: Get-AppxPackage *solitairecollection* | Remove-AppxPackage.
If you simply want to see what apps are installed on your machine, run this command: Get-AppxPackage -allusers | Select Name, PackageFullName.
Use a Whitelist Approach
Other users suggested using a whitelist approach to solve this issue. You can create your own script and update it with new apps whenever necessary. You can then automatically load the script at logon via GPO (Group Policy Object).
Here’s an example:
$excludedApps = ‘.*photos.*|.*sticky.*|.*zunevideo.*’
$unwantedApps = Get-AppxPackage -PackageTypeFilter Bundle | Where-Object {$_.Name -notmatch $excludedApps}
If ($unwantedApps) {
$unwantedApps | Remove-AppxPackage
}
If you need to use one of the apps you previously removed, you can always reinstall it on your machine. Just make sure to remove it from the $excludedApps list.
Alternatively, you can use Windows10Debloater to get the job done. This is a ready-made script that you can download from GitHub.
Even if you remove all bloatware from your Windows 10 computer, the OS may still reinstall the apps when you upgrade to a newer version. Microsoft rolls out two major Windows 10 updates every year. This means that, at least theoretically, you may need to repeat the steps above twice a year. In the best-case scenario, you only need to update your PowerShell script to include the new apps on the list.
Conclusion
If you want to get rid of Windows 10’s bloatware, you can use PowerShell to remove the unwanted apps. Depending on your needs, you can only hide these apps or permanently delete them using the DISM command.
Hit the comments below and rate how much you hate bloatware (on a scale from 1 to 10). Feel free to share additional tips and tricks to keep Windows 10 bloatware under control.

This did not completely remove bing weather for me. It did remove the app from the list that the get-provisionedappxpackages command sets out. I’m so annoyed that I cannot get rid of it!!
Thanks. Finally found the solution here. Will all this bloatware be reinstalled in OS updates? How can I prevent that from happening?
Any suggestions for scripted removal of non-ADMX OEM software that isn’t required by the OS?
For example, HP includes a bunch of their own crap and tends to also slip Office 365 installs as well. Looking for something semi universal that I could potentially deploy via intune so I have relatively a clean OS when using Autopilot. Fresh Start would be great if it could run during whiteglove/initial enrollment but it seems that’s only for devices that have already been in use.
Thanks