
When building a PC on a tight budget, you’ll have to make sure that each part is the best you can get your hands on. It can be difficult to know which parts are worth splurging on and where you can best make some cuts, all while staying within budget. Add to that the fact that some parts, such as GPUs, are often out of stock or hard to come by, and building your dream PC can seem like an impossible task.
The good thing is: It’s not! In fact, it doesn’t need to be difficult or a struggle at all. We’ve compiled some handy tips and good advice on building the best possible PC, no matter your budget. Before you can really get to it, you’ll have to work out what you want to do with your PC. Regardless of budget, there is a difference between building a PC suited for gaming and building one meant for doing your university coursework.
Once you know what you’re trying to do with your PC, it’s time to get started on your awesome build adventure.
Contents
Step 1: Make a List of What You Need
You may think you already know what goes into a PC – and maybe you do! However, there’s a chance that a vital part might slip through if you don’t plan everything out initially. If you blow all of your budget on a fancy CPU or GPU, but you forget to buy a power supply, case, or operating system, you might just end up with a PC that won’t work.
Tip: If you’re unsure and want to make sure you’re not missing anything from your list, use online tools such as PCpartpicker.com to ensure you don’t miss anything important. You might also find some pretty useful tips for parts you could use in your build!
Step 2: Finalize the Budget, Pick the Parts
Next is the most fun part – it’s time to pick your parts! Here, you’ll need to finalize the budget. Work out how much money you have and what you need. Also, consider if you need to buy peripherals – you might have to accommodate a new monitor or mouse/keyboard in your budget!
Your best starting point is likely the CPU. Unless you are building a gaming machine (in which case the GPU will be equally important), you’ll want to make sure that you have a good CPU at the core of your PC. The biggest decision is AMD/Intel.
While for a long time, Intel dominated the market (and still has a lot of fans) in recent years, AMD’s parts have been offering a better performance-to-cost ratio. AMD also offers better support for newer CPUs on older motherboards, giving you more options for future upgrades. So if you are building on a tight budget, an AMD CPU is likely to be your best bet – unless you are set on Intel or come across a special deal!
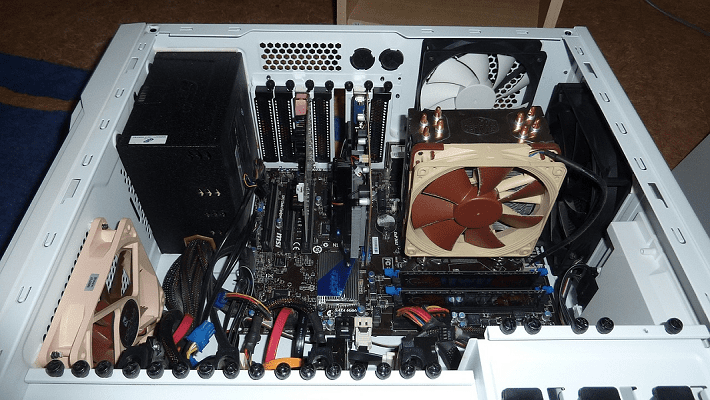
CPU
AMD’s Athlon and Intels’ Pentium and Celeron are good bets for a budget build. They won’t be powerful enough for gaming builds but are good for almost anything else. If you are building a budget gaming PC, you should keep an eye out for Intel Core, or AMD Ryzen deals, as they are some of the better ones you can get on a budget! An Intel i3 or AMD Ryzen 3 is a good starting point if you’re unsure what to choose for a gaming PC.
CPU Cooler
While your new CPU will almost certainly come with a cooler by default, those tend to not be very great. You can use it if your budget doesn’t allow for an upgrade, but if it does, paying for a better cooling system can improve the performance and longevity of your new machine. Liquid coolers are the gold standard – they are smaller, quieter, and run at lower temperatures than air cooling but are also more expensive.
Coolers, like motherboards, don’t fit all CPUs equally – if you have an Intel CPU, look for an LGA 1151 cooler. If you have an AMD CPU, go for an AM4 socket instead. You’ll also need to keep an eye on the size of your cooler – you’ll want to make sure it fits into your case and doesn’t interfere with other parts, especially your RAM!
Motherboard
Naturally, you’ll need to put your CPU into the motherboard. It’s important to pick a motherboard compatible with your chosen CPU. Intel and AMD are NOT interchangeable – you’ll need to pick a motherboard that works with your choice. Almost all motherboards will have both versions available, so make sure it has the right socket for your CPU to get the right one!
You’ll also need to decide on what size of the motherboard to get. Generally, standard-sized ATX boards will be the cheapest, as larger and smaller boards can be more expensive. If you’re unsure where to start, the Aorus X470 Gaming 7 WiFi is a good motherboard for an AMD build, and the ASROCK Fatal1ty Z370 Gaming K7 is a good one for Intel. There in the name is a clue – boards labeled as X470 are suited to most (but not all!) AMD CPUs, while those with Z370 in the name are suited to most (but not all!) Intel CPUs.
Tip: Always make sure you double-check your CPU and motherboard choices are compatible before buying them!
Case
Your computer will need a case – much like motherboards, they come in different sizes such as ATX, ITX, E-ATX, and more. Be sure to buy a case that fits your motherboard size. Otherwise, your parts won’t fit into the case! If you’re planning on getting a big graphics card, you’ll also need to make sure that it fits into the case, or you’ll end up potentially breaking or bending your components. Whatever case you pick, make sure you select one with adequate airflow to keep things cool – in other words, a good amount of case fans!
Graphics Card
A graphics card is definitely one of the main components of your PC – and if you are building yourself a gaming machine, it’s a key component. GPUs are expensive parts, so you’ll probably want to be sure to get one that does exactly what you want rather than splurging on something you might not need. As a baseline, an NVIDIA GeForce GTX 1660 or 1660 TI will likely have you covered for most 1080p gaming at or near 60FPS.
Consider sacrificing optional extras such as shiny brand names or RGB lighting on your card – while it may not look as pretty, an off-brand Nvidia GTX will work exactly as well as, say, the dolled-up MSI version of the same card, so don’t be fooled into paying extra for a brand name on an otherwise identical card.
Monitor
While it might be tempting to go for a spectacular monitor, they get expensive, particularly if you go for a curved or ultra-wide option. Consider what you really need – for most uses, a 1080p monitor with a 60-120Hz refresh rate is more than enough. Getting a better one might even be a waste if your GPU can’t keep up, so check out what your card can put out in the games you’re likely to play, and then select a monitor that matches that.
RAM
RAM is another key part of your PC – if you don’t put in enough of it, you could hamstring your GPU and CPU. As a base standard, you’ll want at least 8GB of RAM, ideally 16GB. Generally, more is better but be sure not to go overboard. Once you have enough, you won’t really see increased performance. It’s important to be sure to always match your RAM ticks. For example, use either 4x4GB or 2x8GB to get to 16GB. For example, don’t combine 4GB and 8GB sticks, or even two 8GB sticks from different brands. This can lead to performance issues.
Tip: RAM is easy to upgrade later as it simply clicks in. Make sure to still only use the same sticks together – and make sure they all have the same speed. For example, if your first two 8GB sticks have 2700MHz, only use other 2700MHz sticks later!
Storage
What sort of storage you put in your PC is entirely up to you. Most gamers prefer faster SSD storage over the traditional HDD options, which are cheaper. Either will work well, so pick whatever drive has the right speed and size for your needs. You can also combine them – if one 6TB drive is too pricy, look into buying 2 3TB ones instead, as you might be able to save some money that way.
PSU
When it comes to a power supply, you’ll need to make sure to get one powerful enough. A 650W should be enough for most budget builds, but you’ll definitely want to check that your specific combo of parts doesn’t need more power than your PSU supplies. Always leave a little breathing room – if your system draws a total of 439W, for example, don’t go for a 450W PSU, but rather for a 500W. Don’t cheap out here – if your PSU fails, it could damage any of the sensitive electronics in your entire computer if you’re unlucky.
Step 3: Hunt for Deals
It’s time to shop around when you’ve worked out exactly what you want and made it all fit into your budget. If you’re not in too much of a hurry with building your system, you might be able to snag a deal or two just by shopping around for a while and comparing prices or waiting for a deal.
Tip: Often, you’ll be able to find things like RAM or HDD/SSDs on sale, so it might be worth seeing if you can get your choices for cheaper rather than buying them the first place you see!
Many online retailers offer good deals, and even on Amazon, you could get lucky with a part on sale. If you see something on your list for cheaper, go for it – and if a slightly better part that still fits your build comes along for less, grab a bargain!
Tip: If, at the end of it all, you have some spare cash left over, you could always invest in a few flashy RGB decorations to liven up your case!
Step 4: Assemble!
The last – and most exciting – step of building your PC is the actual assembly. You can do it yourself or take it to a shop that offers it as a service (for a price, of course). If you build it yourself, be sure to be careful – there are lots of awesome video guides out there on how to best build your PC, but you do run the risk of damaging some parts. Particularly when it comes to your CPU, applying the thermal paste, and connecting things to the motherboard, you’ll need to be careful so you don’t accidentally ruin your PC before you can even switch it on.
Conclusion
Take things slow and watch some guides before you build, and you’ll have your awesome new budget PC running in no time at all! Share your thoughts in the comments below.


Thanks for this awesome and we’ll written guide.