Checking your exam results? Or the price for an eBay auction? Well, whatever it is, you must be fast and constantly update your web page to keep up. But what if the finger cramps hit? Is there a way to auto-refresh pages in Chrome? Keep reading to know.
Even with all the user controls available on Chrome, there is still no straightforward way to auto-refresh pages in Chrome. However, you can use specific Chrome extensions, third-party websites, and even scripts to try and get around this. Let’s have a brief look at them all.
1. Make Chrome Reload Web Pages Automatically Using Extensions
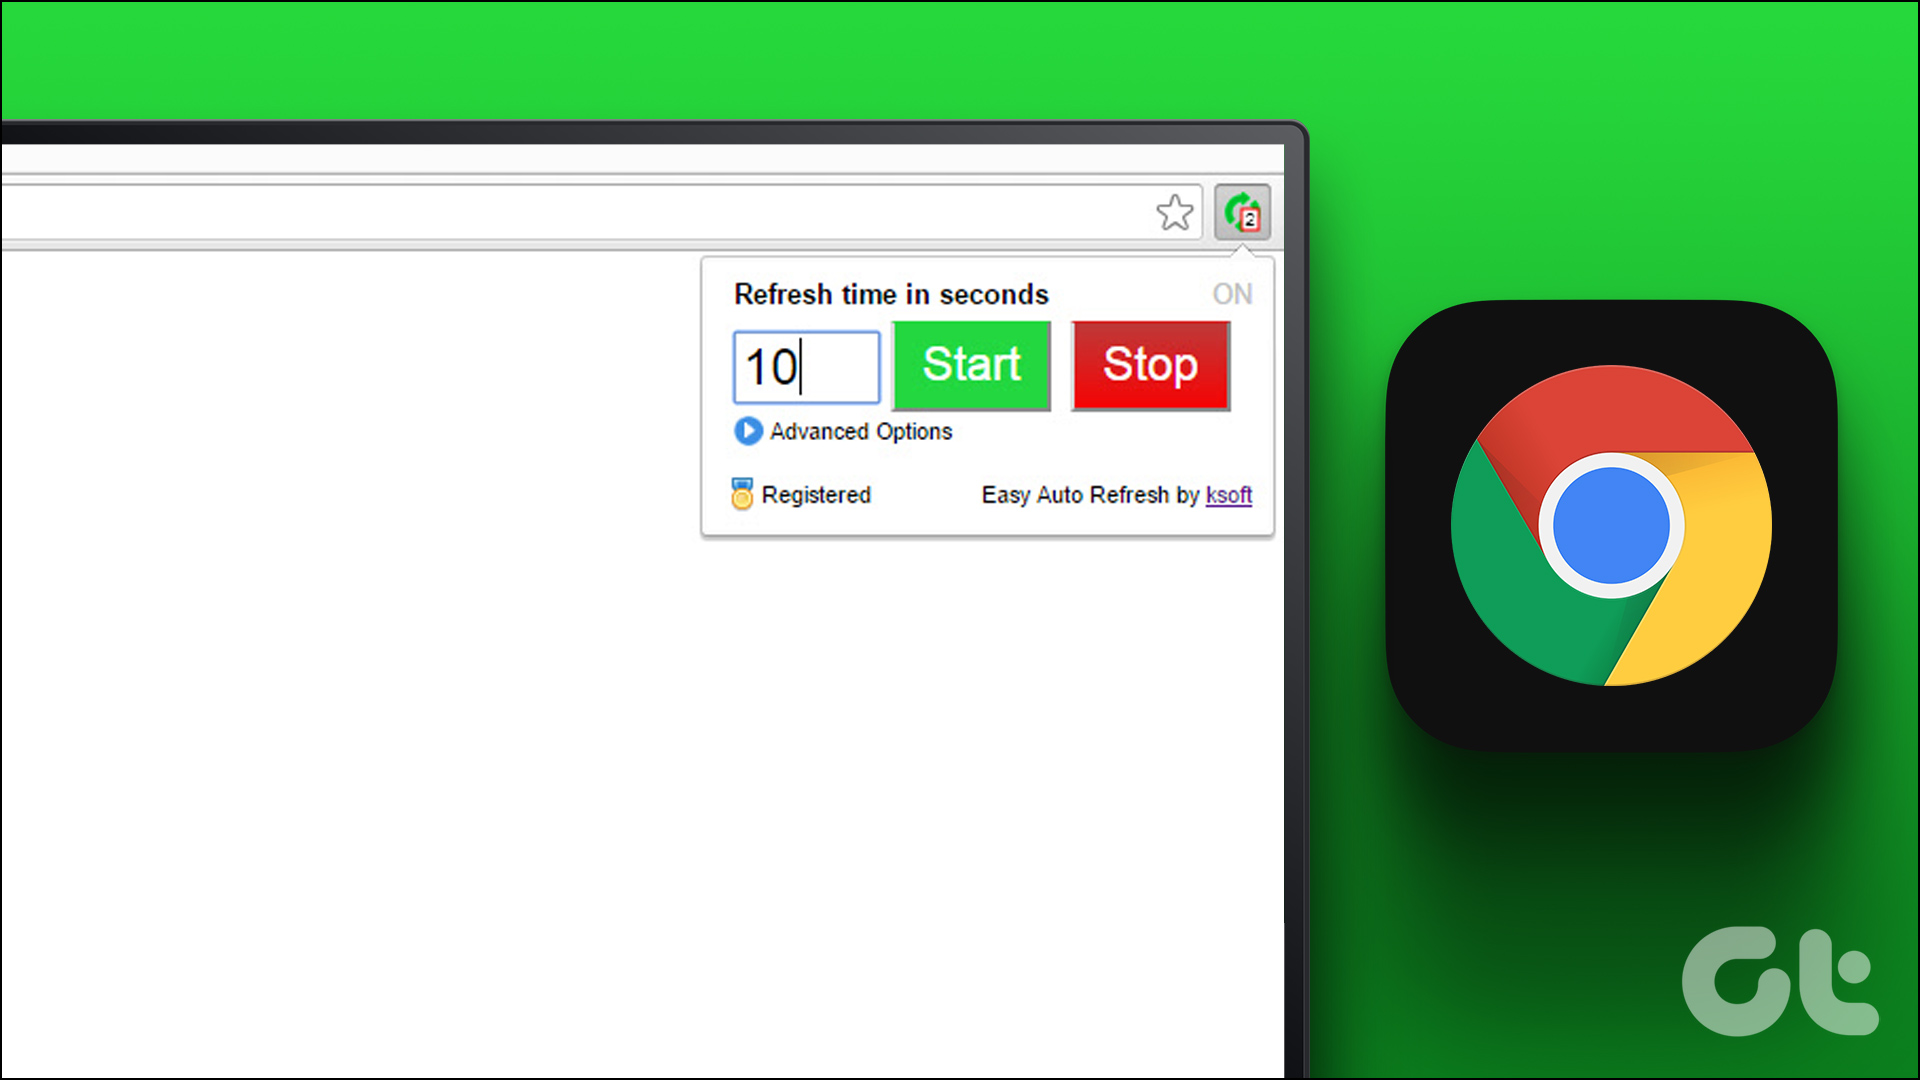
While there are no native controls available to make Chrome reload web pages automatically, you can add the Easy Auto Refresh extension to Chrome and get the job done for all the pages or specific tabs.
Please note that this extension is set for individual tabs, so you must set the timer for each Chrome tab separately. Follow the below steps to do it.
Step 1: Go to Search and type Chrome. Open Google Chrome from the search results.

Step 2: Now, use the below link to open Chrome Web Store in a new tab.
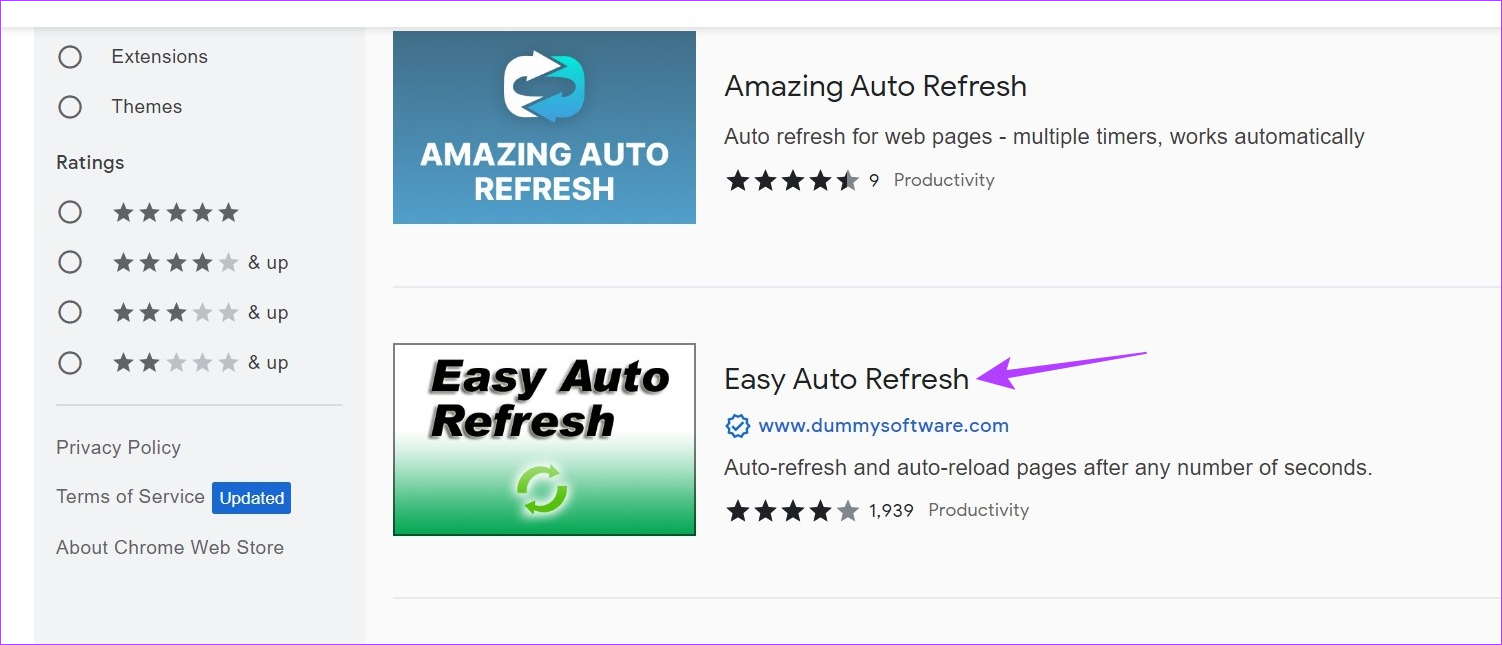
Step 3: Go to the search bar, type Easy Auto Refresh, and press enter.
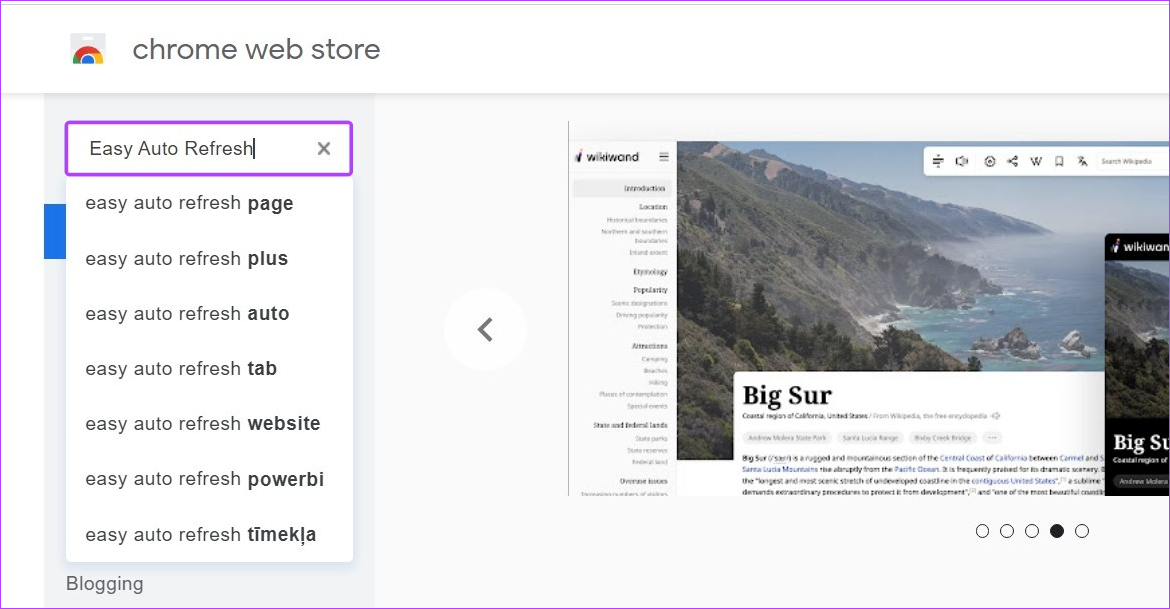
Step 4: Here, click on the ‘Easy Auto Refresh’ extension.
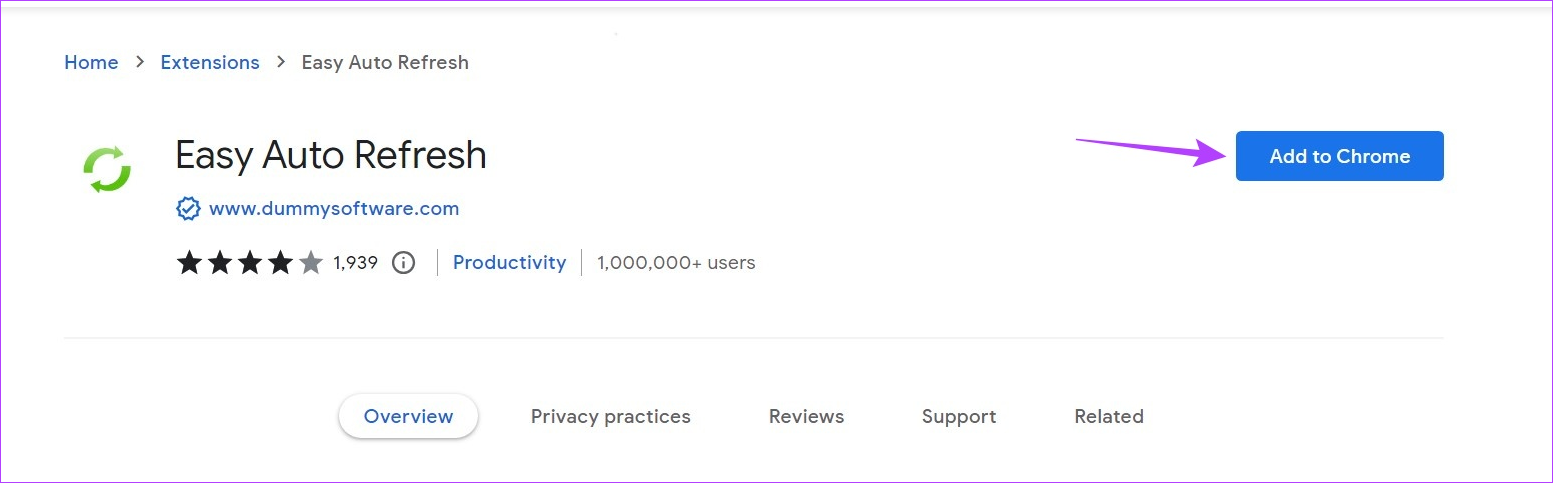
Step 5: Click on ‘Add to Chrome’.
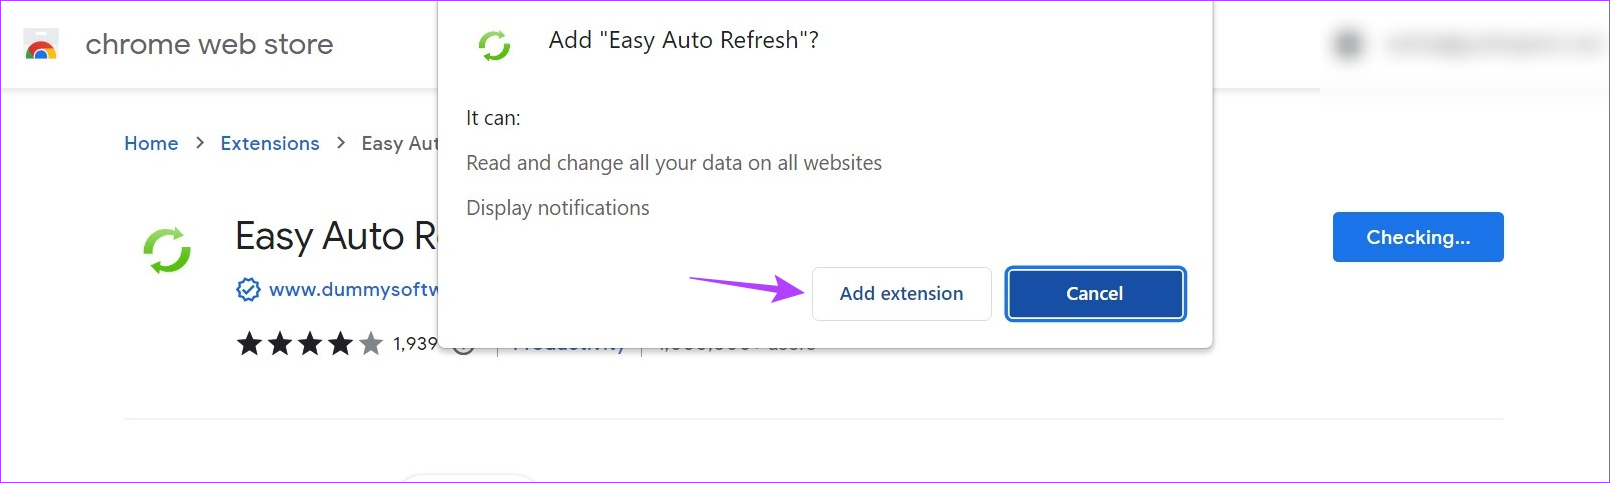
Step 6: Then, click on ‘Add extension’.
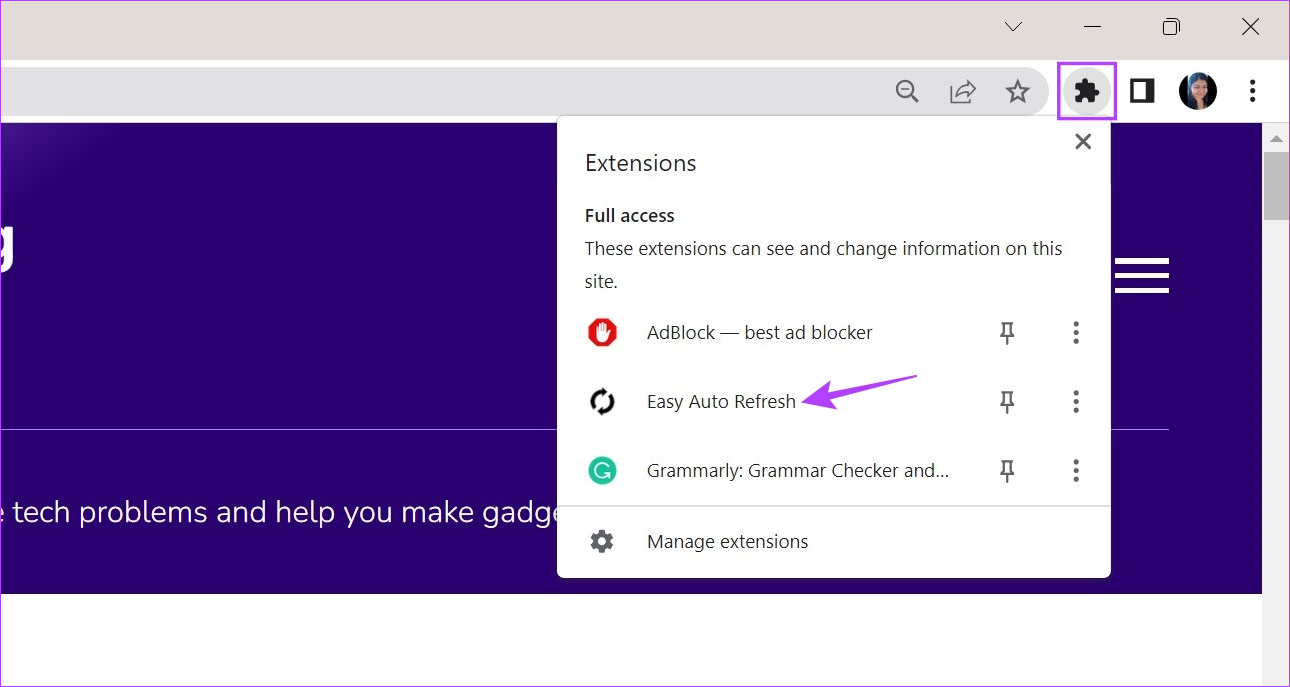
Step 7: Open the relevant web page on Chrome. Now, go to the menu bar and click on the Extensions icon.
Step 8: From this list, click on the ‘Easy Auto Refresh’ extension.
Tip: You can also pin this extension in Chrome.
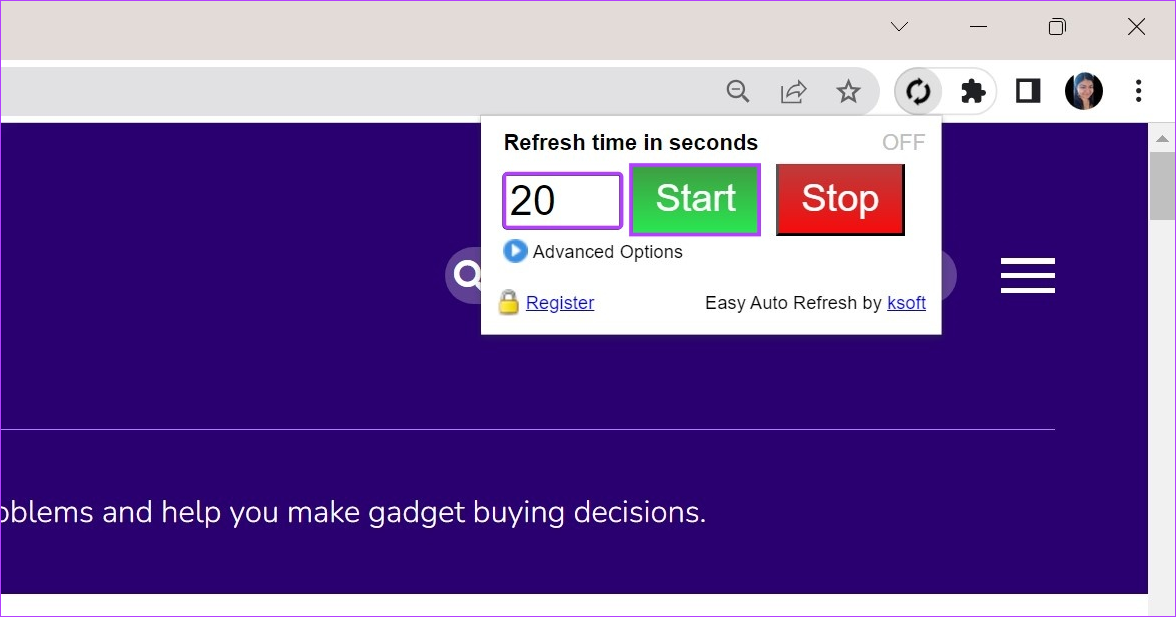
Step 9: Now, set the auto-refresh time. Please note the time will be in seconds, like 5 seconds, 12 seconds, etc.
Step 10: Once done, click on Start.
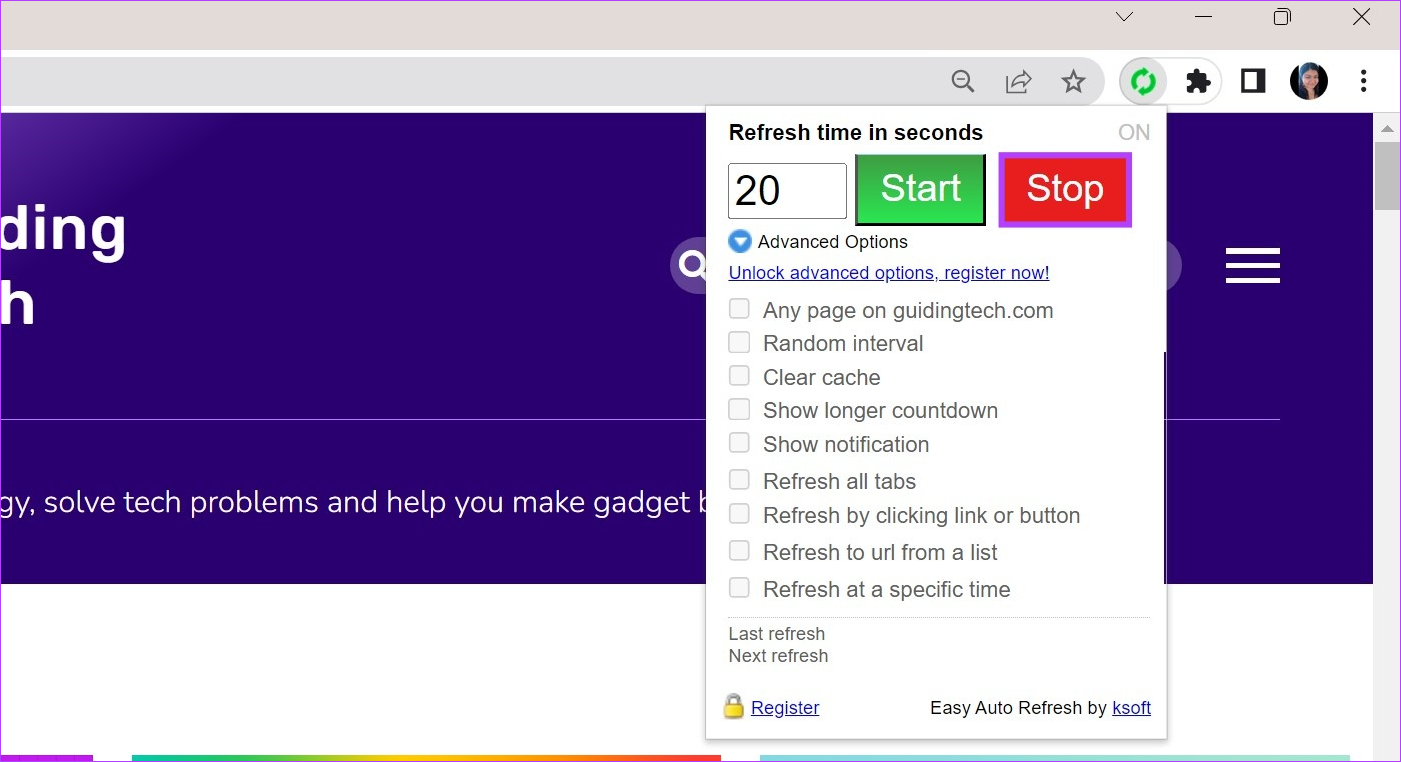
You will now see a countdown on the extension, post which the extension will refresh the Chrome tab automatically. Additionally, if you sign in to the extension, you can use additional controls like setting random refresh intervals or making all the Chrome tabs refresh at once.
Note: To stop Chrome from automatically refreshing the page, open the ‘Easy Auto Refresh’ extension and click Stop.
This will stop Chrome from auto-refreshing the pages for this particular tab. You can also use extensions like Auto Page Refresh and Page Auto Refresh to refresh Chrome tabs.
2. Use a Website to Refresh Chrome Tabs Automatically
If you’re not too keen on adding additional extensions but still want to set the page to auto-refresh in Chrome, you can use the Page Refresher website and set the auto-refresh duration. This will allow you to refresh Chrome tabs automatically by entering the relevant page URL into the website. Here’s how.
Step 1: Open Chrome and go to the Page Refresher website using the link below.
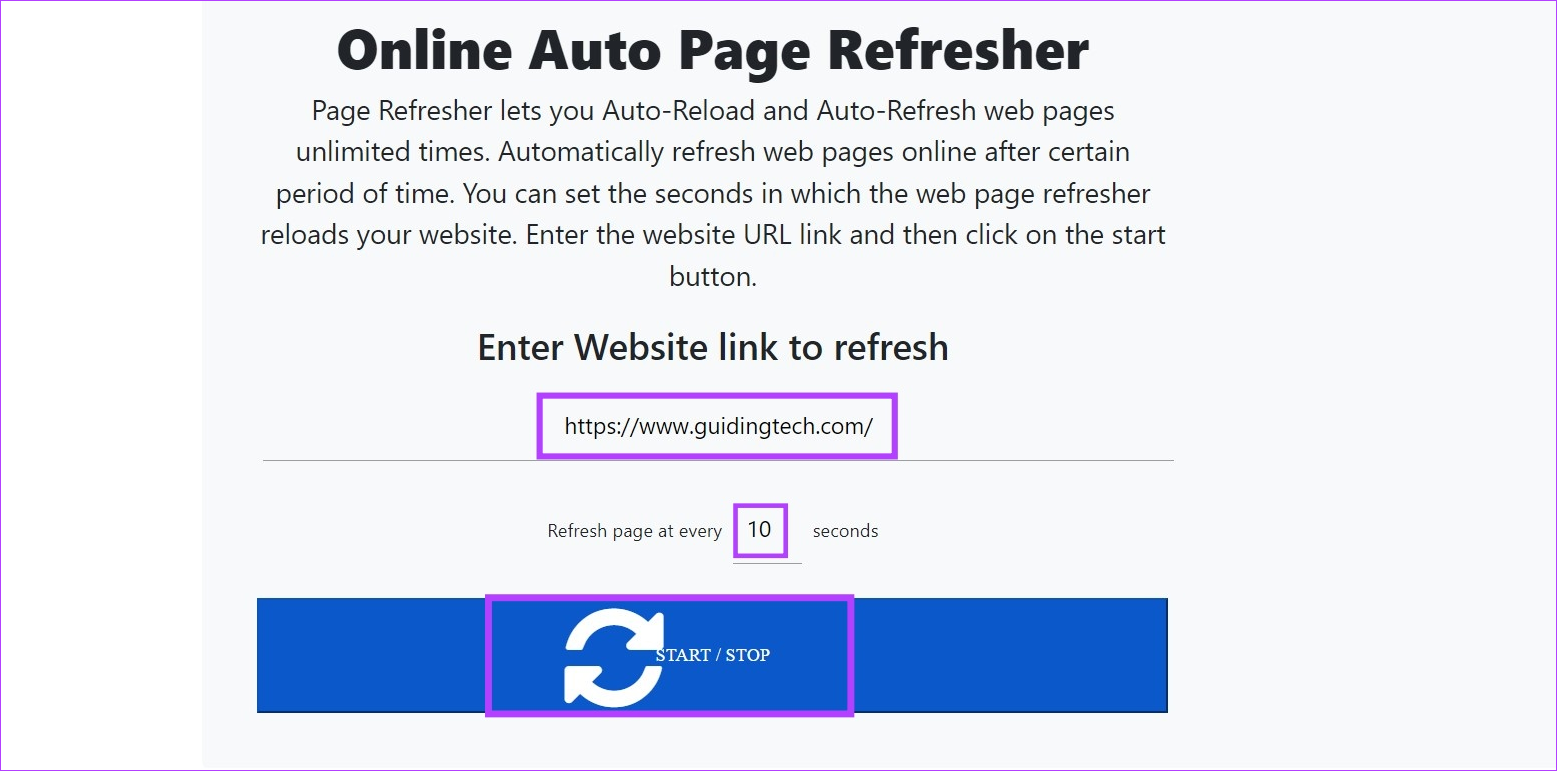
Step 2: In the box, either type or copy-paste the website URL which you want to auto-refresh.
Step 3: Set the auto-refresh duration.
Step 4: Once done, click on the Start/Stop button.
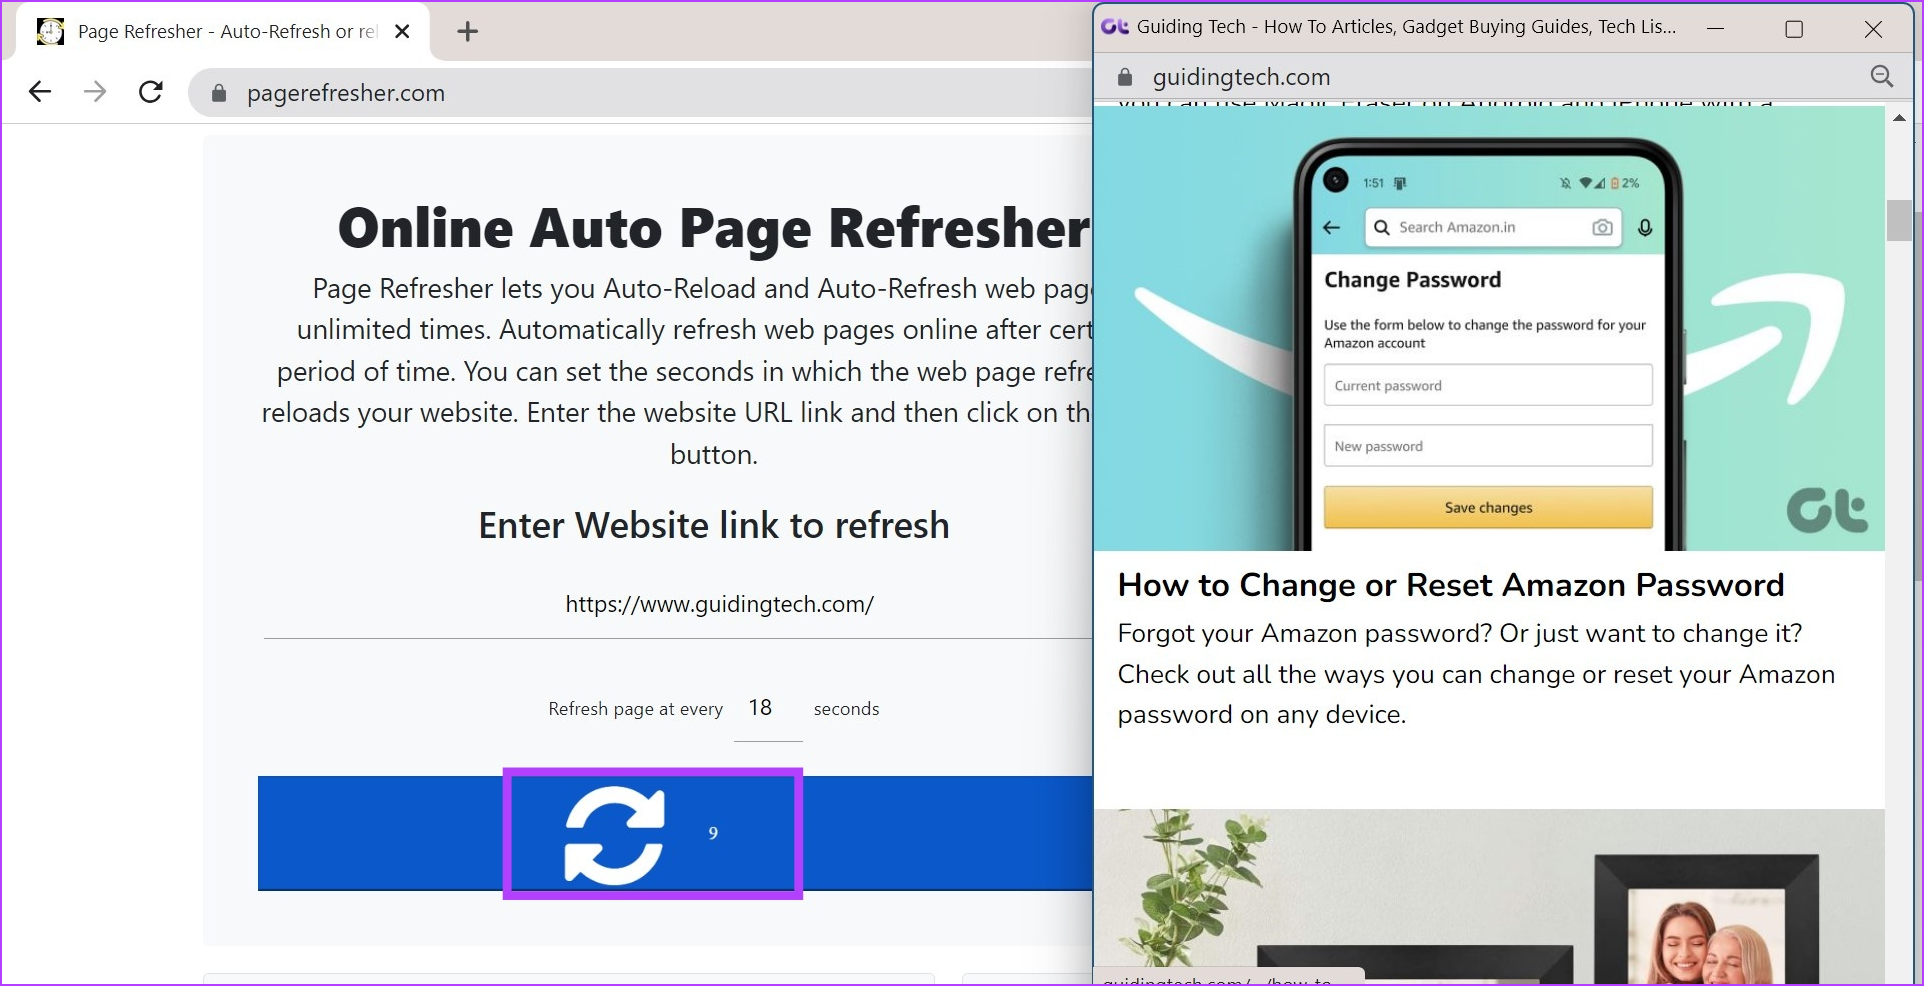
This will open the target website in a new window. On the Page Refresher website, a timer will start, and once it runs to 0, the page will automatically refresh.
Step 5: To stop the page from auto-refreshing, click on the Start/Stop button.
However, this will refresh only one website at a time. If you wish to refresh more than one website, scroll down and click on ‘Open New Tab’.
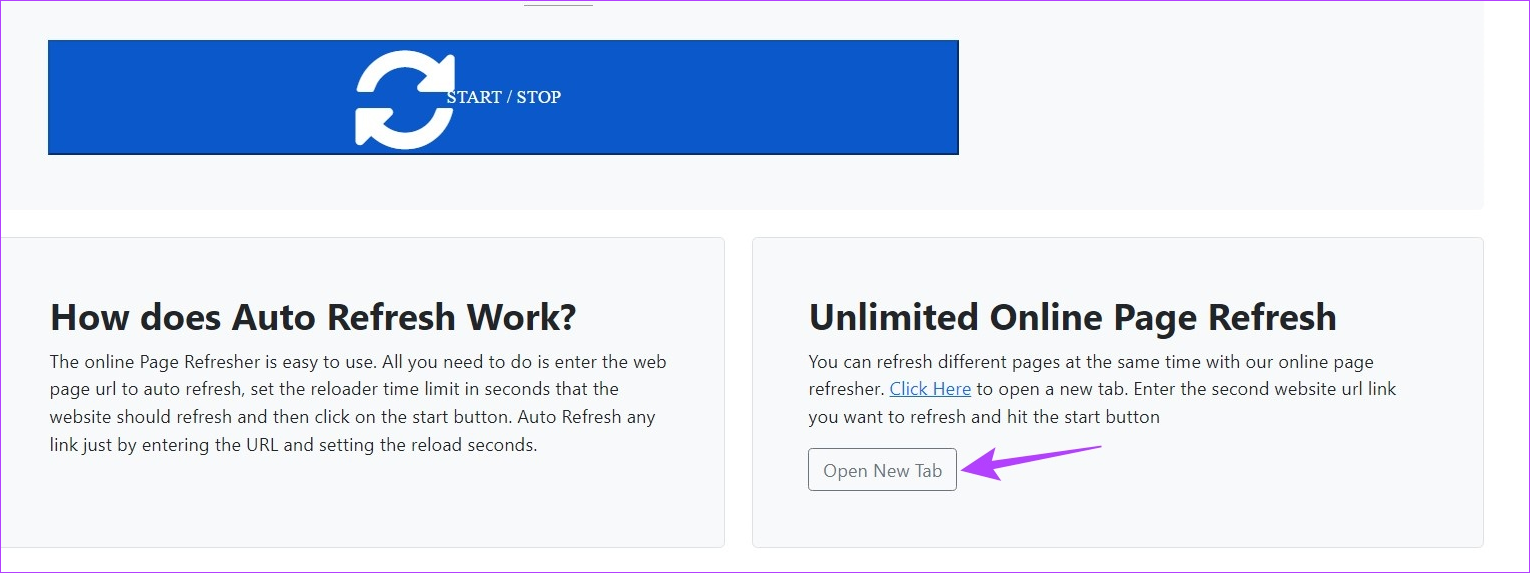
This will open the Page Refresher website in a new tab. Then, follow the above steps and add the website and timer for every new tab.
3. Turn On Auto Refresh in Chrome Using a Script
Another way to turn on auto refresh in Chrome is by using a JavaScript code. This way, you won’t have to rely on any third-party application or website. Although, it might not always work as expected, with a high chance of the script failing with the next Chrome update. However, if you would like to give it a try, follow the below steps.
Step 1: Open Chrome and go to the website you would like to auto-refresh.
Step 2: Then, open a second tab and use the Control + Shift + I key shortcut to open Developer tools.
Step 3: Now, go to Console and paste the following script. Replace Win1 and yourpage details with your target page.
win1 = window.open("https://www.yourpage.com");
timer1 = setInterval(function(){win1.location.href="https://www.yourpage.com"},10*60*1000);

Step 4: Then press enter.
Once the code is executed, the website will automatically refresh every 10 minutes. If you want to stop this from happening, close both tabs or restart Chrome.
FAQs for Auto Refreshing Pages in Chrome
If your Chrome tabs keep auto-restarting, check if an auto-restart extension is enabled. If you cannot pinpoint which one, try disabling all extensions and restarting Chrome. For more fixes, check out our other article on how to fix Chrome keeps auto-refreshing the tabs.
If Google Chrome has been automatically refreshing your tabs on your Android device, check all the necessary permissions have been granted. Often, Chrome is not allowed to run in the background to conserve battery life, which might inadvertently end up auto-refreshing your tabs. To do this, open Settings> Apps. Here, tap on Chrome. Then, tap on Battery and set it to Unrestricted. Once this is done, force close and restart Chrome. However, an unrestricted Chrome might cause a higher-than-usual battery drain on your device.
Auto Refresh Chrome Tabs
The ability to auto-refresh pages in Chrome can help you massively if you’re keeping an eye on something that requires constantly refreshing the page to load updated information. Additionally, you can also fake your location on Chrome and free yourself from your current geolocation restrictions.
Was this helpful?
Last updated on 02 November, 2023
Read Next
 9 Best Ways to Fix Google Chrome Not Loading Pages in Windows 10
Google Chrome is one of the most used browsers in the world, no doubt.
9 Best Ways to Fix Google Chrome Not Loading Pages in Windows 10
Google Chrome is one of the most used browsers in the world, no doubt.
 Top 10 Ways to Fix Google Chrome Not Loading Pages on Android and iPhone
When it comes to web browsing, Google Chrome remains the top choice, even on mobile devices.
Top 10 Ways to Fix Google Chrome Not Loading Pages on Android and iPhone
When it comes to web browsing, Google Chrome remains the top choice, even on mobile devices.
 How to Convert and Open Pages File on Windows PC: 6 Best Ways
If you are a Windows user and have received a Pages file from a Mac user, you may wonder how to open and view the document on your Windows PC.
How to Convert and Open Pages File on Windows PC: 6 Best Ways
If you are a Windows user and have received a Pages file from a Mac user, you may wonder how to open and view the document on your Windows PC.
 14 Best Ways to Fix Instagram Couldn’t Refresh Feed
Instagram’s dream run in the social media space continues with new features like Reels, Stories, Notes, and more.
14 Best Ways to Fix Instagram Couldn’t Refresh Feed
Instagram’s dream run in the social media space continues with new features like Reels, Stories, Notes, and more.
 4 Ways to Refresh Webpages in Safari on iPhone, iPad, and Mac
Whenever you open a webpage on your iPhone, iPad, or Mac, it loads the latest information.
4 Ways to Refresh Webpages in Safari on iPhone, iPad, and Mac
Whenever you open a webpage on your iPhone, iPad, or Mac, it loads the latest information.
 How to Save Web Pages as PDF in Chrome on iPhone and Android
Converting web pages to the PDF format on Chrome has its uses.
How to Save Web Pages as PDF in Chrome on iPhone and Android
Converting web pages to the PDF format on Chrome has its uses.
 What Is Background App Refresh on iPhone and iPad
Turning off Background app refresh on your iPhone or iPad is a great tip to improve battery.
What Is Background App Refresh on iPhone and iPad
Turning off Background app refresh on your iPhone or iPad is a great tip to improve battery.
 How to Force High Refresh Rate on All Android Apps Without Root
In the last few years, it's not just displays and monitors with high refresh rates - smartphones have joined the party too.
How to Force High Refresh Rate on All Android Apps Without Root
In the last few years, it's not just displays and monitors with high refresh rates - smartphones have joined the party too.
The article above may contain affiliate links which help support Guiding Tech. The content remains unbiased and authentic and will never affect our editorial integrity.