Google Keep is full of great tips and tricks. It has features that will help you stay on top of your tasks with ease. For example, you can take voice notes for those times when typing something out will take too long.
There are other things Google Keep has to offer such as enabling dark mode and pinning your favorite notes to the top. That way, your most-used notes are always going to be easy to find.
Contents
1. How to Enable Dark Mode in Google Keep
Dark Mode is a very popular option on any application. Good thing that it’s possible to enable it on Google Keep. If you’re using your desktop, click on the cogwheel located at the top right. The second option down will be to enable dark mode.
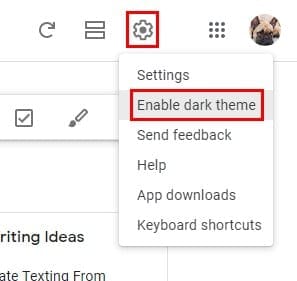
If you ever want to disable dark mode in the future, follow these same steps to find the disable option.
To enable dark mode on your Android device, go to settings and the dark mode option will be one of the options at the top.

2. Add a Voice Note to Google Keep (Android)
Sometimes you’re just too tired to type, and that’s when the voice note feature comes in handy. As soon as you open Google Keep, you’ll see a mic icon at the bottom right. Tap on that to start dictating your note.
If you haven’t already, Google Keep will ask for permission to access your device’s mic. Everything you say will not only be recorded, but it will also be written out. In the new note that’s created, you’ll have both an audio and text note.

You’ll also have the option of erasing either the text or audio if, in the future, you only want to have one of them.
3. How to Create, Manage, and Erase a Keep Label
Keep Labels are a great tool to keep your notes organized. If you create quite a few notes, finding the one you need can almost be a mission impossible.
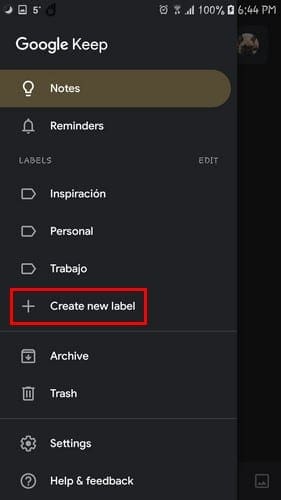
Google Keep will have a few labels waiting for you as soon as you start using the app. But, you can erase those and create your own. If you’re on your Android device, click on the hamburger icon and the option to create a new label.
Be ready to give your new label a name and tap on the checkmark to the side. Your new label will be added automatically.
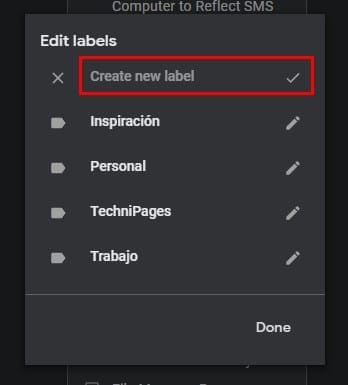
As long as your there, you can edit already existing labels. Tap on the pencil icon to either change the name or erase it. If you ever want to edit the labels in the future, tap on the three lines at the top left and tap on the edit option.
On your desktop, click on the Edit labels option. When the new window appears, click on Create new label and name it. When you’re done click on the checkmark or press enter.
4. Add Images to Your Notes
You know the saying, “A picture is worth a thousand words”. You can add an image to your notes by creating the note first and then adding the image or by adding the image first and then the note.
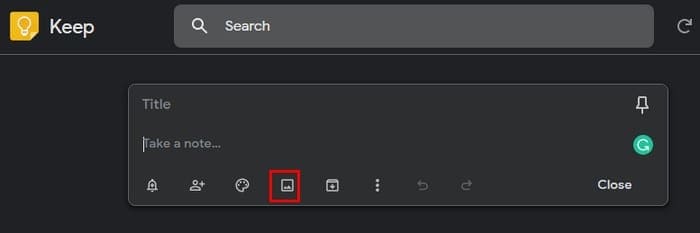
If you decide to create the note first, click on the bar that says Take a note. After creating your note click on the image icon and the files window will appear. Choose the image you want to add and it will be placed on top of the note.
There is no obligation to create the note first, the image icon is visible as soon as you open Keep. Click on it to add your image and the space to add your note will be right below the image
5. Google Keep Keyboard Shortcuts
Did you know that you can create a new note by simply pressing the C key on your keyboard? There are many other things you can do thanks to these keyboard shortcuts, but remembering all of them can be a mission impossible.

Click on the cogwheel and click on Keyboard shortcuts. The keyboard shortcuts are divided into different sections such as Navigation, Application, Actions, and Editor. Thanks to the division the shortcuts are easier to find.

6. Copy Text off an Image
By now, you know how to add an image to a note, but how about grabbing the text and image has? Open keep and tap on the image icon at the bottom right. Choose to either take a picture or choose one from your device’s gallery.
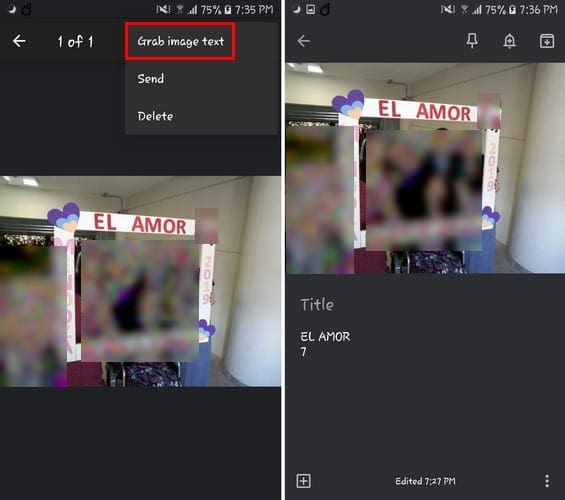
Once the image has uploaded, double-tap on the image. Select the three vertical dots and choose the option that says Grab image text. Whatever text your image has will be pasted as a note right below it.
Conclusion
Don’t be afraid to play around with Google Keep to discover what the app has to offer. If you discover a tip that I forgot to mention, leave a comment below and share it with us.